Tuesday, October 30, 2018

Cheers - my first layout for the Paige Evans Design Team

Hi there friends,

I have some exciting news! I've moved from the Paige Evans + Silhouette Design Team to the Paige Evans DT! You won't really see the difference, maybe more projects and I might not use cut files on all of them, but otherwise I will be working with Paige's collections, creating layouts and cards as before! Thank you so much Paige for this awesome opportunity, it is such an honor to be on this team!

As for today's layout. One more with older supplies! By the time this post goes live I will have the beautiful new Whimsical collection, but since I work ahead, this page is still created with a previous collection! 

I haven't used the Turn the Page collection in awhile, so I thought I'd do that now. 

I've chosen the Flower cut file (Design ID: #274765) and decided to cut lots of smaller flowers instead of one big one and create a grid type of layout with them.


I can't believe I went with white background, but I just didn't find a patterned paper I liked with all these colors. Except for pinks, and I didn't want to use pink. Plus the texture of this Bazzill card stock is so awesome, I had to use it for something anyway, ha!


I glued down all the flowers, but only in the middle so they lift off the page a little. First I wanted to add a grid kind of machine stitching but I liked the airy look of the flowers, so I decided against it. 


Since the background is so busy and I did not want to cover it up, I kept the rest of the page very simple. I layered some tissue paper behind my photo as well as some journaling spots/tags and glued them in place. I decorated the photo with a couple of chipboard and puffy sticker hearts on the right side. 


I trimmed down a label, stamped my date on it and tucked it under the photo. Cardstock stickers I always glue on a piece of heavy weight card stock and fussy cut them out, so they can be used as die cuts. This is what I did with the Coolio banner, that I then mounted on my photo using foam adhesive. I created my title the same way and I used foam adhesive to glue down those letters too. Last but not least I placed a chipboard arrow on my photo, mainly to add some color to the left side which kind of separates the photo from the background if that makes sense.


I wrote my journaling on one of the tags and as a last step I splattered some navy ink all over the page.

I hope I could give you an idea on how to use up lots of different patterned paper scraps on a page!

Thanks for stopping by today! Have a lovely day!

X

SUPPLIES:
Turn the Page collection: Journaling spots, Sticker book, Chipboard stickers, Puffy stickers, Paper 1, Paper 4, Paper 8, Paper 9Paper 13Paper 21, Paper 24


Friday, October 26, 2018

Christmas card inspiration - DT project for Pinkfresh Studio

Hey guys,

I'm checking in with some new Pinkfresh Studio cards! On today's cards I've combined the super adorable Holiday Vibes collection with some of the stamps from the Pinkfresh Studio July release.

All my cards have an A2 size top folding card base, although one of them is in landscape orientation.

Often when I'm bored I fussy cut (or hand stitch) just to do something! One of these times I fussy cut  one of the 12x12 patterned papers, Christmas Cheer. It's such a cute paper, I can't even!

I added some patterned paper to my card fronts (Very Merry and Merry Christmas), then started creating my scene.


I adhered the little animals and leaves, then I took a bunch of Christmas stamps sets and added some simple black images. The presents and snowflakes are from the Train Ride and the Magical Christmas  stamp sets. The sentiments are from the Magical Christmas and Great Joy sets. 


Once the stamping was done, I added the little hats with foam dots. I love the oversized look!


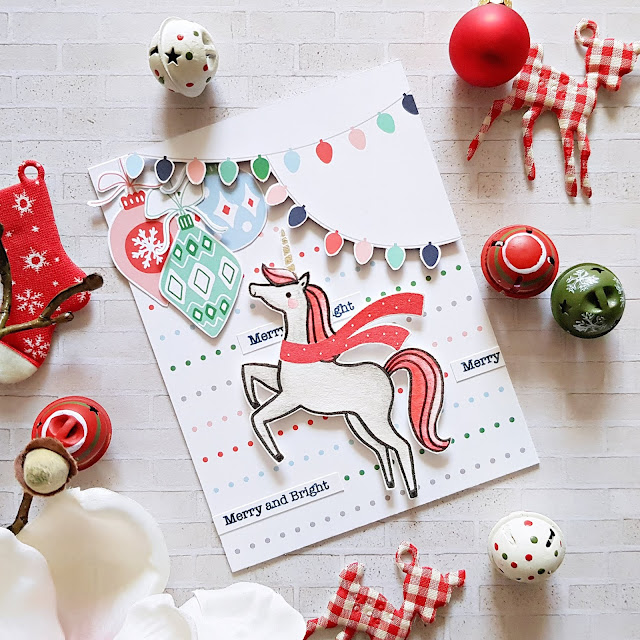
Next up is a card with the Magical Christmas stamp set (coordinating dies are also available, however I just quickly fussy cut out my unicorn because I often have no space to take out my die cutting machine). I cut an A2 size piece of the Home for the Holidays patterned paper for the background. This has some sentiments along with the polka dots on it, but I covered them up with the Merry and Bright sentiment from the Great Joy stamp set


I fussy cut out some lights from the 12x12 Seasons Greetings patterned paper and adhered it to the top of my card, using foam tape. I added a bit of water color to my unicorn, stamped its scarf in red ink, embossed its horn with gold embossing powder, then attached it to the card with foam dots. Last but not least I hung some fussy cut ornaments from the top. These are from the 12x12 Christmas Cheer paper.


I've created a shaker card next. Using the Great Joy coordinating dies I cut out a window from and A2 size patterned paper (Let It Snow). I also cut the wreath from white card stock which I then stamped and embossed using the Great Joy stamp set. I adhered these two to acetate then added foam tape to the back.


I covered my card base with the Home for the Holidays paper, placing it in a way that the Holiday Vibes sentiment would show in the shaker window. I placed some sequins and beads in the middle and attached the card front to the card base. I added a few details: die cut and twine bows plus a few fussy cut pieces (again, from the Christmas Cheer paper), to add some dimension.


Then we've arrived to my last card for today! This is a very simple one! I adhered a piece of the Very Merry patterned paper to my white card base. I stamped my sentiment right in the middle in black ink. I've used the Magical Christmas stamp set for this. 


Now, there were lots of partial presents in the 12x12 Christmas Cheer paper and as I don't like to throw away any scraps, I tried to use as many of those as I could. The rest of the presents I had to trim down after adhering them to the background paper. I also added a few candy canes, some fussy cut, some stamped. The tiny candy cane stamp is from the adorable Train Ride stamp set


That's it for today guys! I hope I could inspire you to mix and match stamp sets for your holiday projects!

Thank you for stopping by! Have an awesome day!

X

* Full disclosure: I'm using affiliate links in this blog post at no cost to you. *

Shimmering "three for one" cards - DT project for WOW! Embossing Powder

Hi there crafty friends,

Long time no hear! And then I have two posts for you today haha! Timing is everything :).

This month at WOW! Embossing Powder our theme is shimmer. So we are using anything that shimmers basically!

I always start out with one card to be honest, but then I hate throwing away anything so often I end up with more cards. This was the case with these cards too!


Do you know the Glintz powders? They are super pretty! They feature subtle shades of mixed golds and silvers. I selected three of them for my cards today:
I've covered 3 sheets of white card stock that were slightly bigger than A2 size with embossing ink. I then added a different color powder to each and heat set them. I repeated the process to get a smooth finish. Unfortunately these pictures don't do these powders justice! They are so shimmery and gorgeous!!!

I then used the Birch Press Design Butterfly Garden layering dies and die cut a different layer from each of these embossed sheets. I adhered them on a white, top folding A2 size card base. I embossed a sentiment with Bright White Regular embossing powder on black card stock and attached it to my card front. Done!


I was left with a lot of butterfly and leaf cut outs and had no heart to throw them away...So for my next card I layered up 3 big and 2 small ones and added some machine stitching to them. I should have used longer stitches because with these small ones some butterflies were torn (I glued them back together). 


I used a stencil to add some embossed stripes. For this I used the Metallic Copper Embossing Glitter. I then glued down the butterflies and splattered some copper ink here and there.  Finally, I added some clear crystals and another thin strip of black card stock with white embossed sentiment.


For my third background I used the same stencil as before but this time I added Clear Hologram Embossing Glitter. It's sooo pretty! But boy is it hard to photograph haha! Well, with my skills anyway. I just didn't get an angle where my camera picked up the different colors very well. But believe me, in person it is so stunning and special!

I then glued down the remaining scraps: leaves and two butterflies. I added copper ink splatters, a bunch of clear crystals and my sentiment and done!


Maybe you can see some of the hologram in the next two photos but they are bad quality:


I hope you enjoyed today's inspiration and will give some of these powders a go! I promise you'll love them!

Oh, before I forget! Have you heard that there is a brand new, dual speed heat tool in the WOW house?! I'm a proud owner of this beauty and I can tell you, it's a game changer! I didn't have the previous tool from WOW so I can only compare it to my old heat tool and there is a world of difference! I generally stay away from heat embossing on acetate and even vellum because I hate warping. But I quickly tested them with this new heat tool and there's hardly any warping! I'm so impressed! If you're looking for a great heat tool, look no further! Check this out:


GORGEOUSNESS am I right?! I'm super excited about it if you can't tell haha!

Anyhow, thanks so much for stopping by! Don't miss my post in the afternoon, I'll be back with some Christmas cards!

See ya X


Saturday, October 13, 2018

Flower Power - DT project for Paige Evans + Silhouette

Hey there crafty friends,

I'm checking in today with a new layout I've made for the Paige Evans + Silhouette Design Team. While waiting impatiently for Paige's new collection, Whimsical, I've been working with some older collections. To be honest, I don't mind doing that because I have too much stuff and it's always a good feeling to use up something from my older supplies!

On today's layout I've mostly used the beautiful Oh My Heart collection plus a few items from Pick-Me-Up, Turn the Page and Fancy Free.

I've chosen the Geometric Peace Sign cut file (Design ID: #274772) because when I saw it, I remembered I once made some Flower Power cookies for a friend and thought the photo would work well with this cut file. Seeing these cookies now I realise they looked rather bad, I didn't know all the tricks of icing back then. However, I loved the color scheme and knew I could make it work with Paige's collections.


I cut the cut file from textured white card stock, then backed some of the shapes with different patterned papers. I fussy cut a bunch of flowers, luckily I had most of them done before. Sometimes I'm not in the mood to scrap but still want to do something, and then I normally either fussy cut or hand stitch. So I have several bags full of flowers and butterflies ready to go!


After preparing my background and adhering the cut file to it, I glued down my picture as well. I then created 3 clusters of flowers. I added foam dots here and there for some dimension. Finally I stitched on some buttons in the middle of the biggest flowers.


I used the small white foam alphas from Pick-Me-Up for my title and a white gel pen for my journaling. To finish off my page I added some gold paint splatters.


I hope you have enjoyed today's layout inspiration! Thanks so much for stopping by! I wish you a beautiful day!

Until next time,

X

SUPPLIES:
Fancy Free collection: patterned papers, buttons
Oh My Heart collection: patterned papers, die cut pieces, puffy stickers
Turn the Page: Paper 2, Paper 15
Pick-Me-Up collection: Paper 8Paper 10, Foam alphabet stickers


Thursday, October 11, 2018

Altenew October 2018 Stamp/Die Release Blog Hop + Giveaway


Hello crafty friends,

I can't believe how fast the months go by?! It's time for another Altenew release blog hop woot woot! You should have arrived here from the talented Agnieszka Malyszek 's blog.

This is such a wonderful release again, it's hard to pick favorites! However, the Layered Floral Elements die set has to be one! I paired it with the Dainty Swiss Dots stamp set on these cards. 


I die cut a bunch of flowers from different colored card stock. I assembled the ones that have two layers. I then stamped a couple of polka dot backgrounds with black ink. I created 3 A2 size top folding card bases. For the first one I cut a strip of black card stock and a slightly smaller strip of polka dot paper, then glued them down on the background. I stamped my sentiment. I just love the font of these sentiments!
I arranged the flowers along the strip and glued them down, some with liquid glue, some using foam dots for added dimension.


For my next card I used an A2 size panel of the polka dot background I stamped earlier. I glued this on my card base. I stamped my sentiment and created two clusters of flowers in two opposite corners of my card.


I still had a small piece of polka dot paper left so I punched a circle from it and added it on top of a larger black circle. I glued these on my card front, then I created a cluster of flowers at the bottom of the circle. Last but not least I splattered black ink all over my card front.


Next up is the super pretty Brilliant Baubles set. I created 2 cards with similar designs. The first one I stamped directly on the card front, the second one however I stamped on some white card stock, die cut, then layered on the card front. To finish off the first one, I stamped my sentiment, added some twine and Nuvo drops. 


On the second I added sequins instead. My goodness, this sentiment though?! Sooo pretty right? I love the hand written look to it.


On my next card I've used the itty bitty Poinsettia Pieces stamp set. This is an adorable 2x3" set! I simply stamped a background and splattered some black ink all over it. I cut a circle from white card stock and stamped my sentiment on it. I drew some faux stitch detail around the circle. I trimmed off the right side and using foam dots I glued down the (now) semi-circle. To finish it off I added a grey flower with leaves and Nuvo drops.


Next I focused on the gorgeous Peace Love Joy set. I randomly stamped the star onto my background, then die cut an extra one and added it in the middle using foam dots to add interest and dimension. I stamped a bunch of little red bows for an accent color.


Finally, I made two cards with the stunning Peaceful Wreath stamp set. I stamped a blue and a pink polka dot background using the Dainty Swiss Dots stamp set. I went with a simple and a bit more complicated card. I trimmed off a little from the left side of the circle, and arranged my leaves around it.

The second card. I die cut the circle in the middle and created a sequin window. I stamped the sentiment inside that window too.


That's it from me today! I hope you liked all the inspiration so far! I'm yet to check the whole blog hop but I'm pretty sure it's full of awesomeness!

Now for the fun part, Giveaways, yay! Read on to figure out how you can win! Good Luck!

Prizes: 
1. To celebrate this release, Altenew is giving away a $50 gift certificate to 6 lucky winners! Please leave a comment on the Altenew Card blog and/or Altenew Scrapbook blog by 10/17/2018 for a chance to win. 6 winners will be announced on the Altenew blogs on 10/20/2018!

2. I will also draw a winner to receive a $30 gift certificate! Same deadlines and rules apply as before.  Comment away!!!

*********************************************************************************
GIVEAWAY NOW CLOSED!

Thank you all for your lovely comments! I apologize for not answering but I've been having a difficult past couple of weeks. I'll try to do better next time!

My winner is mindy1414 - please contact me at mzs6666@googlemail.com so I can tell you how to pick up your prize! Congratulations!

*********************************************************************************

Your next stop is the ever so talented May Park!

Take care guys!
XXX

I'm attaching the full blog hop list for your convenience:

Zsoka Marko ---> YOU ARE HERE!

Monday, October 8, 2018

Pinkfresh Studio October Release Blog Hop


Hello and welcome to the Pinkfresh Studio October Release Blog Hop!

You should have arrived here from the amazing Yoonsun's blog. I bet she's made some awesome cards!

My main focus today was the super gorgeous Hello with a Bouquet die but of course I couldn't stop there...Whenever I get new goodies to play with, I want to try them all at once! Anywho, this die was designed by the talented Bea Valint. She always creates such beautiful and feminine things!

I've made these 3 cards, some easier, some a bit more complex, or rather, time consuming.


This is the simplest of the 3. I simply die cut it from one of the patterned papers from the Indigo Hills 2 collection and adhered it to my A2 size top folding (landscape) card base. I then die cut it again from white card stock and added foam adhesive to the HELLO sentiment which I then glued on my card front. To finish it off, I splattered some ink and added a puffy sticker.


For the second one I again made an A2 size top folding (landscape) card base. I attached some patterned paper from the Indigo Hills 2 collection in the same size. I die cut the image from a purple patterned paper and white card stock and glued them together, but offset them a little. I pieced back the purple HELLO sentiment. Finally I added some enamel dots and gold paint splatters.


The most time consuming one was this last one. I won't even admit how long it took because it would be embarrassing! I die cut the image from white card stock and glued it on my card front. I then pieced back every single tiny purple/blue piece and adhered them down. Of course I could have backed the whole thing like I would a cut file, but it just doesn't look the same! Those rounded edges are to die for in my opinion!


I stamped and embossed the second part of the sentiment "You are a warrior." For this I've used WOW Metalline Plum embossing powder.


Next up, two cards using the super pretty Folklore die, designed by Inna Moreva. The first card was a total accident. I forgot to use a metal shim when die cutting (you need this for all intricate dies), so not everything cut through. I was not going to throw it away though. The parts it did cut through were just so lovely! So I took my scissors and cut out some pieces to make a shaker window and also some others to have a more symmetrical cut. I did notice in the photos that I forgot some pieces...Of well. Embrace imperfection!


Afterwards I managed to cut another one, from white card stock, this one worked perfectly. I went for a simple look. I love navy and white, the combo reminds me of some china. 


And last but not least I absolutely had to try the amazing Noteworthy Frames and Dainty Blossoms dies. The frames are so clever! There's a bunch of different shapes which you can use to cut an opening into your card front and tuck flowers in there. Or whatever else! These frames are meant to hold the sentiment. I like how these turned out:


Now for the fun part! As always, there's giveaways of course!

GIVEAWAYS:
The Pinkfresh Studio blog will be giving away the entire October release to one lucky commenter. But that's not all! At each stop in the hop you can also win a $25 gift card yay! So comment away! The winners will be picked randomly from the comments and they will be announced on Sunday, October 14th on the Pinkfresh Studio Giveaway page. Please remember to check that page and claim your prize within 2 weeks!

SHOPPING PROMO:
There are TWO fabulous promotions during this release!
1. A free HUGS die with your purchase. Your order must include something from the new release. This die is exclusive to this release promo and will not be sold later. It is free while supplies last. You don't need a code, it will be added automatically to any order that has a new release product included.


2. Free/discounted shipping from Oct 8-11 on orders $50+. You need to use the code OCTFREESHIPWITH50. Shipping is free in the USA and $5.50 off for international friends.

I hope you enjoyed the hop and love the new stamps and dies! I love this release so much!!! 

I'm the last stop in this blog hop, so from here you'll go back to the Pinkfresh Studio blog. I'm attaching the full blog hop list below for your convenience.

Thanks for stopping by today! Have a great day!

X


<!-- end InLinkz script →