Monday, May 22, 2017

Hey hey my my - DT layout for The Cut Shoppe

Hi guys,

I'm back today with a new layout I created for The Cut Shoppe!

I've picked the All Heart Remix cut file which is one of my favourites ever from The Cut Shoppe and I've used it many times too. In fact I've used it in this form as well, cropped into two semi-circles, but I do like this design so I don't mind doing it more than once. The end result is always different since I use different collections, decorate differently and so on.

https://www.etsy.com/listing/234503384/the-all-heart-remix-cut-file-is-a


I've chosen the stunning Wild at Heart collection from Cocoa Vanilla Studio - now that CVS is finally available in Germany (at Scrapbook Werkstatt) I can't stay away :).

I very often go with white card stock for my cut file because I generally don't have a plan in my head when I start a layout. And with a white cut file one can go in many directions!


I backed the bigger semi-circle with different patterned papers from the collection and glued it down on the right top side of my page. I didn't glue down the biggest hearts so they add a bit of dimension.


I layered some tissue paper and a couple of the frame ephemera pieces behind my photo and placed these on the big semi-circle. I added some phrase stickers, chipboards, ephemera, fussy cut butterfly and a flair button to embellish this side. I wrote my journaling here too.

Don't ask about the title...I just had this song on my mind when I was working on the layout :).


As for the smaller semi-circle. I cut this from the same white card stock and glued it down completely so it is flush against the background. I hand stitched a few of the hearts and did some string art.


I filled some hearts with those fabulous glitter enamel dots, some wood veneer hearts and I added a couple more fussy cut butterflies.

I splattered some blue paint across my page to finish it off. I hope I could inspire today in some small way!

Thank you for stopping by X


Sunday, May 14, 2017

My first Travelers Notebook - I am HOOKED!

Hey there scrappy friends,
Long post alert :)

For a long time I didn't know what to do with or even what to think of Travelers' Notebooks. I didn't look into the topic but often I saw different spreads somewhere in social media. Everybody uses them for different purposes it seems!
Then we booked our summer holiday, which will be kind of a road trip in the US - we are trying to visit several places while we are there. First of all, I don't feel like I'd survive without crafting for almost 3 weeks. And then I remembered TNs! As in TRAVELERS notebooks! Of course, I could use some for our travels! Cos, you know, I am very forgetful...My dad remembers every single town, restaurant, museum etc we have ever visited, possibly with dates too. Me on the other hand...I don't remember where I was yesterday. At least this way I will be able to remember :).
So when we went on spring break I thought I'd do a test run with the TN. Trying to figure out what works for me, what supplies I should take on summer holiday. I am really happy I did this! I did learn a lot. More about this a bit later.
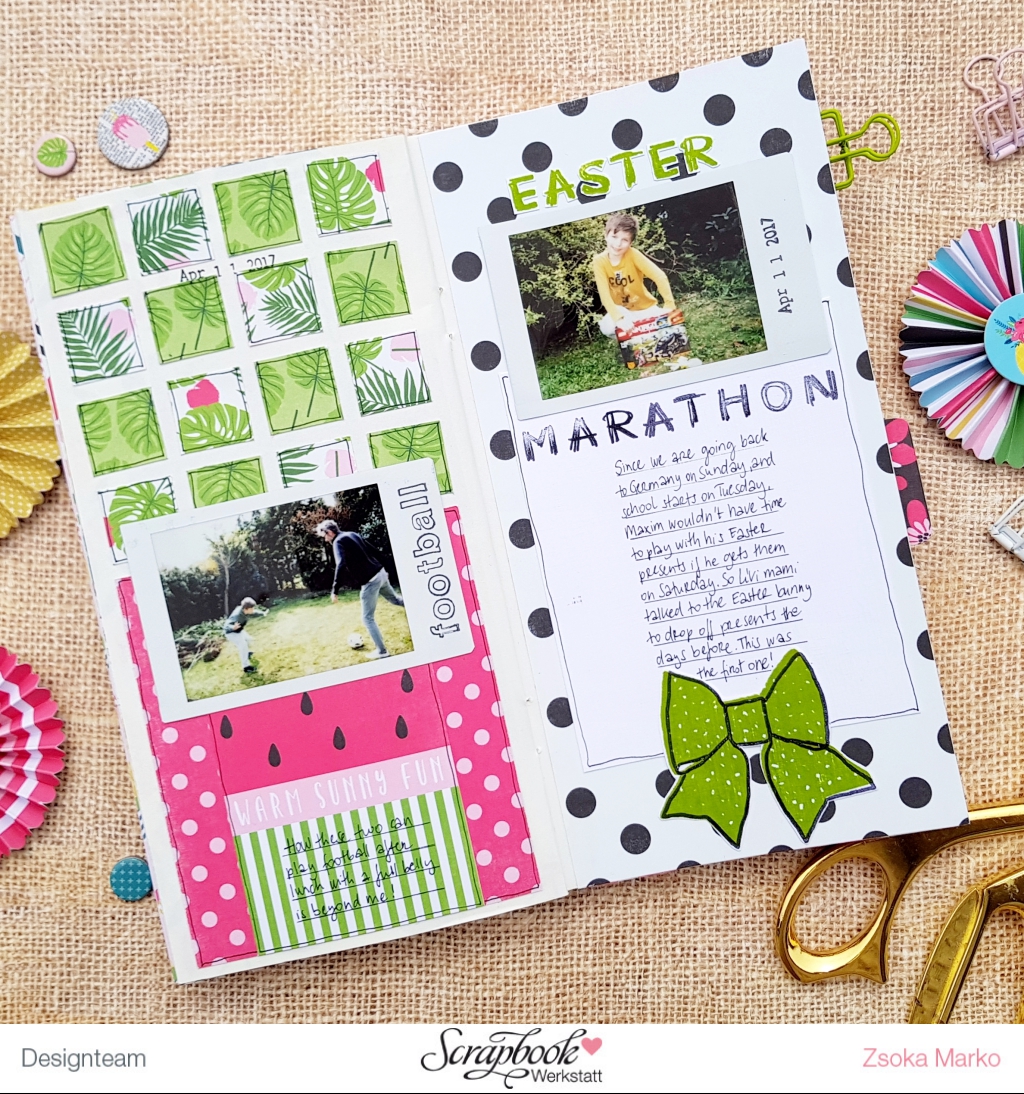
I figured I could buy an Instax camera and take a picture or two every day and document our activities, which restaurant we liked (in case we ever go back!), what we've seen. I did just that...Bought myself an Instax Mini 70, (God how I hate Amazon! I bought the camera only 6 weeks ago and it was 30 eur more!) in yellow, because obviously the color is the most important thing, ha! In retrospect I wish I hadn't...The camera is a lot of fun to use; watching the picture develop, especially with a kid that knows nothing of Polaroid cameras is kinda cool. Apparently my almost 25-year-old nephew has never seen a Polaroid camera either. Am I really THIS old?!
I love that the Mini 70 has a small mirror for taking selfies - which of course is a whole lot of fun for an 8-year-old! But then most of the photos are just very bad quality. Don't get me wrong, I wasn't expecting a lot, but in a lot of pictures you can barely tell what you should see. Faceless people. Barely there landscapes. No colors! NO COLORS! Of course I took photos of everything with my other camera too, but still, I was very disappointed that the beautiful bold colors we saw everywhere, were just missing from the Instax photos. Anyway, what could I do? I used them for my TN anyway, because I didn't want to prepare the spreads for photos to be added later at home.
I mainly used the super fun Summer Fun collection from Echo Park which I got from Scrapbook Werkstatt, together with various stamps from Studio Calico, SCT magazine, Lora Bailora, just to name a few.


What I've learnt so far:
  • I need to take apart the TN inserts and make more, smaller books out of them. These inserts are small but because I add cardstock or patterned paper to pretty much every single page, I wasn't even half way through when the book fell apart...Too bulky.
  • Possibly find inserts that have whiter and thicker pages. Then I don't need to add white cardstock or patterned paper to each page.
  • I need to take more white cardstock with me. The problem I had was that my pages were very thin and if I had PP on one side, I had to add some to the other side too otherwise the patterns showed through...When I added white cardstock on one page, I didn't have to add one on the other side. Well, I mostly did because I didn't like the cream colored pages. I prefer white. So find an insert with white pages as stated before!
  • Taking loads of stamps is a good idea! Since I couldn't really add very dimensional embellies to my pages to avoid bulk, I really liked adding some interest by using stamps.
  • I need to take a LOT more adhesive (ATG) - or hopefully buy them locally! With all the craft stores in the US I'm hoping this will be possible.
  • I've missed cut files! I will try to cut some smaller ones to take with me next time!
  • About the Instax...I totally forgot about the existence of the Instax printer lol! I just saw in my Amazon basket today that I had the SP 1 saved in there from a looong time ago haha! See, I told you I was forgetful...Anyway, thanks to the lovely feedback I got on my Insta feed I decided to buy the Instax Share SP 2 printer . I haven't tried it yet, cos, you know, when some technology is involved (Bluetooth ehh?!) it always takes me time to warm myself up to the idea of trying things when I don't need them right away. And the holiday is still almost 2 months away, ha!

I loooooved working in my TN! I love the small format - if I didn't love 12x12 so much, I would consider using TN for documenting our every day life, kind of like Project Life in a different format. Because it would take up so much less space and would also require a lot less supplies (I will admit at this point that this probably wouldn't hold me back from buying way too much anyway).

Sorry for the long post, I just thought maybe some of you have the same problem I had and maybe you can use some of my experience to decide if TN is for you!
Any questions, shoot!

Laters peeps X


Monday, May 8, 2017

This sweet face - DT layout for The Cut Shoppe

Hi there scrappy peeps,

I'm back today with a new layout for The Cut Shoppe. You might have heard already that there will not be a TCS DT after July so I only have 4 more layouts (including this one) to share with you as part of The Cut Shoppe Design Team. I'll admit this makes me very sad... Thank you Ashley for having me this past year, I've really enjoyed it!

For today's layout I picked one of the more recent cut files, the Spiral Scallop. I love circles and I love scallops so this was a no brainer!


I decided to use the cut file in two ways: as a stitching template and as a normal cut file.


I used my sketch pen on my Cameo to draw the lines of 4 circles that I arranged the way I wanted them in my Studio program. I then pierced  holes along the lines. You can use the perforate option in the Studio program to do this for you, but I prefer to do it by hand.


I used different color embroidery floss for each circle, all matching the collection I chose to work with: Oh my heart from Paige Evans / Pink Paislee. The smaller circles were a nightmare to stitch to be honest! The lines were so close and I broke my smallest needle a while back so I had to use a bigger one which didn't make my life easier. Or the paper prettier!


I added patterned papers and a photo in the middle of the circles, then embellished them with stickers, ephemera pieces, chipboard stickers, charms, puffy stickers...Then I moved onto the next section of my layout, the die cut scallops.


I printed 4 different sized scallops and apart from the biggest one, I backed them all with patterned papers. Then I just layered them on top of each other, using foam tape between each layer. There's no reason for my doing this, other than I really love layers!


I mixed and matched some thickers and alpha stickers for my title and wrote my journaling along the biggest circle. 


I splattered some bronze ink around my page then I was done!

Hope you like my project and I could inspire you in some small way! See you soon!

X


Friday, May 5, 2017

Favorites

Hey there scrappy friends,

Tomorrow is National Scrapbook Day (and also my birthday, ha!), so it is quite timely that a couple of us girls came together (mostly Design Team members of Scrapbook Werkstatt) and created some projects based on a mood board I created. Just for fun!

There's no blog hop or prize or anything, just inspiration. We all are very different style scrappers, from casual and simple, elegant and delicate to messy and complex, so I think we bring something to everyone here today. Come check out all projects on Instagram!

I've always wanted to create a mood board - well technically I created plenty during my studies, but never on the computer! I've had this color combo in my head for years and finally I had a reason to do it! It includes some of my favourite things: my Joop Tempelhof bag, a Mies van der Rohe Barcelona chair (this in the pic is a replica), peonies, ranunculus, mosaics...I thought these colors fit this time of the year too!


This is my layout based on the mood board:


I created a cut file for this layout which is available for FREE download here (it is a Studio file)! Tag me if you use it so I can leave some love!

Also, while I already have shared this card on Instagram, this was also based on the mood board. As you can see I used some stuff I had left after I finished my layout :).


Aaaaaand without further ado, here's the list of talented Ladies who participated in this little get together (in no particular order)! Check out their projects on Instagram, ENJOY!
Have a great day you guys, and enjoy NSD weekend!
X