Showing posts with label Pinkfresh Studio. Show all posts

Monday, March 29, 2021

Pinkfresh Studio March 2021 Cling Stamp, Stencil, Die, and Hot Foil Release


Hi there friends,

I'm super excited to be joining the Pinkfresh Studio March 2021 Cling Stamp, Stencil, Die and Hot Foil Release Blog Hop today! You'll find all  participants at the end of this post, make sure to check out the amazing work of all these talented ladies!

I've made 3 slimline cards for today's blog hop in my most favorite color, blue!

I will leave you with a few photos and instead of writing a step by step here, I have a process video on my YouTube channel, if you want to see how these cards came together. I'll link the video in after the photos!

All products I've used on today's projects are linked in the description box below the video!


Check out the video here:


Giveaways:

1. Pinkfresh Studio is giving away the full release on the Pinkfresh blog!

2. They are also giving away a total of TEN $25 gift certificates!


As always, the winners will be selected from the comments left on all blog posts. Winners will be announced on Monday, April 5th, 2021 on the Pinkfresh Studio Giveaway Page. You must claim your prize within two weeks, so don't forget to check the above page! Comment away! Good luck!

Pinkfresh Studio is also offering free shipping with $50+ purchase, within the United States and discounted shipping on international orders from March 29 thru April 4th.


That's it for today! I hope you enjoyed all the inspiration along the hop!

Thank you for stopping by and have a fabulous day!

X

BLOG HOP LIST: 

You are invited to the Inlinkz link party!

Click here to enter

Sunday, October 25, 2020

Winter Scene cards with Concord & 9th Bundled Up

Hi lovelies,

It's been a long time since I've made a blog post just for fun! I have some time now and because I've made a process video for these cards, I thought I might as well share them here too!

I've recently started making process videos, so many of you might not even know about my You Tube channel! I actually have two, because I also created one for my small business, A Pocket Full of Happiness (where I sell stamp sets and baby swaddles that I designed, handmade cards, planner clips, rainbow charms; all kinds of happy things!). 

Check them out, and if you like what you see, be sure to subscribe! I'd love to see you there!

- YouTube Channel - Zsoka Marko

- YouTube Channel - A Pocket Full of Happiness

Anyway, I have a stack of stamp sets that I've bought but never got around to using, and sometimes I just need new inspiration! Sooo I went through this pile and I've found this super cute Concord & 9th set called Bundled Up. You can buy it as a stamp and die bundle, or just the stamp or die sets. I've used both the stamps and the dies on today's cards.


Supplies I've used to create these cards:
Thanks so much for stopping by today! Have a lovely weekend!
X

Thursday, December 19, 2019

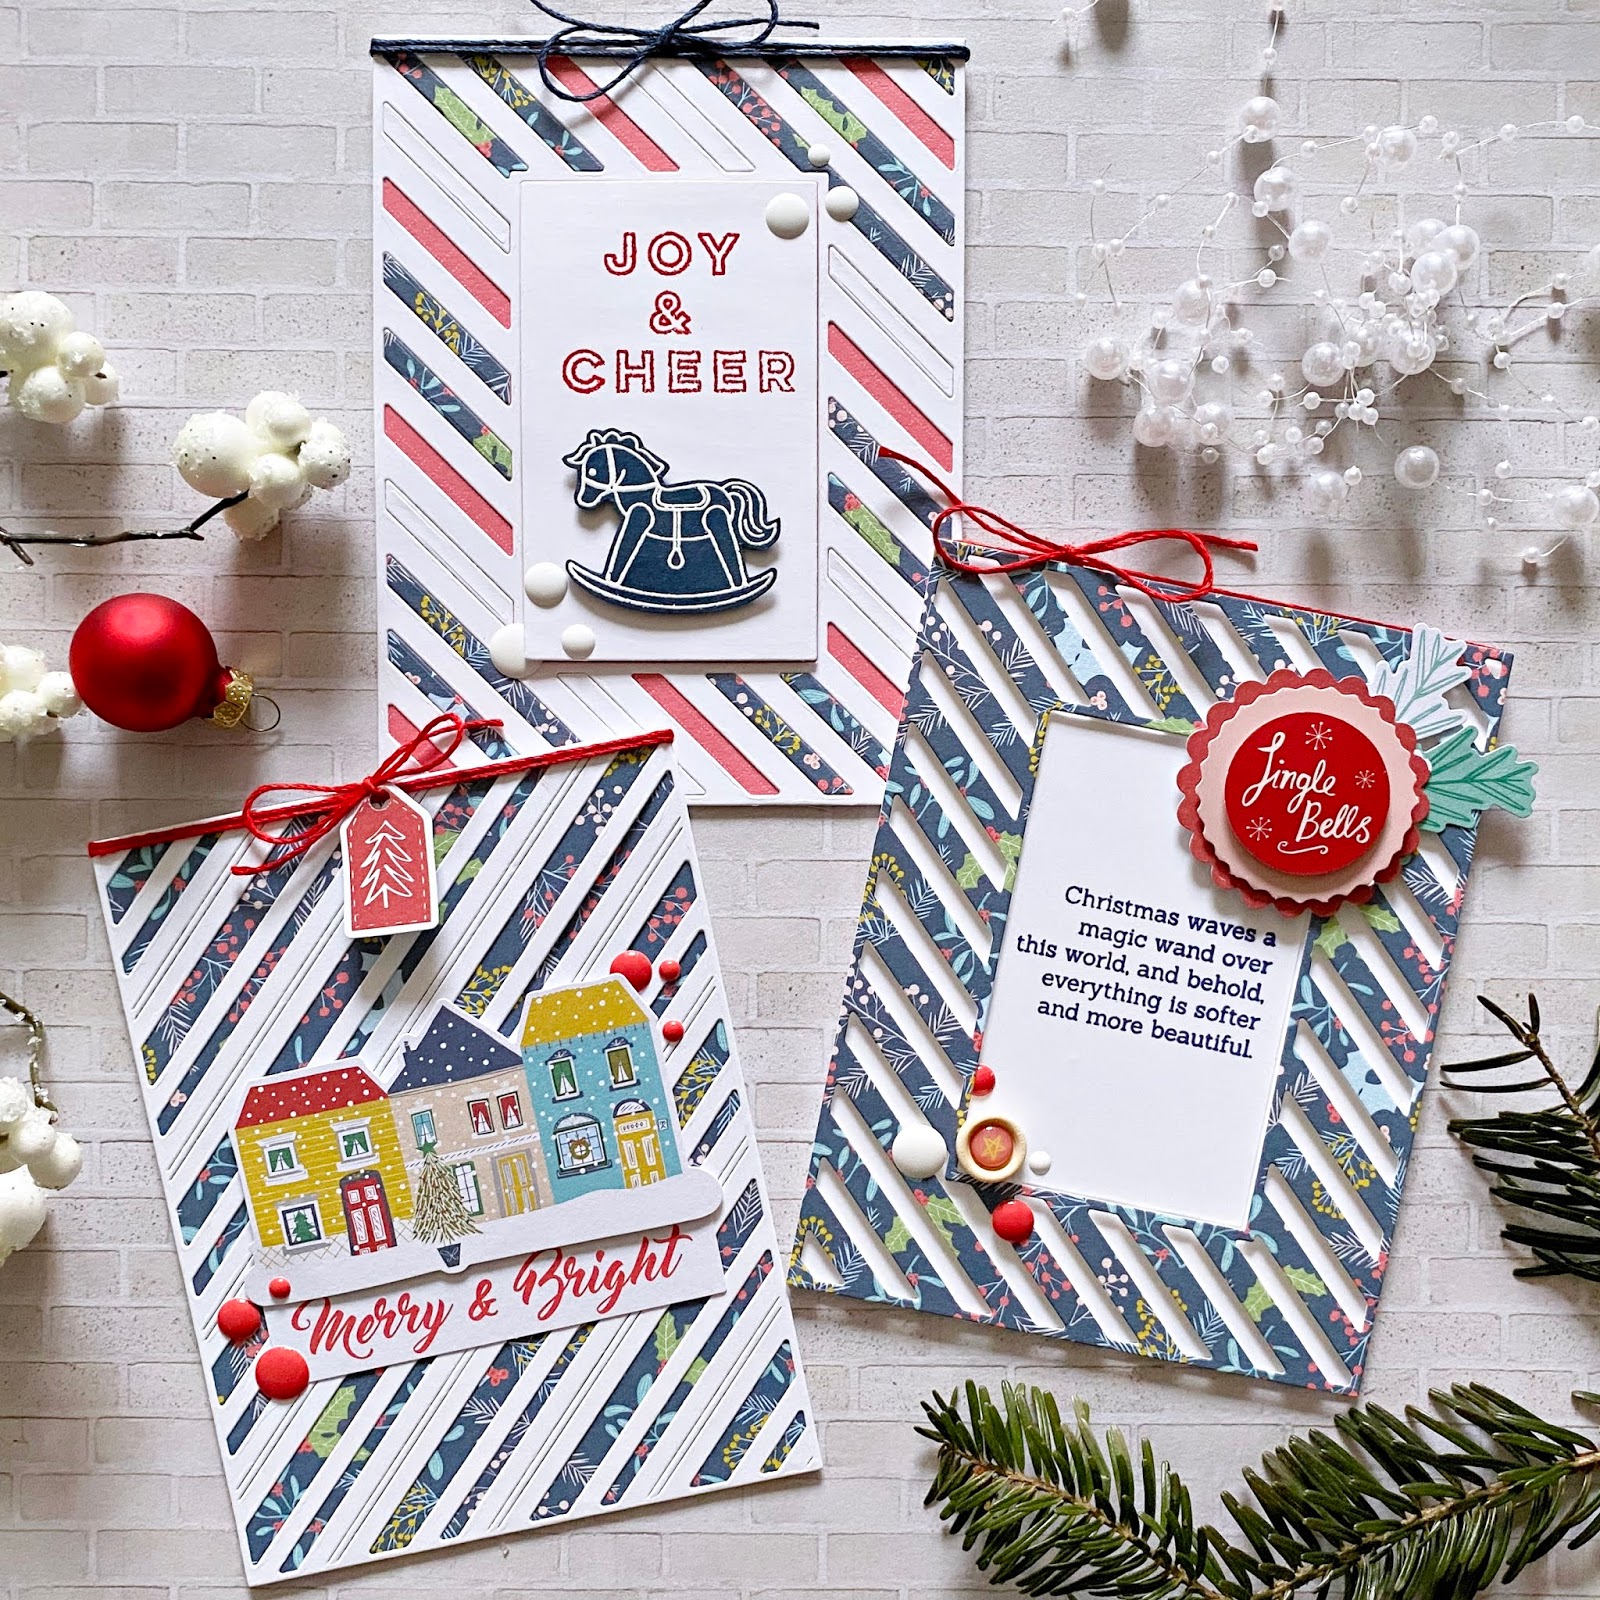
Last minute Christmas cards - DT project for Pinkfresh Studio

Hello Pinkfresh fans,

I'm back to share my last cards for Pinkfresh Studio. I think Christmas cards are my favorite, I could truly create them all year long. I doubt I'm going to have time for more this year though! Lack of time is also the reason why I ended up making such simple and quick cards for today's post. These are great for some last minute crafting!


I was focusing on my favorite (6x6) patterned paper from the Home for the Holidays collection and some of the new dies from the latest release.

For my first card I used the Essentials: Diagonal Stripes with Window die to create a frame from patterned paper. I also die cut the center from white card stock and stamped a sentiment from the gorgeous Share Cheer stamp set in navy blue, using the Stargazer ink pad. I added foam adhesive strips to the back side of my die cut and adhered it to my A2 size, top folding card base. I also glued down the middle piece.


I then went through the Home for the Holiday embellishments and picked out a few: a layered sticker, some die cuts, a wood button and a few enamel dots. I glued these down in two opposite corners. To finish off this card, I added some red twine at the top.


My next card is the simplest of the three! I created an A2 size, top folding card base from white, heavy weight card stock and added a patterned paper layer on top. Then using the Essentials: Fancy Diagonal Stripes die and white card stock, I created my top layer.


I glued down the Merry & Bright die cut first, then popped up the houses using foam adhesive. Some red enamel dots and red twine finish this card off. Oh oh! And a teeny tiny red tag from the ephemera pack! Isn't that too cute?!


For my last card I made another A2, top folding card base, then added red patterned paper to it. I adhered a white die cut on this which I cut with the Essentials: Diagonal Stripes with Window die. I glued some of the white fall-out pieces back in place, plus a few patterned paper strips as well.


I dug up a cute little stamp set from last year, Merry and Bright Toy Shop, cut apart the long Joy & Cheer stamp and re-arranged it in a way that it all fit on the paper in the middle. I then embossed this with red glitter embossing powder. I stamped the rocking horse image onto navy card stock, white embossed it and fussy cut it out. Using foam adhesive I attached it to the middle. Enamel dots and twine finish off this card.


That's it for today! I hope you've found some inspiration in this post!

Wishing you Happy Holidays, a wonderful and relaxing time with your loved ones!

X

Monday, December 9, 2019

Pinkfresh Studio Essentials 3 Release Blog Hop


Hello Pinkfresh friends,

Welcome to the Essentials 3 Release blog hop, full of amazing products and gorgeous inspiration! My most favorite card making supplies are standalone dies, so I'm pretty excited about this release! I wish I had had more time to try each one of them, but I'm sure you guys know how busy the end of the year gets!

I decided to create a mini Christmas banner with the smaller die from the Ornate Banner die set. I'm thinking, I should make a mini box for it and then it will be a cute present for a friend!


I die cut the banners from Home for the Holidays papers - here I used the little teardrop shaped die at the bottom too. I also die cut the banners from heavy weight white card stock that I layered behind each patterned paper banner so they are nice and sturdy. 


This striped background I had left from a previous project, I thought I might as well use it! I had enough for 2 banners!


I die cut each letter from the same patterned papers, using my favorite Kelly Alpha Upper Case dies. I glued them on heavy weight card stock, inlaid the little fall out pieces too, then fussy cut the letters out - again, nice and sturdy. I like my projects to stand the test of time! 


So that my letters stand out from the background, I added a white square to each banner. To create these, I used two new die sets: Diagonal Stitched Squares and Stitched Squares. These are really great basic shapes that I'm sure I'll use a lot!

I then added bits and pieces from the Home for the Holidays scrapbook collection to each banner, puffy stickers, stickers, wood buttons, layered stickers and enamel dots.


Last but not least, I added some gold eyelets to each banner and threaded pink ribbon through them. 


While I was at it, I made a second banner for my table decor piece! This time I die cut the banner from blush card stock. I did add a second layer of white heavy weight card stock behind it. I also die cut the tear drop shapes from white card stock and glued them in place.


For the letters I used citrine card stock and this time I left the patterns open, so the white backing could peak through. I adhered the letters in the middle of the banners.


To add something a little different, I used one of the dies from the Teardrop Tag with Fillable Elements die set to create a white ornate border at the top of my banner.


I then punched two holes in each banner and added some eyelets. I'm not sure what color these are, some kind of metallic brown or so. Works well with the color of the pine cones in the glass!


I used the same pink ribbon as before, and secured the banner on the glass with a bow.


This is what's inside! The brush trees have such a pretty color and shape and they are on concrete stands which I find super cool. 


There you have it! I rarely do home decor because we just have no space, but I loved working on something different for a change! Hope you like these projects too :).

Giveaways:

1. Pinkfresh Studio is giving away the full Essentials 3 release on the Pinkfresh blog and Instagram as well!

2. On each blog we are giving away a $25 gift certificate too!


As always, the winners will be selected from the comments left on all blog posts. Winners will be announced on Monday, December 16, 2019 on the Pinkfresh Studio Giveaway Page. You must claim your prize within 2 weeks so don't forget to go check the above page! Comment away! Good luck!

Pinkfresh Studio is also offering free shipping on orders $100+, within the United States. No code is needed.

That's it for today! Thank you for stopping by!

Have a fabulous day!

X


BLOG HOP LIST

You are invited to the Inlinkz link party!
Click here to enter

Tuesday, November 19, 2019

Floral cards - DT project for Pinkfresh Studio

Hello there Pinkfresh fans,

I'm back today with some new card inspirations! This time I focused on flowers and using stamps I haven't used before (well, mostly!). 

On today's cards I've used the new Pinkfresh Premium Dye ink pads as watercolor. To do this, I simply stamped some color on my acrylic stamping block and added some water.


I started with the Flower Garden stamp set: I embossed the image with rose gold embossing powder. I then colored in the images using the following colors:


Once the flowers were dry, I loosely painted the background too, using the same green colors as above. I stamped and embossed a sentiment from the Delicate Wreath stamp set on white card stock. I trimmed it down and popped it up on my card. To finish this off, I added some copper twine at the top.

For my next card I created a striped background. I used washi tape to mask off the areas I didn't want  to paint, one stripe at a time. I added water first, then dropped in some color. Once it was dry, I stamped and embossed the wreath from the Delicate Wreath stamp set in rose gold. 

I didn't like the look without any white space in between the stripes plus I don't like when there's just no dimension to my cards. So I decided to try another design before throwing this panel away. I cut some white strips of papers and glued them down in between the colors, to separate them. I didn't mind that this came on top of the embossed wreath because I was going to add a die cut wreath on top anyway. So I embossed another wreath, die cut it, then using 3d adhesive I glued it down on top of the other one, but taking care that it was turned in a different direction, so the bottom wreath could still peek through. Finally, I added an embossed sentiment, some copper twine and a little clothespin (because it was on my desk and I was too lazy to put it back into its box haha!). 


For my third card I stamped a colorful floral pattern using the Lovely Blossoms stamp set and the same ink pads as before. Beside die cutting patterned papers, this is my most favorite thing to do: creating my own patterns with my own color combos. It's so fun!
I didn't want to cover up the stamped background so I kept the rest of the card simple. I die cut two labels with the Essentials Basic Label Frames dies. I layered them up, then added two bronze(ish) eyelets and threaded copper twine through them. I glued down the ends of the twine on the back of this panel. I adhered the whole panel to an A2 top folding card base. 


I painted a piece of paper with Coral Reef, Passion Fruit and Regal Kiss colors and die cut XO from it. Just so I have watercolor on all three cards hehe! I embossed another piece of paper with rose gold embossing powder and die cut the same letters again - I then mixed and matched the two, so that the fill is the watercolor paper, the outline is the embossed one. Last but not least I added a ribbon bow.
 

That's it for today! I hope I could inspire you in some small way!

Thanks for stopping by, I wish you an awesome day!

X

Thursday, October 24, 2019

Non-traditional Christmas cards - DT projects for Pinkfresh Studio

Hello there Pinkfresh fans,

I'm back today with some non-traditional Christmas cards I've created for Pinkfresh Studio. Do you guys prefer traditional or non-traditional color combos and designs? I'm not very picky, I love them all! I generally don't like red and green together except on Christmas projects. Lately however I replaced green with blue and I'm loving it. I've always loved navy+white clothes (lots of stripes!) with red accessories, so why not try these colors on Christmas cards? What do you think, yay or nay? I won't be offended ha! To each their own right?!


First I stamped my background using the Adore Alpha stamps. I really prefer using a stamping tool but I wanted to stamp "HO" many times randomly and I wanted the two letters always to be lined up the same way. So I had to hand stamp these. Luckily the inks are wonderful and I really wouldn't have needed to double stamp the images. Oh by the way, the inks I've used on all these cards:
You can also buy these in a variety of bundles:

Back to the card. I stamped some details on the lighter letters using a color in a darker shade. I cut off a piece of this panel and glued the bigger part on my white (dry embossed) card front. I added two thin red strips for interest. I then die cut 3 wreaths from white, light and dark blue card stock using the Layered Wreath die set. I layered them up and glued them together. I added some red berries that I had left over from previous projects (I colored these with the Candy Apple ink). To finish off this card, I die cut a sentiment from pink card stock, using the Classic Holiday Words die set (seriously my favorite sentiment die set!) and glued it down in the middle. 


For my next card I dug out an older stamp set, Constellation. I first stamped the image with Sapphire ink, then inked up only the edges of the circle with Stargazer. The colors are soooo gorgeous in person, unfortunately my photos don't do them justice. I was planning to add some die cut wreath to this but they would all have covered up the beautiful dark blue edge, so I had to come up with a different solution! I white heat embossed the sentiment from the lovely new Season's Greetings stamp set and I stamped the wreath from the same stamp set in embossing ink. I was going to white heat emboss this too but again...the dark blue edges would have been covered up plus I really liked the tone on tone look! I die cut this circle and a larger red one - layered these up, using foam tape. I prepared my card base, added a dry embossed, white panel to it as well as two pink strips. I glued the circles on top and added some twine bow as a finishing touch.


For my last card I die cut a white panel with the Geo Star 1 die, and a pink one with the Geo Star 2 die. I also die cut HO HO HO from white card stock using the Adore Alpha die set, then using Berrylicious, Slumber and Stargazer inks and the Adore Alpha stamps I added color to these letters. If you know the Adore Alpha die set, you know it cuts not only the letter but also a super cool outline. I did not want to throw these away! I layered the Geo Star die cuts on my card base. I die cut the letters from heavy weight card stock a bunch of times, so I could create dimensional letters. I then attached both the letters and the outlines in a random way, adding some playfulness to my card. To finish it off, I added some twine at the top.


That's it for today guys! I hope I could inspire you in some small way!

Thank you for stopping by and have a wonderful day!

X


Tuesday, October 15, 2019

Layton's Legacy Fundraiser & Card Drive 2019


Hello crafty friends,

Today I'm joining the Layton's Legacy Card Drive & Fundraising efforts organized by Lea Lawson, marketing manager of Pinkfresh Studio, in honor of remembrance of her adorable baby, Layton Caleb. 


This is not an easy post to write, not for any parent, I'm sure. It is hard to stop our minds from going there and think about what ifs. What if something this terrible had happened to you? 

October is Pregnancy & Infant Loss Awareness month and October 15th is what many in the loss world call Wave of Light. It is a public way to share the memory of your lost pregnancies and/or babies. This card drive and fundraiser is Lea's version of Wave of Light and I am happy to spread the word and help wherever I can. 

  • You can find Lea's original post with all the information HERE.
  • You'll find the fundraiser HERE.


I hope you have a few minutes to spare to check it out, and maybe even help. Ways you can help:

  • DONATE - through Layton's Legacy GoFundMe Fundraising link
  • SHARE - not everyone is able to financially donate, but sharing on your social media outlets is welcomed and helpful
  • CREATE - this year's card drive theme is "Sensitive Sympathy" geared towards parents who have lost a pregnancy due to miscarriage or stillbirth, infant or child. You can get all the card drive info HERE.

Pinkfresh Studio created a stamp and die set for this card drive and they will be donating $5 from every stamp set sale to the Layton's Legacy fundraising efforts. 

I've created a card duo with the gorgeous Forever in Our Hearts stamp and die sets. It's really hard to know what to say to parents that are going/went through this - the sentiments in this stamp set are sensitive to this topic. 


I hope you can join us in spreading the word about this card drive and fundraiser, I think that's the least we can do to support these parents going through unimaginable pain. We appreciate all your help!

Thank you for stopping by today and I wish you a wonderful day!

X