Tuesday, June 25, 2019

Summer - DT layout for Paige Evans

Hi there crafty friends,

I'm back today with a new layout I've created for the Paige Evans Design Team. This time I've used the fab Horizon collection again.

I started out by cutting the Summer in Grid cut file (Design ID: 293962) from white textured card stock. 


I then pulled out various patterned papers and backed each section of the grid with a different color of the rainbow.


Once done, I glued down the cut file on my chosen background paper. I selected a few embellishments in each color so I could add them to their matching squares, for a tone on tone look.


I love this about the Horizon collection, that there is truly all kinds of embellishments in all the colors of the rainbow, so it is pretty easy to finish any layout! I used chipboards, stickers, clips, epoxy stickers, die cuts, and I fussy cut some butterflies too from one of the patterned papers.


I added some tissue paper and some bits and pieces of die cuts behind my photo and glued them all down in the middle. Last but not least I wrote my journaling on a journaling spot and adhered this down too.


And that's pretty much it! 
Thank you so much for stopping by today! 
Have a wonderful day!

X

SUPPLY LIST: 
Whimsical Collection: Paper 22


Monday, June 24, 2019

Pinkfresh Studio June Washi Release Blog Hop


Hello crafty peeps,

Welcome to the Pinkfresh Studio June Washi release blog hop!

You should have arrived here from the Pinkfresh Studio blog, but I'll attach the full blog hop list at the end for your convenience, in case you're lost.

Today's release is pretty fantastic (but I probably say that about each Pinkfresh release ha!). Besides the washi tapes, there are stamps and dies that you can use on their own OR!!! Brace yourselves! Or you can use them with the washi tapes! How you ask?! There are stamps that coordinate with some of the washi, so you can stamp on them, emboss them even (I haven't done this on today's projects, but I have on my cards for my July blog post, so watch this space!). You can die cut flowers with coordinating dies, so no more fussy cutting!!! Genius, right?!

Today I've focused on the Simple Edgers die set which works with the thin washi tapes (Matte Gold Washi, Watercolor Fantasy Washi) or pretty much anything else! There are also thin strips in the Adorable Frames Washi - which is what I've used on today's projects!


First up a shaker card! All my cards today are mounted on A2 top folding card bases. Here I added a  puprle patterned paper panel (Indigo Hills 2 collection). Using one of the Simple Edgers, I die cut a piece off of my white panel on both top and bottom. I also die cut two strips from a peach patterned paper (Joyful Day collection) which I then tucked in at the top and the bottom. But before doing this, I heat embossed my sentiment in the middle of the white card stock (sentiment is from the Floral Cluster Stamp set).


I die cut the wreath image from the Painted Florals washi tape and added acetate plus 2 layers of foam tape behind it. I placed some jewels in the middle (peach, pink and lavender colors from the Pinkfresh Essentials: Jewel Mix box) and attached my shaker frame. To finish off this card I splattered some purple paint around the wreath and added a twine bow at the top.


My next card is suuuuper simple! I added the same peach patterned paper panel I used before, then I die cut the big flower bouquet from the Painted Florals washi tape. I white heat embossed my sentiment in the middle ( sentiment is from the Floral Cluster stamp set). 


I placed some gold tangled thread behind the die cut, added foam adhesive and attached it to the card front. Using the scallop Simple Edger I die cut a thin strip from the Adorable Frames Washi and glued it down at the bottom. Last but not least I splattered some purple ink all over the card.


My last card is very simple too but I'll tell you it took me ages before I finally settled on this design haha! I die cut lots of thin strips from the Adorable Frames WashiMatte Gold Washi and Watercolor Fantasy Washi  but didn't end up using the latter two because I wanted to go with purple/peach tones. I also die cut two strips from the same peach patterned paper I used on the other two cards as well.


Once I figured out the design and how I wanted to use the strips, I gold heat embossed my sentiment (from the Eucalyptus Fantasy stamp set) on white card stock. Then I glued all the strips in place.


I created 2 floral clusters using 3 small die cuts (each) from the Painted Florals washi tape. To finish off this card I added a twine bow at the top.


That's it! I hope I could peak your interest and that you are as excited as we are about this new release!

And now for the fun part! 

Giveaways:

1. Pinkfresh Studio is giving away the full June Washi release on the Pinkfresh blog and Instagram as well!

2. On each blog we are giving away a $25 gift certificate too!


As always, the winners will be selected from the comments left on all blog posts. Winners will be announced on Monday, July 1, 2019 on the Pinkfresh Studio Giveaway Page. You must claim your prize within 2 weeks so don't forget to go check the above page! Comment away! Good luck!

Shopping Promo:

Pinkfresh Studio is offering free/discounted shipping from June 24 - 30th on orders $50+. You just need to use code JUNEWASHISHIP50. Shipping in the US is free, and there's $5.50 off on international shipping.


Phew I think that's it for today! I hope I didn't miss anything :).

Your next stop is Yoonsun's blog!

Thank you for stopping by!

Have a fabulous day!

X


BLOG HOP LIST:
You are invited to the Inlinkz link party!
Click here to enter
<!-- end InLinkz code →

Saturday, June 22, 2019

Technique Tuesday and WOW! Embossing Powder Blog Hop


Hello dear friends,

Welcome to DAY 2 of the Techniques Tuesday and WOW! Embossing Powder Blog Hop! We are celebrating summer with fresh and summery stamps/dies, designs and colors!

You should have arrived here from the talented Verity's blog! I'm also including the full blog hop list at the end of this post, for your convenience.

One of the things my family loves in the summer is strawberries! We can buy them pretty much all year but they never are locally sourced and they never taste like strawberries in the summer! It's just a  few short weeks we can truly enjoy them so that we do! And not only their taste...I just love how sweet they look too! This is why I decided to work with two strawberry sets from Technique Tuesday, the Strawberries on the Border die set and the Sweet Summertime stamp set.


On my first card I stamped a background full of strawberries and added a very basic coloring using alcohol markers. Note that I rarely use realistic colors for things...I love color and I love playing with it! I dry embossed the panel to add a bit of texture and interest. 


I heat embossed a panel with my most favorite embossing glitter, Sorbet (yes, I am totally obsessed with it and I am not ashamed haha!) and I die cut a circle from it. I stamped my sentiment in black on a smaller circle. I glued down the citrus circle on my card front and wrapped some twine around it. I  then added the sentiment on foam tape. 


I had so many different ideas with the die...none of which worked out haha! So I just used it as it was intended (I think!), on the edge of my card front. I die cut the flowers, leaves, stems and the strawberries from patterned paper, color card stock and the embossed panel I used earlier. 


I then did a bit of paper piecing. I love love love paper piecing. It often takes ages but I always love the result so to me it's worth it. Can you imagine I was going to piece back the little dots on the strawberries...OMG. As I was trying to remove them from the die they flew EVERYWHERE. Plus they lost their shape as I tried to add them. I decided to remove them in the end. :(


I stamped my sentiment on a piece of patterned paper and adhered it to my card front. I also added a thin strip of embossed card stock, because those 2 strawberries were just not enough Sorbet hahaha. I dry embossed another A2 size panel and added it to my A2 size top folding card base. Using foam adhesive, I glued the strawberry panel on top. To finish off this card I tied some twine at the top. Done!

Now for the fun part! No blog hop is complete without a prize (or more)! 
  • WOW! Embossing Powder has 6 powders of your choosing along with a WOW carry case to store your powders safely in. 
  • Technique Tuesday is giving away 2x$20 gift certificate to their store
Winners will be chosen at random from the comments left on all the posts on both days. We encourage you to leave comments on both days, the more comments you leave, the more chances you have to win these fabulous prizes.

The hop is open internationally! Good Luck!

You might also be interested in the SUMMER SALE Technique Tuesday has going on now! The deets:
  • To receive your free stamp, use the coupon code: FreeWings.
  • The coupon code is valid June 22th through 24th, at midnight!

That's it for today guys! I hope you've found some inspiration along the hop! Your next stop is the lovely Jo's blog! Enjoy!

Have a wonderful day!

X
Verity Biddlecombe
Zsoka Marko ------ YOU ARE HERE!


Friday, June 21, 2019

Out and About layout inspirations and a Song to Say Goodbye - DT projects for Pinkfresh Studio

Hi there crafty peeps,

I'm stopping by today to share two new layouts with you that I've created for Pinkfresh Studio with the awesome Out and About collection.

With these two layouts I'm also saying goodbye to the Pinkfresh Studio Scrapbook Design Team. It's been an honor...It was a very difficult decision for me and it's very hard to write this blog post too. 

I discovered Pinkfresh a few months after I started scrapbooking in 2015, thanks to Ashley Horton and her use of those awesome rainbow colored wooden chevron pieces which I still have a million packages of (yeah, thanks Ashley!!! Haha!). It was not easy to find PF supplies here back then, in fact  that's how I discovered Scrapbok Werkstatt (which became my favorite scrapbook store and later my second home as a DT member for a few years) on my quest of finding those chevron pieces. Ahhh memories! :( 
Pinkfresh has been one of my favorite companies since then. Together with Basic Grey and Fancy Pants, one of which doesn't do scrapbook collections anymore and the other...I'm not even sure what's happening to the other. If you know me, you know that I am a fan of small, family run businesses, unique, revolutionary designs that break rules, that don't care about trends. Patterns and color combinations I don't find elsewhere. To me Pinkfresh Studio is all that. Pioneers.

OK, I don't believe in coincidences. You know what just started playing on the radio...Nelly Furtado's All Good Things Come to and End. Seriously?! Tears running. But I do believe this was the right decision for me right now.

Thank you Kinnari for having me this past year! Thank you for having faith in me and for your continuous support!

Sorry guys for the long intro, but I had to say all those things!

Back to my layouts phew! Since most of our photos are travel photos I decided to work mainly with Out and About on both these layouts with a bit of other collections mixed in there (patterned papers). 


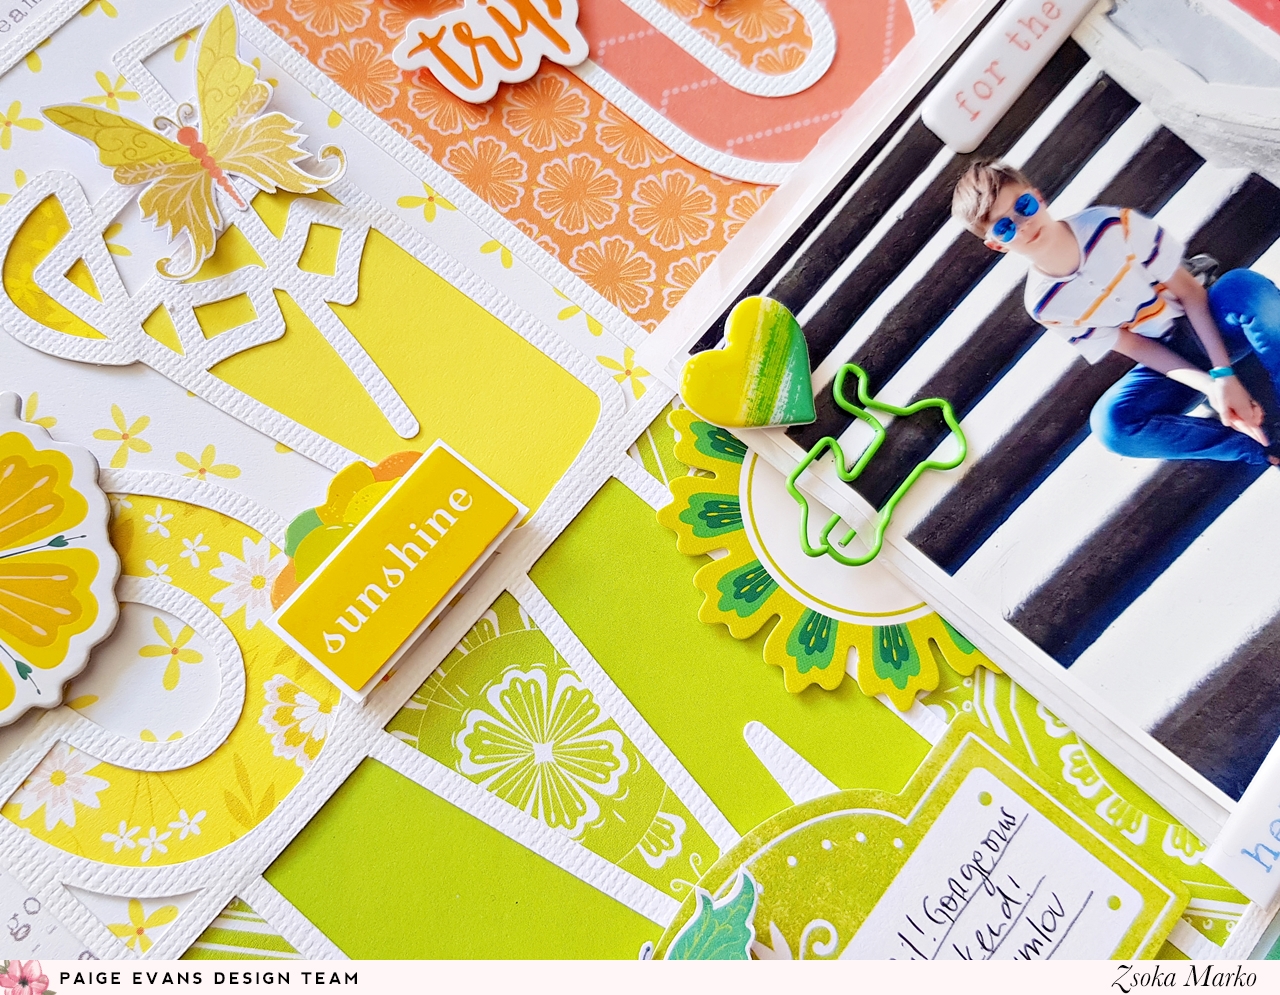
I first cut this gorgeous Paige Evans cut file from textured white card stock, then backed it with various patterned papers. Once done, I carefully glued the thin frame on the New Places paper, then stitched it down so that it surely stayed put. I then fussy cut out the whole middle part (I actually really loved the cut file on the rainbow paper but I thought it would end up too busy once I add photo and embellies).


I turned the frame around and added foam tape everywhere, on the back of some of the flowers and leaves too. Then I adhered it on the Scenic Route paper. I thought the street map design fit my photo well.


I layered some tissue paper and a bunch of die cut pieces, tags and labels behind my photo and glued the whole stack down in the middle, tucking a part of my picture behind the cut file.  I added a few embellies, die cuts, epoxy clip, puffy stickers, not too many because I wanted the papers to shine. I'm all about patterned papers, can't help it! I stamped my date and added my journaling, done and done.


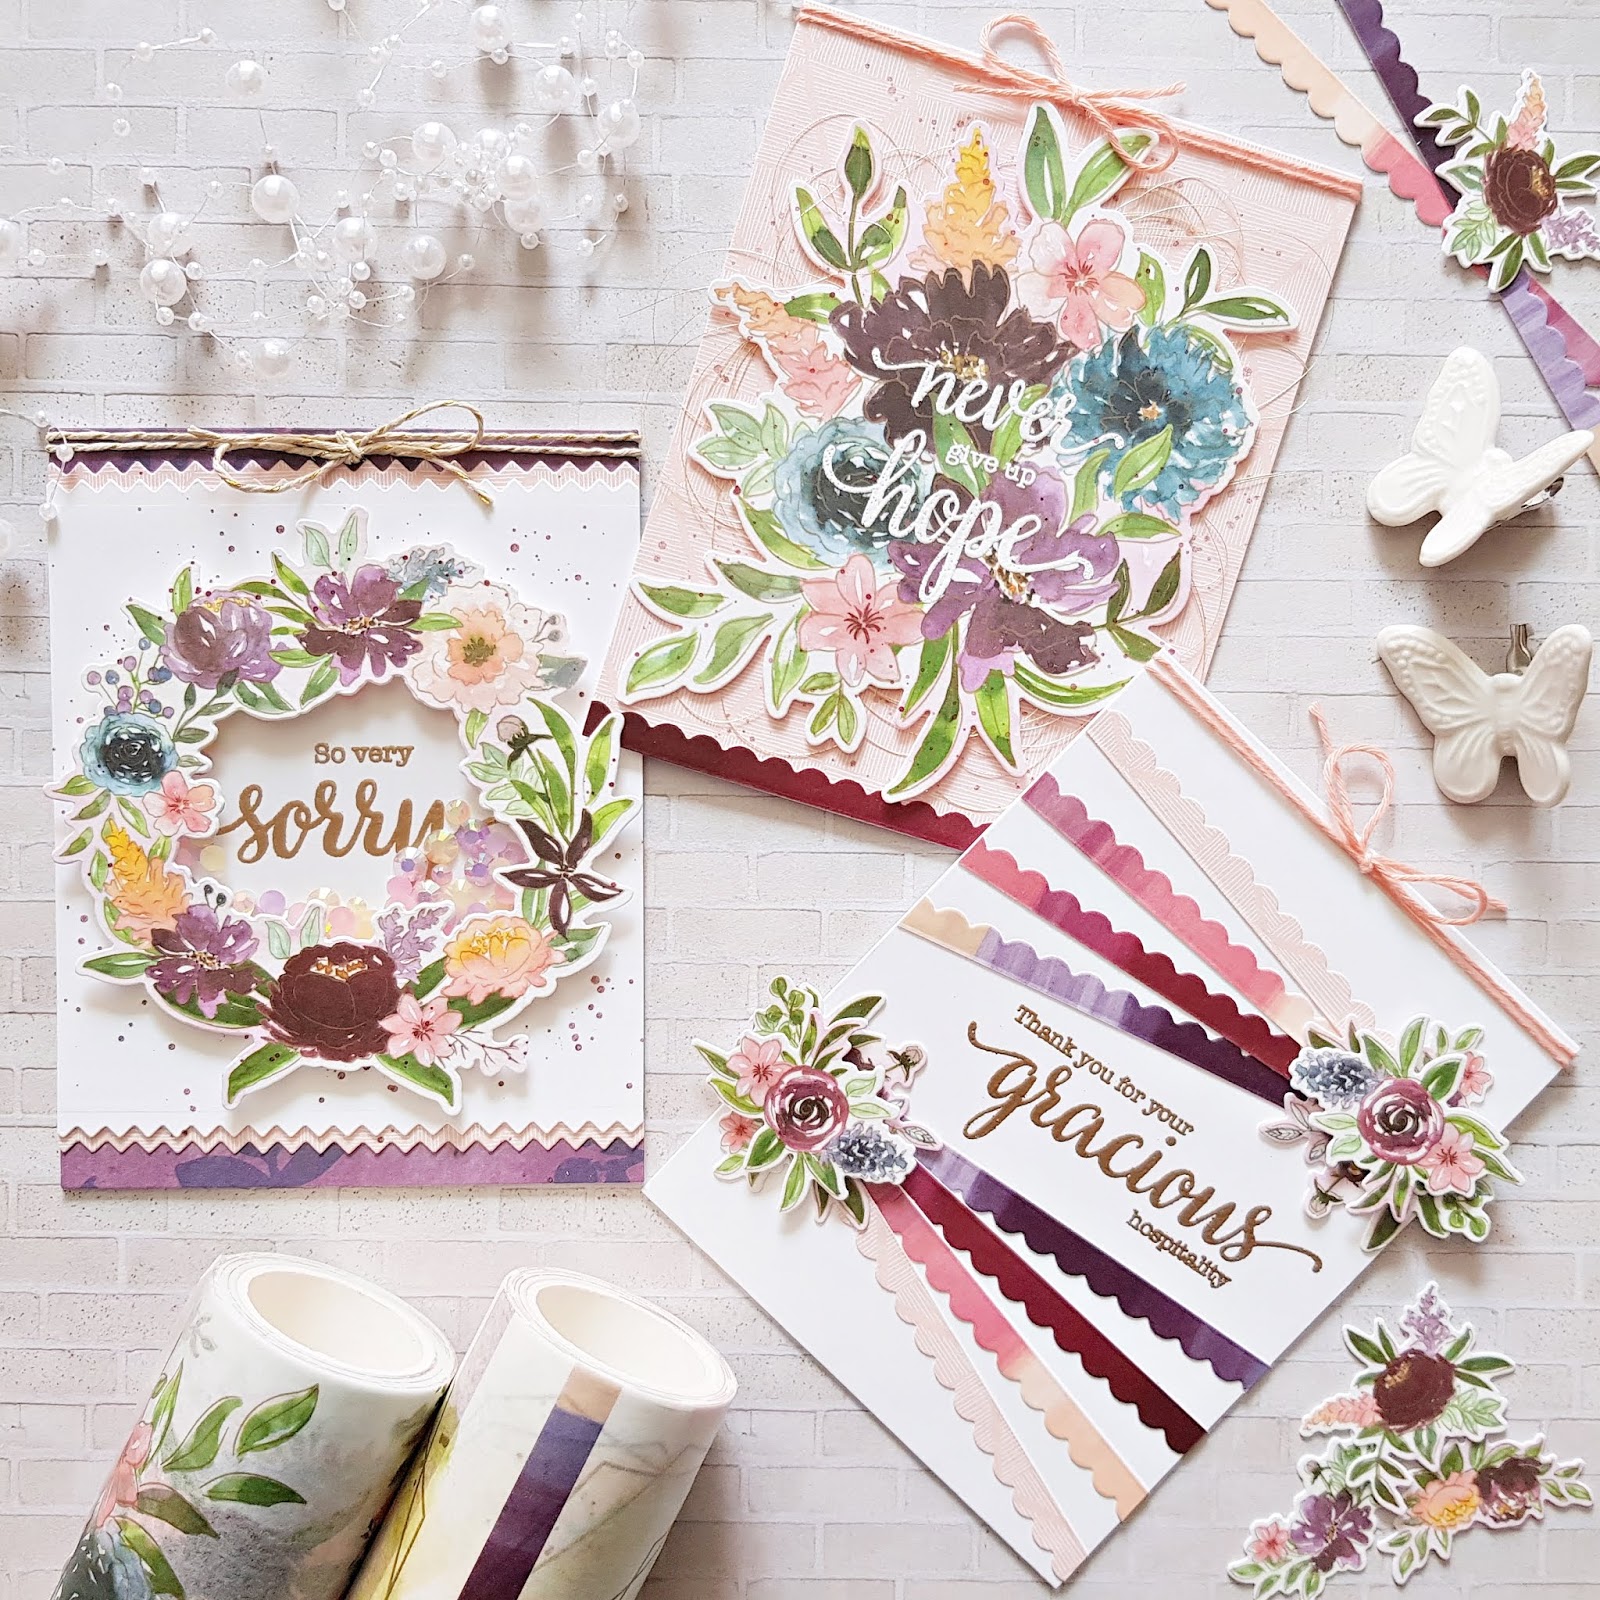
On my second layout I used a cut file that will soon be available as a freebie in the Pinkfresh Studio Facebook fan group, so don't forget to check every now and then for new cut files! I backed the flower and leaves with patterned papers and also die cut some layered flowers for additional dimension. I need dimension and texture.


The white cut file was pretty much invisible on the background so I glued the stamp on a yellow card stock and fussy cut around it, leaving a bit of outline. Please excuse my fussy cutting, I don't normally do such a bad job. I also could have done this using my Cameo but it was an afterthought and by then I closed down the Silhouette software and I couldn't have gotten the sizing perfect.


Since I used this stamp cut file I thought it would be great to use the Tickets paper with all the different stamps on it. Or at least a small part of it. The top bit of my background is the Present and Perfect paper from the Everyday Musings collection, the bottom part is the Travel Icons paper from Out and About, turned on its side.


Using foam adhesive I glued down the cut file on my background. I added the 3d flowers and started embellishing. Enamel dots for flower centers, and a few die cuts, puffy stickers around my photo. I stamped my date on a label sticker.


Last but not least my title. I'm obsessed with the Adore Alpha die set (coordinating stamp set also available!), I think it's the best alpha die set out there! It's also two for one since you get outlines and inner pieces as well. So I die cut my title from white card stock once, then from the New Places paper as well. I was debating which version I should go with, rainbow outline with white letters or the other way around. In the end I liked this version better. I added pop dots behind the letters and glued them in place. To finish off my title I used the mini puffy alpha stickers from the Everyday Musings collection. That's about it I think!

So while I was trying to put this post together, several other songs came up (to be fair it took me half a day to write this haha), like Verve's Bittersweet Symphony and Placebo's Song to Say Goodbye. Really?! I mean REALLY? Ugh.

Have a wonderful day!

X

Tuesday, June 18, 2019

Altenew June 2019 Stand-alone Die Release Blog Hop + Giveaway


Hello crafty peeps,

Welcome to yet another Altenew release blog hop hehe! Today we are showcasing the June stand alone dies!

You should have arrived here from the wonderful Irina Fonina's blog! I'll add the full blog hop list at the end of this post, for your convenience!

I've only made 5 cards with this release (I know right?!) because there's so much going on in my life right now, deadline upon deadline...But I'm sure you see loads of inspiration along the hop! Oh, also, I had a 6th card but guess what...I messed it up since I mixed in some July release dies too, omgosh, where's my mind...So that one I will only be able to share in July!

Anyway, about my projects! First up is the Color Wheel die! This is a rather large die so I decided to only use parts of it. I don't like big cards! All cards but one in this post are A2 top folding cards. The one here on the right side is a bit taller because I absolutely wanted to use this beautiful sentiment in the middle (the sentiment is from the gorgeous Build-A-Flower: Ranunculus stamp set) and also didn't want to crop more off the wheels. 


I grabbed a few shades of pinks, aquas and blues and did a bit of paper piecing. This takes time but I always love the result! There's an extra big circle die in this set, so you can die cut the wheel two ways: directly in the panel like I did on the left card, or if you use the extra circle, you will have the color wheel completely cut out. Now I'm thinking I could have made circle cards too!


I stamped the sentiment in black Versafine ink so it's nice crisp. I just felt I was missing something. I went through my enamel dots stash and pulled out all colors I thought would fit. And then totally went overboard...I can't help it... I finished off both cards by adding some gold paint splatters.


On my next cards I used the the Dainty Blooms cover die. Honestly, I am always only planning to make one card...Here, that was the one in the middle. But then I hate throwing anything away! I'm sure a lot of you can relate to this. Especially with paper piecing, if I want to use more colors, I have to die cut the whole panel several times and I have a bunch of perfectly good die cut panels...However, since piecing back all pieces takes a long time, I tried to use the rest in different ways.


On the left card I just stacked up two die cut panels and attached them to a white card base. Easy peasy. I then gold heat embossed the sentiment (from the Folksy Florals stamp set) on vellum so I didn't cover up the die cut background so much. For a little something something I added some ribbon and a button.

Sentiment on the card in the middle is again from the Build-A-Flower: Ranunculus stamp set.

For my last card I trimmed off the top part of the die cut panel, adhered it to a white card base, did some paper piecing, stamped my sentiment (from the Folksy Florals stamp set) and added a twine bow at the top. Oh and some gold ink splatter on all 3 cards! Because after two years of searching I found 2 bottles of my fave gold ink (in Malaysia for all places!) and now I don't have to be so stingy with it anymore hehe!


And now the fun part...Giveaways, yay! Read on to find out how you can win! Good Luck!

Prizes: 
1. To celebrate this release, Altenew is giving away a $50 gift certificate to 6 lucky winners! Please leave a comment on the Altenew Card blog and/or Altenew Scrapbook blog by 06/24/2019 for a chance to win. 

2. Altenew will also draw a winner to receive a $15 gift certificate from comments on each designer's blog in the blog hop list.

All winners will be announced on the Altenew blogs on 06/27/2019!

That's it for today guys! I apologize if this post is full of mistakes, I'm writing it after just 2 hours of sleep... You know the feeling when you wake up in horror to remember that today is blog hop day and you haven't written your post. No? Me neither, it's a first lol! Alright, back to bed!

Thanks so much for stopping by today! I hope I could inspire you in some small way!

Have an awesome day!

X

Blog Hop list:

Friday, June 14, 2019

Rainbow card trio - DT project for Pinkfresh Studio

Hello friends,

I'm stopping by today to share my latest creations for the Pinkfresh Studio Card Design Team. 

I didn't have time to play with the super cool Abstract Builder stamp set before so I thought I'd go with this set and create a few different backgrounds. I love the sample designs on the back of the packaging so it was hard to not do them! They are however simple and clean designs and every time I go for that I don't like my cards. Why is it that I love other people's CAS cards, but when I make them myself I feel like they are unfinished? I don't get it. Having said that, the cards I'm sharing today are super simple, mostly one layer cards - but with less white space.

I went with rainbow colors, because well, I love it colorful! All 3 cards are A2 size top folding cards.


I stamped the big black frame first, then created a mask for it - which was completely unnecessary because I ended up stamping it again so I could add foam adhesive behind it to pop it up. I never do think ahead (when it comes to crafting), what can I say :D. Anyway, with the mask on, using the small, straight brushstroke stamp, I created colorful stripes. These stamps are so forgiving, you really don't need to measure anything. It doesn't have to be perfect! Once done, I stamped the second frame, then stamped and heat embossed one of the sentiments from the You've Got This stamp set. This is the second time I forgot that my embossing powder was translucent so it doesn't show up on the black frame ugh! It doesn't bother me though. To finish off this card I tied a twine bow at the top and added jewels from the Essentials: Jewels Mix box. It's a good thing those jewels come in a rainbow of colors, ha!


On my next card I used the 4 curved brushstroke stamps to create a circular design - I just started in the middle and followed the same order of colors as on my first card, alternating between the four stamps. Once done, I stamped and heat embossed my sentiment (same stamp set as before) in the middle, added some black splatters for accent (also part of the Abstract Builder stamp set!) and a twine bow. First I didn't like how this turned out but now it's my favorite of the 3 haha!


On my last card I created a black frame in the middle - this is the same L shape stamped twice to form a rectangle, if that makes sense. I created a mask for this frame too, then started stamping at the top. I used less colors since the leaf images are quite large. I went from lightest to darkest colors, from top to bottom, again. I finished off this card with some jewels and twine.


That's it! I hope you feel inspired to give the Abstract Builder stamp set a go! There's so many options to build backgrounds, or if you like more white space, create some focal designs. I love this set!

Thank you so much for stopping by today! Have a wonderful day!

X

Take Me Away - DT layout for Paige Evans

Hello there crafty friends,

I'm back today with a new layout I've made for the Paige Evans Design Team!

A while back I was working on some cards for Spellbinders (you can check the blog post here) for some of which I used Paige's older collections and all of a sudden I felt the urge to use one of those for my new layout. I chose Take Me Away because it's what I used least in the past. At the time it came out I still refused to use flowers and feminine colors on my boy layouts so I didn't buy a whole lot of the collection. It's a shame really because it is gorgeous!

Now that I use whatever I want/like on my layouts, I totally could have gone with flowers, right?! Then what do I do? I pick a cut file that is not all that feminine nor does it have anything to do with flowers hahaha! The most photos we have are from our travels and now that I don't make a lot of layouts I wanted to make sure I scrap those photos first. So I guess give me all the travel themed collections, ha! 

Anywhooo...The cut file I chose is called Signage Post (Design ID: 293593), I thought it would be perfect for a travel layout. I totally love road signs, no idea why, is that weird?!


I backed the cut file with different patterned papers: I started with yellow tones at the top then pinks and purples going down. For the pole itself I chose a stunning deep blue floral paper.


I added some tissue paper, tags and die cut frames behind my photo and glued it all down around the middle of my page. I placed the cut file on foam adhesive and attached it to my background, slightly overlapping my photo. I selected some embellies which I added on top of the signs: chipboard and wood veneer arrows. I also glued a wood veneer geo tag on my photo! These pieces are so cute!


Lastly, I added my title, journaling and date. The title is from the Foam Phrase Thickers pack. I think now I only have 2 words left (and I had 2 packs) which is so sad because it's one of my favorite! The font is perfection, the words/phrases are versatile and there is a sheet of gold words as well as the most amazing pearl white I ever did see! I truly don't have anything else in that color and it literally fits everything. So sad :(.


That's it for today! I hope I could inspire you to dig into some of your older stash and create something lovely! I for one love working with older collections!

Thank you so much for stopping by today!

Have a wonderful day!

X


Wednesday, June 12, 2019

Altenew June 2019 Stamp/Die/Stencil Release Blog Hop + Giveaway


Hello crafty friends,

I'm so excited to be joining the Altenew June 2019 release blog hop today! You should have arrived here from Sveta Fotinia's blog. You can also find the full blog hop list at the end of this post in case you're lost.

There are so many beautiful stamps and dies in this month's release again!

I've created quite a few cards to showcase these gorgeous products. Hope you'll like them! I won't be doing step by steps BUT if you want to know any details on how I made something or what products I used (other than stamps and dies which I will be linking in this post), please just ask away. I'm always happy to help!

On my first cards I've used the lovely Peaceful Reverie stamp and die set (bundle also available here) as well as the Sentiment Strips stamp set.


On my next cards, besides the Peaceful Reverie set, I've also used a few others: the super awesome Pattern Power stamp set, with which you can build wonderful abstract patterns, so cool! Then the beautiful Frilly Frame die and the Welcome Home stamp set (coordinating dies and stamp and die bundle also available!)


One more duo with the Peaceful Reverie set! This time I went with black stamping, which I think fits perfectly with the style of this set. Another set I've used here was the One Friend stamp set for my sentiment on the left card! I love sentiments with mixed fonts!


On my next duo I've used up a panel I stamped together with the other ones above (hence the same colors), using the Pattern Power stamp set. I also used the Frilly Frame die and an older die set, still one of my favorites: the Bold Alphabet die set.


Next, I created a couple of stamped panels with the Pattern Power stamp set and made this card trio with them. I also used some older sets: Folksy Florals stamp set and the Mega Alphabet H die


My last card duo with this release is using the Welcome Home stamp set, Welcome Home die setthe Frilly Frame die and the Sentiment Strips stamp set.


And now the fun part...Giveaways, yay! Read on to find out how you can win! Good Luck!

Prizes: 
1. To celebrate this release, Altenew is giving away a $50 gift certificate to 6 lucky winners! Please leave a comment on the Altenew Card blog and/or Altenew Scrapbook blog by 06/18/2019 for a chance to win. 

2. Altenew will also draw a winner to receive a $20 gift certificate from comments on each designer's blog in the blog hop list.

All winners will be announced on the Altenew blogs on 06/22/2019!

Thanks so much for stopping by today! I hope I could inspire you in some small way!

Have an awesome day!

X

Blog Hop list: