Monday, June 25, 2018

Catherine Pooler + WOW! Embossing Powder Blog Hop


Hi there crafty friends,

Welcome to a very special Blog Hop collaboration with WOW! Embossing Powder and Catherine Pooler Designs. You should have arrived here from the wonderful Tracie Pond's blog!

I am so excited to be joining all the talented design team members on both teams to bring you a fun blog hop full of love, hope and travel! We will be using Catherine's "Love Is in the Air" Stamp of Approval Kit. And most importantly Catherine Pooler's new ink collection!

You are in for a treat I promise! The most fun part of a blog hop is meeting, sharing and inspiring one another in this beautiful crafting community.

I'm sure you'll find lots of inspiration along the way too!

Without further ado, here are the cards I've made!

For these two I mostly used the Love is in the Air die set. I love working with patterned paper and dies! The paper collection I picked for these cards is an old Basic Grey one, Tea Garden.


For this card I die cut a bunch of hot air balloons from various patterned papers, then glued them down on the A2 size top folding card base. I added pop dots behind a few of them because I love dimension. I also popped up the baskets. I embossed my sentiment, XOXO, with black regular WOW embossing powder. I also fussy cut a few flowers from one of the patterned papers and decorated some of the balloons with those.


For my next card I die cut 3 balloons from white card stock and stamped/embossed my sentiment on these. Again, I used WOW regular black embossing powder. Then I die cut a whole lot of teeny banner pieces from a variety of patterned papers and created some banners in the background. I also added some twine to them to make them look even more like banners.


I added foam adhesive behind the balloons and glued them on top of the banners.


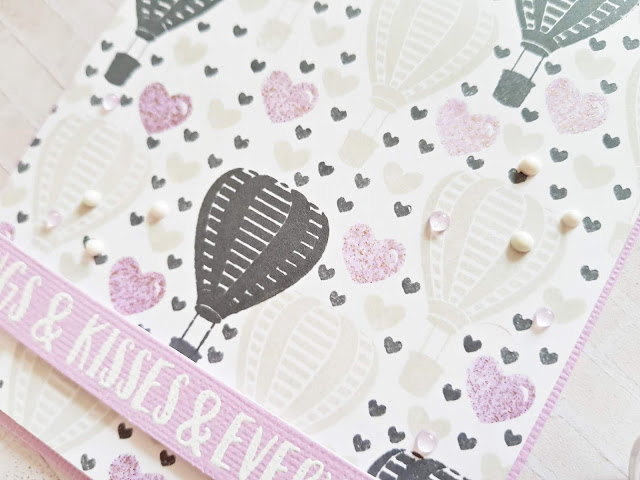
My last card I mostly stamped, using the Love is in the Air stamp set. First I stamped the balloon on the background, then I filled the empty spots with smaller images. The bigger hearts I embossed with Mulberry Mist embossing glitter.


The Catherine Pooler inks are pretty amazing! The images are so crisp! Totally in love! Here I only used one of them though, Black Jack (the darker one on my card). I'm sure I'll be using the bright colors I received in the future!


Now for the fun part! What would be a blog hop without prizes, am I right?
  • WOW is giving away 6 powders of your choosing and a carry bag that you can store them in!
  • Catherine Pooler is giving away her new ink pads (8Pcs, Full of Life Party collection)
The only thing you need to do to be eligible to win is leave a comment on each participating member's blog hop post. The winners will be chosen at random from the comments left on ALL post, by EST Sunday July 1 and will be announced on the blog week of July 2. Good luck! X

Your next stop is the super talented Olga Lukaseviciene!

Here's the full line-up for your convenience:
Zsoka Marko ------------ >>> YOU ARE HERE!

Saturday, June 23, 2018

Card Inspirations - DT project for Paige Evans + Silhouette

Hey there,

I'm stopping by to share couple of cards I've created for the Paige Evans + Silhouette Design Team!
Now, I'm rarely in the mood to do mixed media but I felt like that's the only thing I didn't do on cards on this DT! So I thought I'd do something different now!

I chose two cut files to work with, the Butterfly Background (Design ID: 254134) and the Cross Stitch Heart (Design ID: 242188). 

I created two 5x5" squares in Silhouette Studio so I knew how big my designs should be. Then I cut both of them from white card stock.


Now if I'm honest, it would have been simpler to use a pencil and the sketch function of the Cameo, but I have no idea where my pencil holder is...so I went this way. I used the white card stock cut out as a stencil and simply drew in the butterflies with a pencil. Next, I painted the butterflies with the gorgeous new Pinkfresh Studio liquid water colors. I tried to match the colors to the Turn the Page collection.


Once done, I added a light grey water color wash around the butterflies for contrast as well as some black dots. I created a 5.25x5.25" top folding card base, attached a pink patterned paper in the same size, then glued my water color panel on top. 


To finish off this card, I added a few butterflies I fussy cut from one of the patterned papers in the collection and a sentiment I cut out from a die cut piece.


Oh, there was another reason why I decided to go with mixed media! I just remembered now ha! I bought some storage for my wall and rearranged my RASKOG, which had most of my paints and mixed media supplies in it. While reorganising everything I started feeling guilty for having sooo much stuff I don't use...Hence, mixed media projects ha! 

For my second card I chose Shimmerz Dazzlerz to use with my stencil. I love this color and I had the same in Texturez which I had to throw away because it completely dried out. I was happy this one was still OK! I found a patterned paper in the Turn the Page collection that was pretty much the same color, so I decided to go for a tone on tone look.


Again, I made a 5.25x5.25" top folding card base, adhered a slightly smaller light pink patterned paper on top, then added my mint panel. 


I created two clusters of flowers for which I used some die cut pieces as well as some I fussy cut from one of the floral patterned papers. I glued them down in layers, adding foam adhesive here and there to create dimension. For my sentiment I took apart one of the paper clips...And used the sentiment from that.


That's it! I hope I could inspire you to not shy away from mixed media on cards!

Thanks for stopping by today!

Have a wonderful day!

X

SUPPLIES: 
Turn the Page collection: Paper 1, Paper 8Paper 15, Paper 16Pennant Paper Clips, Ephemera pack


Thursday, June 21, 2018

Adventure - Saying Goodbye to the Just Nick Design Team

Hey there crafty friends,

Today's post is bittersweet for me. I am posting my last layout for the Just Nick Design Team...The year went by so fast, I can't believe it. I guess it's true that the older we get, the faster time flies by. It's been a pleasure to be on this team and I want to thank Nicole for having me! I'm sure our paths will cross somewhere sometime! THANK YOU!

For today's layout I chose the wonderful Compressed Chevron cut file. I'm not sure if I've used this one before to be honest, but I don't think so.


I also looked for a collection that I haven't used in ages, Shimelle's Little by Little. This is my most favorite collection from her to date and I barely used it so it was time!


When I took out the collection, I found this photo and all the fussy cut hearts - then I remembered I was planning to make this layout last year but had no time to finish it, then I completely forgot about it. Well I'm happy it's finally finished!

I took a photo where I have not cropped off the top of the layout so you can see how the balloons hang off the page!


Another funny thing is, there actually is a beautiful chevron patterned paper in the collection! Had I known, I would have sized the cut file in a way the patterned paper fits! Would have been a lot quicker! Instead, I backed the chevrons with different patterned papers, going from yellows through pinks and greens to navy.


I adhered the cut file to the background paper as well as the photo on it. I then started arranging the hearts above the photo and once I was happy with how they looked, I glued them down, then machine stitched over them.


I went through my embellishment stash and pulled out a few that fit the colors of my layout, stickers, puffy stickers, buttons, flair button, clips and more.


Last but not least I added my title, a short journaling and date! Done!


I hope you like this layout as much as I do! This photo makes me smile, balloons and colors make me smile...

Thanks for stopping by today! Have a wonderful day!

X


Wednesday, June 20, 2018

In the spotlight: the Painted Rose bundle by Concord and 9th

Hi there friends,

Lately I haven't had much time to create anything with the stamp and die sets I keep buying, which makes me feel incredibly guilty! So I snuck in a little bit of time and started with the awesome Painted Rose stamp and die set (you can also buy them as a bundle here)from Concord and 9th.

Lately I haven't been enjoying coloring very much, which is a shame considering my boyfriend bought me the big set of Faber Castell Polychromos pencils and I also bought loads of different watercolors over the years...I feel bad about it but hopefully one day I'll enjoy it again. Why I mention this you ask? Because this stamp set is perfect for those like me, who don't want to spend hours on coloring! Sure, you can color the image if that's what you like, but if not, you also have the option to fill it in with stamps. Easy peasy! I had to try a few colorways!


I diecut the white card fronts with the Confetti Card dies, then just stamped the image, added some twine, enamel dots, a sentiment and pretty much done!

The next ones I stepped up a little bit, in that I made a custom background on the card fronts too.


For both of these backgrounds I've used the Sketched Stripes background stamp. On the black background I used Versamark ink and white WOW embossing powder, and only stamped the background once.


On my other card I just used two colors of ink and stamped both horizontally and vertically too.


The Thinking of You die is part of the Painted Rose die set! It's so delicate and pretty! What do you think? Do you like this set as much as I do?! I love the fact that you can create nice cards quite quickly.

That's it! I hope you feel inspired to get your stamps and dies out and make some cards!

Have a lovely day!

X

Friday, June 15, 2018

Spellbinders Special Moments Collection by Marisa Job - Part 3

Hello crafty friends,

I'm back with you to share my third and final post showcasing the wonderful Special Moments collection by Marisa Job for Spellbinders. If you've missed my previous two posts, you can find them here and here.

Today I'm sharing 3 cards I've made with this collection. As before, I started out by making A2 size  top folding card bases. 

One of my favourites in this collection must be the super duper gorgeous Shapeabilities Laced Flowers Etched Dies . For my first card I die cut these flowers from a purple patterned paper, layered them up using foam adhesive to create just one big, dimensional flower. I added a pink flower button to the middle.


I adhered a 4.24x5.5" size white card stock to the card base, then cut a few strips of patterned papers and glued them down. I actually did paper weaving in the top left corner but then covered it all up with the flower :). I never plan out my cards, which of course would have saved me some time here, since it was completely useless to do the paper weaving ha! Oh well! Next time! Finally, I added a phrase sticker for my sentiment.


For my next card I die cut 3 flowers with the same die as above, plus another 3 using the Shapeabilities Floral Oval Etched Dies. The shape of these flowers is the same so I thought mixing up these two dies would be a great way to create something different. I layered a bigger and a smaller one adding pop dots in between the layers. I added some Nuvo drops for the middles.


I then took one of the circle dies from the Shapeabilities Special Day Frame Etched Dies set and die cut a sentiment from a 12x12 cut apart paper. I again added a white 4.25x5.5" card stock to the card base and the bottom part I covered with a piece of patterned paper. I adhered the circle on top and glued down the flowers too.


I cut some flamingo patterned paper to cover my card base on my third card. I die cut two circles from different patterned papers using the Shapeabilities Special Day Frame Etched Dies. I also die cut a circular Happy Birthday sentiment, which comes in the Shapeabilities Happy Birthday w/Numbers Etched Dies set. I layered up the circles, adding foam adhesive between the biggest and the middle layer. I just love dimension!


I die cut some more flowers, because...well, flowers make everything better, am I right? To finish off this card, I added a few white enamel dots. That's it!


I've loved working with this collection, it's just super pretty! Anything with flowers and I'm good :). I hope you enjoyed the cards I've created and I could inspire you in one way or the other!

I wish you all a wonderful day!

Zsoka

Spellbinders supplies:
  • S4-943 Shapeabilities Happy Birthday w/Numbers Etched Dies Special Moments Collection by Marisa Job
  • S4-945 Shapeabilities Laced Flowers Etched Dies Special Moments Collection by Marisa Job
  • S5-374 Shapeabilities Special Day Frame Etched Dies Special Moments Collection by Marisa Job
  • S5-378 Shapeabilities Floral Oval Etched Dies Special Moments Collection by Marisa Job
Other supplies:
  • patterned paper, phrase sticker, button - Crate Paper
  • Nuvo drops
  • enamel dots
  • twine
  • white heavy weight card stock for card base
  • diecutting machine
  • trimmer
  • liquid adhesive, double sided adhesive, foam adhesive

Wednesday, June 13, 2018

Spellbinders Special Moments Collection by Marisa Job - Part 2

Hello friends,

Today I'm sharing a bunch of new cards using the wonderful Special Moments Collection by Marisa Job for Spellbinders! If you missed my first blog post featuring some items from this collection, click here!

All 4 of my cards are assembled on an A2 size top folding card base.
For the first one I used a die set I also used on a card in my previous post, the gorgeous Shapeabilities Floral Oval Etched Dies. This time I die cut the crescent shape from textured card stock and the lattice oval from patterned paper. To add more layers of ovals, I also used another set that I seem to use a lot on my cards, the super awesome Nestabilities Fancy Edged Ovals Etched Dies.


I added a 4.25x5.5" piece of patterned paper to my card front, then started adhering down the ovals. I used foam adhesive between two of the layers to create more dimension. I glued down the lattice oval then added the floral piece. There are three little flower dies in this set too, which I used to make Foamiran flowers. A while back I saw a video where Yana made these flowers and I fell in love right away so I was excited to try them! I made a few and because they turned out so teeny, I made a small bouquet from 5 flowers and attached this to my card. For my sentiment I used the LOVE letters from the Shapeabilities Miss You Swirl Etched Dies. I added a few Nuvo drops and done!


Up next is a colorful card! I adhered a 4.25x5.5" piece of patterned paper to my card base. I die cut this gorgeous floral panel from a light mint colored patterned paper, using the Shapeabilities Flower Background Etched Dies. This may very well be my favorite piece in this collection! I simply glued this die cut on top of my striped patterned paper, then die cut 2 ovals using the same die set as mentioned above. 


I added a few chipboard embellishments as well as some Nuvo drops. For the sentiment I used mini alpha stickers. 


Since I love this cover die so much, I die cut another one too from a different patterned paper. Then I backed the flowers with various patterned papers. Once done, I decided to make 2 cards from this one panel. I cut it in half at an angle as well as another piece of patterned paper so they both were cut at the same angle. This patterned paper serves as the other half of the cards. I glued everything down, I added a tiny strip of coral card stock, to bring in a bit more color.


I stamped the sentiments using black Versafine ink. To finish off these cards, I added a little bouquet of Foamiran flowers and some twine.


I hope you liked today's projects and will come back for my final post in 2 days!
Thanks so much for stopping by today!
I wish you all a wonderful day!

X

Spellbinders supplies:
  • S5-376 Shapeabilities Miss You Swirl Etched Dies Special Moments Collection by Marisa Job
  • S5-378 Shapeabilities Floral Oval Etched Dies Special Moments Collection by Marisa Job
  • S5-375 Shapeabilities Flower Background Etched Dies Special Moments Collection by Marisa Job
  • S4-907 Nestabilities Fancy Edged Ovals Etched Dies
Other supplies:
  • patterned paper (first card) - Cocoa Vanilla Studio
  • patterned paper (all other cards), chipboard, mini alpha stickers - Simple Stories
  • Nuvo drops
  • Foamiran
  • twine
  • white heavy weight card stock for card base
  • color card stock - American Crafts
  • diecutting machine
  • trimmer
  • black permanent ink
  • phrase stamp
  • liquid adhesive, double sided adhesive, foam adhesive

Monday, June 11, 2018

You Are 4 - DT layout for Paige Evans + Silhouette

Hi there lovelies,

I'm back today to share a new layout I created for the Paige Evans + Silhouette Design Team!

Paige has sooo many cut files that I get overwhelmed when it comes to picking out one for my next layout haha! There's so many I want to use, but I never find the time! I just can't seem to be able to catch up! Anyway... I love balloons so the Balloons cut file (Design ID: 257768) stood out for me, of course. I decided to go with the gorgeous Fancy Free collection to mix things up a little!


I enlarged the cut file so that it covered most of the page, then cropped it and cut it from textured white card stock. I backed the balloons with various patterned papers, making sure they are all colorful and happy! I then added hand stitching to them, mainly because at the time I was working on it, I was lacking mojo. When I don't feel like creating, I either fussy cut or hand stitch, because it's mindless work but at least I'm doing something!


Once done, I added foam adhesive to the balloons and adhered the cut file to the background paper. To make it a bit more interesting, I placed some buttons, layered stickers, die cuts and chipboards here and there. 


Next, I layered some tissue paper and tags behind my photo and glued it all down. I tucked in a few embellies as well and attached a chipboard piece and a sticker to the photo. 


Here's the thing. I had (and still have) so much of the Fancy Free collection, multiples of everything, like 6 packs of embellies etc. Serious FOMO! BUT, I've never been able to put my hands on the alpha thickers. This was the time when AC moved warehouses and there were huge delays in delivery and many items never made it to Europe. So long story short, I had to go with other thickers. :) I found the alphas from the Take Me Away collection quite fitting! I made sure I picked a mix of colors so the layout is more fun! I added my journaling and date, done!


I hope these happy colors bring a smile on your faces today!

Thanks for stopping by!

Till next time X

SUPPLIES: 
Fancy Free collection: Patterned papers, buttons, chipboards, die cuts, tags, layered stickers 
Take Me Away collection: alpha thickers


Spellbinders Special Moments Collection by Marisa Job - Part 1

Hello crafty friends,

I'm back today with another 3-part blog series for Spellbinders. This time I am showcasing the lovely Special Moments collection from Marisa Job! I love flowers of any kind so this line was super easy to work with!

Today I am showing you 3 cards I've made. I created an A2 top folding card base from heavy weight white card stock for all of these cards.


For my first card I cut a 5.5x4.25" piece of ombre striped patterned paper. I worked with the gorgeous Shapeabilities Floral Oval Etched Dies and die cut a bunch of flowers from two different shades of  coral textured card stock. I layered up some, others I just left as a single layer. I also die cut the floral crescent shape from patterned paper. 


I then glued this shape on the card front, added the flowers and stamped a part of the sentiment. For the other half of my sentiment I chose a phrase from a cut apart sheet from Elle's Studio. To finish off this card I added Nuvo drops in two colors, the darker at the bottom where the paper is darker too, and the lighter at the top.


On my next card I adhered a white panel to my card base. I did this because the heavy weight card stock I use is a greyish kind of white that I don't like. The panel is Neenah Solar white 80lbs card stock. Unfortunately we don't have the heavier weight where I live and the 80lbs one is not sturdy enough for the cards I usually create. Anyhow... I used the Shapeabilities Miss You Swirl Etched Dies  to die cut a floral swirly circle from patterned paper and a smaller circle from light coral card stock. 


I backed the swirly circle with dark coral card stock. Then I added foam adhesive behind the smaller circle and adhered it onto the larger circle. For my sentiment I selected a puffy sticker. I added some Nuvo drops and done!


On my final card I went with the pretty Shapeabilities Floral Lace Border Etched Dies. I love this lace border! Again, I added a white panel to my card base. Then I die cut the lace border several times from patterned paper - this is a 12x12 paper with rainbow stripes and the size was perfect for this border die! 


I started gluing down the borders at the bottom and moved up. Once I knew how much space I have left, I cut a piece of floral patterned paper for the top. I also added a thin strip of striped patterned paper. I kept embellishing to a minimum because the background was already busy and I really wanted that to be the focus. I built up my sentiment using wood veneer heart and a phrase strip from a cut apart sheet, so basically it says "Love you to the moon and back". I placed a purple puffy sticker heart next to the wood veneer heart and I called it done.


That's it for today! I hope you enjoyed these cards and will come back for more in two days!

Thank you so much for stopping by! Have a lovely day!

Zsoka

Spellbinders supplies:
  • S5-376 Shapeabilities Miss You Swirl Etched Dies Special Moments Collection by Marisa Job
  • S5-378 Shapeabilities Floral Oval Etched Dies Special Moments Collection by Marisa Job
  • S4-944 Shapeabilities Floral Lace Border Etched Dies Special Moments Collection by Marisa Job

Other supplies:

  • patterned paper, puffy stickers, wood veneer, cut apart sheet - Elle's Studio
  • Nuvo drops
  • white heavy weight card stock for card base
  • color card stock - American Crafts
  • diecutting machine
  • trimmer
  • black permanent ink
  • phrase stamp
  • liquid adhesive, double sided adhesive, foam adhesive