Friday, December 17, 2021

Home Sweet Home - DT Layout for Paige Evans

Hi there lovelies,

Stopping by today to share a new layout with you that I've created for the Paige Evans Design Team, using the lovely Bungalow Lane and Wonders collections.

You can achieve so many different looks with Paige's collections, because they are always so full of color and you can put together so many different color combos from feminine to masculine, there's something for everyone!


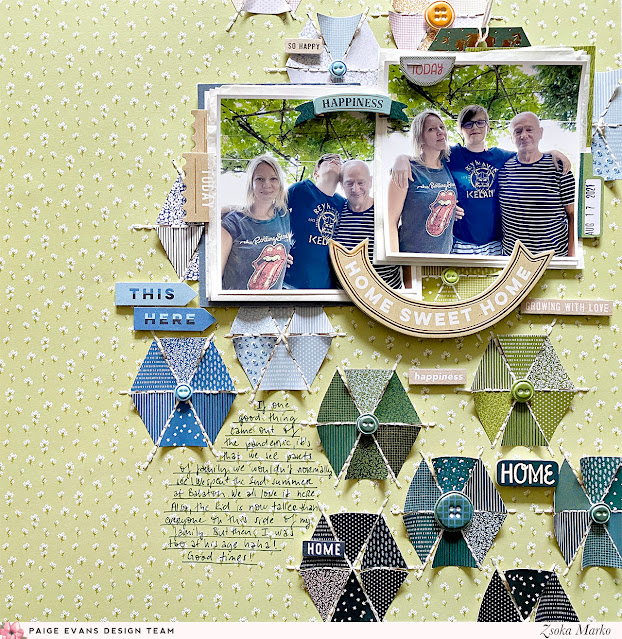
I knew which photos I wanted to scrap, I knew that I wanted to use one of Paige's stitching cut files, but I had no idea which papers I wanted to use! So I printed my photos and I was trying to figure out what background to use. As I was going through the papers, I realized that Paper 3 was a pretty perfect match for the colors in my photo. But of course I could forget about stitching cut files if I were to use it. The dilemma!

Looking at the paper, all I saw was hexagons (even though it's triangles). Since I love hexa layouts, I decided to go with that idea. I cut the paper in strips, then into little triangles. I sorted them by color, then created various hexagons to see what they would look like.


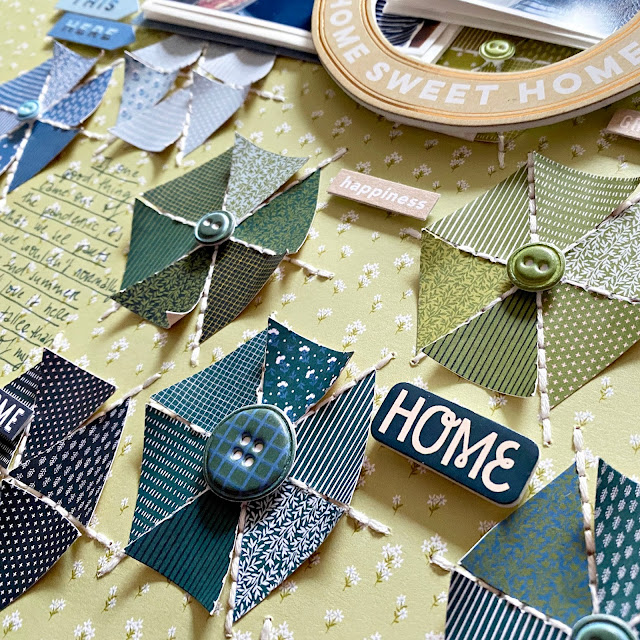
Unfortunately I already used up all the papers I wanted to use for background (Paper 7) so I had to look for something else. Eventually I decided on a green paper from the previous, Wonders collection, Paper 14

I arranged my hexagons and once I was happy with their placement, I started gluing them down. I only added a teeny bit of glue in the middle of each triangle because I was planning to bend up the sides for some dimension and interest. I also left a bit of space in between each triangle so I could add some hand stitching without stitching over the shapes, or I wouldn't have been able to bend up their sides.


So I eventually ended up with some hand stitching, only I didn't use any cut files. Maybe next time! 

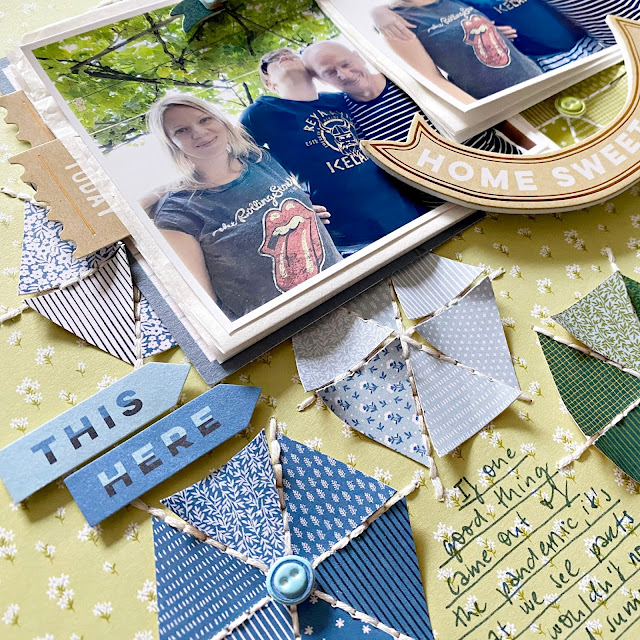
I added some tissue paper behind my photos, as well as some pieces of ephemera, then adhered them to the background. I pulled out a variety of embellishments that I thought would go well with my chosen colors; cardstock stickers, foam stickers, layered banner stickers and puffy stickers. I added little puffy sticker buttons to some of the hexagons. Not all, because I didn't have enough buttons, ha! 

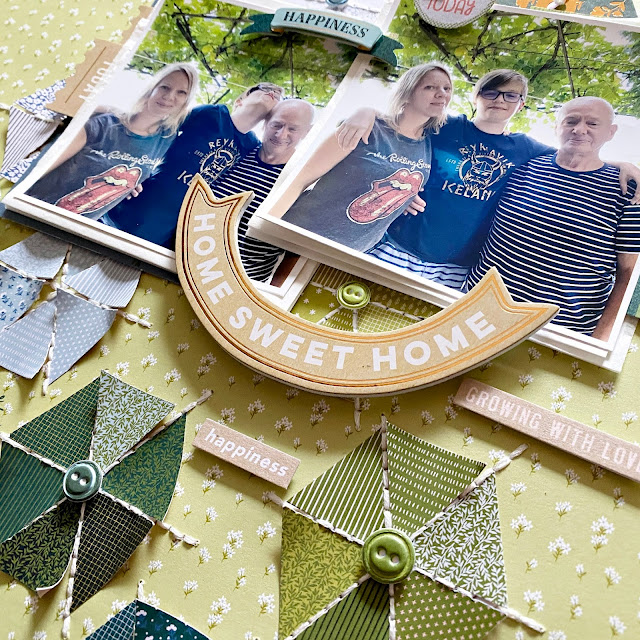
For my title I used a foam sticker, saying Home Sweet Home. These pictures were taken at my late grandparents' vineyard at Lake Balaton, Hungary, this summer. I spent all my childhood summers here, with my grandparents, aunt and uncle and my cousins. I absolutely loved it. I haven't visited much as an adult, mainly because I've been living in Germany and when we go home to visit my parents, it's usually winter and no one goes to the vineyard then. We normally go on summer vacation elsewhere. However, with covid, we haven't been travelling and instead we went home to visit family the past two summers. My boyfriend (or I guess at my age I probably should start calling him my partner haha!) had never been to Lake Balaton in the summer before last year and he absolutely loved it. The vineyard is on the hill so it has the most amazing views on the lake. Plus my uncle is pretty fun, there's lots of wine, good food, so you know, it was easy for him to fall in love with the place. Me, I get super nostalgic, I get tears in my eyes looking at the lake, remembering my beloved grandparents. I miss them so much.

Long story short - this is why Home Sweet Home was the perfect title for this page!

Oh and another story while I'm at it! The reason this picture was actually taken, was to prove to my uncle that my 13-year-old kid had outgrown all of them :D Granted, it was unavoidable, I mean, at his age I was also already taller than this side of my family haha!

Gosh, sorry for the long post, like I said...nostalgia!


Back to the layout! I used foam tape to adhere all my stickers, my title as well. To finish it off, I stamped my date on a tab sticker from the sticker book and tucked it under one of my photos. Then I wrote my journaling using a navy fine tip pen. Done and done!

I hope I could inspire you to look at your patterned papers differently!
Thank you so much for stopping by!
Have a great day!

X

Wednesday, December 1, 2021

In the spotlight: Spellbinders Small and Large Die of the Month kits - December 2021

Hi there friends,

It's that time again! The Spellbinders December Club Kits are here!

I will not go into step by step tutorials here, since I made process videos for all of today's projects - I'll just attach some photos! I'll link the videos down below, after each set of cards. You can also subscribe to my YouTube Channel and press the bell icon so you never miss a new video! You'll find all the supplies I've used linked in the description boxes of the videos.

As a reminder, Spellbinders have several monthly kits, which are really great! You can subscribe to:

You can find all necessary information about these kits here.  

First up some cards with the Large Die Kit!


Here's the process video, if you're interested:


Next up, my cards with the Small Die Kit!


And the process video:


That's it for today guys! I hope I could inspire you in some small way!

Thank you so much for stopping by! Have a wonderful day!

X

Friday, November 26, 2021

Oh What a Day! - DT Layout for Paige Evans

Hello there crafty friends,

I have a new layout to share with you today, that I've created for the Paige Evans Design Team! I've worked with the beautiful Bungalow Lane collection on this page.


Now that it gets dark so early, I seem to like to sit down with Netflix/Prime and just stitch away more than any other time of the year. So I was in need of a stitching project! Now you must be asking yourselves "Huh? What is she talking about? There is no hand stitching anywhere on this project!" True, ha! BUT that's the idea I had for this page! So I was browsing through Paige's cut files and I soon decided to go with some simple butterflies that are easy to stitch. My idea was to add an offset to the cut file in Silhouette Studio and then stitch that, then add some patterned paper butterflies inside. But by the time I finished cutting my butterflies it got so late, I didn't want to stitch anymore hahaha! Oh dear. I did stitch on my next layout though, not a whole lot, but it's something :D


Anyway, the cut file I chose for this page is the Butterfly Cluster (Design ID: 252982). I wanted to cut some from the gorgeous foiled acetate sheet and add them as the top layer to every butterfly. I haven't cut acetate with my Cameo in years but I did remember I had used the highest blade setting (10) for it before. So that's what I did now too with double pass...Didn't work. I sent the mat back several times after seeing they didn't cut through, and without me noticing, every time the blade just cut in a slightly different position. Maybe it's to do with the material because this has never happened to me before. Anyway, I started over, and this time I changed the settings to SIX passes, just to be sure. Welllll...I could kind of pop them out but it wasn't easy. I have an old Cameo 2, so maybe the newer versions work better!

There are three butterflies in the ephemera pack so I wanted to use those too. All 3 colors are in the acetate sheet so it was perfect! I went through the papers and selected a few that matched those colors. The dark petrol color is not in the patterned papers, at least not on a big enough surface to cut butterflies from. So basically I went with pinks and yellows. I chose the less busy ones, because I was going to add the acetate on top which is busy enough. I ungrouped the cut file and rearranged the butterflies. I knew I wanted to use two bigger ones for my photos, the rest I cut from patterned papers.


I then layered them up (3 paper layers plus 1 acetate), glued the paper layers together, but only in the middle. I glued them in place on my layout, my photos as well. By the way, the photos I just fussy cut out using the die cut butterflies as templates. Then I added the acetate, one butterfly at a time, and stitched everything down. 


Next, I added my title using the alpha thickers. I also placed some phrase stickers and little heart foam stickers here and there, to add interest to my page. To finish it off, I added my journaling and stamped my date on a tab sticker. I'm obsessed with these by the way. I wouldn't mind if there was a full pack of them in every collection haha!


That's it for today! I hope I could inspire you in some small way! 
Thank you so much for stopping by!
Have a wonderful day!

X

SUPPLY LIST:

Friday, November 12, 2021

Wonderful Quiet Moments - DT Layout for Paige Evans

Hey there lovelies,

I'm checking in today, to share a new layout with you that I've created for the Paige Evans Design Team. I've used the lovely Bungalow Lane collection on this page!

I went with a super quick and simple design. Sometimes I wonder what happened to me. I used to make such time consuming pages and I loved every minute of the process. Nowadays I seem to go for simpler things. It's also true for my lifestyle if I'm being honest. I live a simpler life these days. I think I'm getting old haha! Anyway, back to the layout!

You know how there's always a whole pack of die cut flowers in Paige's collections? My main focus was this pack today. I wanted to just use all the flowers!


I started out by shaping each flower, bending up the sides with my fingers basically. Some of them I layered up - I added foam tape in between the two layers to create dimension. I arranged them on my background paper and decided on where I wanted to place my photo.


I then started to glue them down. Some of the flowers I cut in half so I could add the same colors in multiple places, where the whole flower wasn't visible anyway, like around the photo or at the sides of the page. I layered some tissue paper behind my photo and adhered it all to the background.


I then looked through the embellishments and selected a few items I thought would work with my design. I pulled out lots of buttons from various packs; chipboard stickers and puffy stickers to be exact. I placed one in the middle of each of my flowers. Well, most of them anyway. I skipped the ones that were not visible, obviously.

Then I added a few foam sticker sentiments. You probably have noticed, that this is my most favorite thing to do hehe! For my title I used a chipboard and a foam sticker. I stamped my date on a label sticker (another favorite!). Now that I'm looking at the layout, I entirely forgot about journaling. Or maybe I thought it wasn't needed because I would anyway remember the story. Well...Like that's going to happen! I should know better by now. I think I'll need to write something on the back of the page! Has this ever happened to you? It's certainly not my first time :D.


To finish off my page, I added some white acrylic paint splatters. I intended to only add a few in two areas, but I never know when to stop and then I always end up with more than I wanted. Oh well! It's just paper right?!

Okay, that's it for today! I hope you like how this layout turned out!

Thank you so much for stopping by! Have a beautiful day!

X


Tuesday, November 9, 2021

In Focus: Spellbinders Fluted Classics Collection by Becca Feeken

Hi there friends,

Today I have some cards to share with you that I've created with a brand new Spellbinders collection: Fluted Classics by Becca Feeken. There are 5 die sets in this collection:

However, I've only used the first three sets on today's projects!

I also used a few additional die sets:

I have a process video for you at the end of this post, so I'll just leave you with photos here. If you're interested in how these came together, what supplies I've used, please stop by my You Tube channel! All supplies are linked in the description box below the video.  


Here's the process video:


That's it for today guys! I hope I could inspire you in some small way!

Thank you so much for stopping by!
Have great day!

X