Thursday, August 27, 2020

Endless Summer - DT layout for Paige Evans

Hello crafty friends,

I'm stopping by today to share a new layout with you that I've created for the Paige Evans Design Team! 

As you know, Paige's new collection, Go the Scenic Route, was released recently, so I'll be using this wonderful new collection! It's perfect because we just got back from holiday, so I have a million new travel themed (and other) photos!


When I saw this orange/pink paper, I immediately thought of the sunsets at the beach that we often had to go see because they were just too beautiful. Unfortunately, my Selphy doesn't print vivid colors (like not even close to the real colors) but I think this photo still fits that background paper just fine. I generally stay away from scrapping photos like this because normally I don't find collections/papers that go well with them. I'm glad it worked out this time!


I cut the Endless Summer cut file (Design ID: 327560) from white card stock, then backed the waves with different blue tones of a single paper, plus I added a dark blue patterned paper at the bottom, behind the letters. I backed the sun with an orange patterned paper but didn't back the rays because I wanted the background to shine through.


I then fussy cut out all the letters from a variety of pink/red patterned papers, glued them on the white fall out pieces from the original cut file to make them hold up better and added them back into place using foam adhesive.

I chose a few embellies to decorate my page: chipboards and die cuts. Aaaaaaand something super cool! My friend Sandra posted a few buttons on Instagram that she made with the new We R Memory Keepers Button Press that I'm dying to have - and one of them was using Paige's paper from this collection. So, I asked her if I could have some of those buttons and in 2 days they were in my mailbox wooohooo. At that point I had several layouts ready, so I checked which one I could use the button for. I thought the middle of this large chipboard flower was the perfect spot for it :)


I wrote my journaling using a white gel pen, then I splattered some white acrylic paint all over my page (obviously covering my photo with a tissue paper). 


It's a very simple page but I think the stunning background paper adds so much to it! What do you guys think?

Thank you so much for stopping by today!

Have an awesome day!

X

SUPPLY LIST:

Tuesday, August 11, 2020

In the spotlight: Spellbinders Christmas Foiled Basics by Yana Smakula

Hello crafty peeps,

I'm stopping by to share a few projects with you with the new Spellbinders Christmas Foiled Basics collection by my uber talented and gorgeous friend, Yana Smakula! Everything this girl creates is magic, and this collection is no different!

I've said it before but I'll say it again: red is not my favorite color hehe! However, from all the Glimmer Hot Foils the Crimson Stars is one of my most favorites - it just has something so elegant about it. Especially for Christmas. 

So I've kept it simple today, red and white - inspired by Nordic design. I wish I could take better photos, that show all that shine better!


I turned on my Glimmer Hot Foil System, waited till it was hot, and foiled everything I wanted in one go - because I don't have enough space for the machine and working on cards at the same time. So generally when I take the machine out, I'll foil a lot of things at once! It takes time, but then next time I want to add some foil to a project, I have some ready to go. Especially sentiments! 


On the first card I've used the Christmas Foliage Circle Border as well as the Holiday Sentiments Series 2 plates (the latter is from the Sparkling Christmas collection, not Yana's). To create a full wreath, I foiled the foliage 3 times and the circle once. I didn't do a great job on the foiling, but to be honest it doesn't bother me - I've let go of perfection a long time ago! :D

For the background I embossed a piece of red card stock with my favorite embossing folder, Love Stripes. I also embossed some white card stock with snowflakes. I then adhered these papers onto my A2 size, top folding card base. I glued together the 3 partial wreaths, and adhered them down with foam adhesive. To finish off this card, I popped on a foiled sentiment and added some twine.


On my second card I've used the Christmas Foliage Background, which is undoubtedly my favorite from this collection! To create a full background, you'll have to foil the same panel twice, you just turn around the plate. I'm not good at foiling, but even I could line this up easily, this panel you see here was my first try! The one thing I've noticed is that I would have needed a shim for the areas in the middle to foil nicer - however I knew I was going to add some circles on top so I didn't redo it. 


I die cut a larger circle from red card stock and a smaller one from white - which I then embossed. I used the Nestabilities Hemstitch Circle Etched Dies Romancing the Swirl Becca Feeken set for the circles.

Again, I finished off the card with a sentiment and some twine.


On my last card I'm featuring the Christmas Foliage Circle Border set again. I adhered the red grid paper to my A2 size, top folding card base, then I added a piece of embossed white card stock on top as well as two thin red strips. 


I added foam adhesive to the circle and attached it to my card panel. I then arranged the poinsettias and leaves the way I liked it, and using liquid and foam adhesive, I glued everything down. Last but not least I tied a twine bow around the card front.


That's it guys! I hope you like this collection as much as I do!

Thanks for stopping buy! Happy crafting!

X

Saturday, August 8, 2020

Rainbow Card Duo - DT project for Paige Evans

Hello there crafters,

I'm back today with a pair of cards I've made for the Paige Evans Design Team!

While I was working on other projects with the Horizon collection, I found this rainbow panel I had die cut from a 6x8" paper ages ago, so I decided to turn it into a card finally. This is how I ended up with a rainbow theme, but also, rainbows are very easy to create with Horizon, since there's papers in every possible color in this collection!


For my first card I die cut the The Struggle Is Real cut file (Design ID: 324925) from white card stock. I sized it to fit a 5.5x4.25" card panel. 


I chose 17 patterned papers in all the colors of the rainbow and die cut the inner pieces with my Cameo too. I also used the white fall-out pieces to make the letters stronger - so I glued the patterned paper letters on top of the white ones. I then added foam adhesive to each to create a dimensional design.


I created my top folding A2 size card base (landscape format), then I adhered a slightly smaller, embossed gray panel on top. I glued down the outlines with liquid glue and adhered the colorful letters too. First I splattered some white acrylic paint but it was barely visible on the light gray card stock, so I decided to add gold splatters too. To finish off this card, I added a chipboard flower and some enamel dots.


For my second card I created another top folding, A2 size card base, then adhered the rainbow panel to it. 


I die cut the Flower Wreath cut file (Design ID: 273818) in a small size and glued it down on my card front. I also added back the white inner pieces of the flowers. I will say, my blade and mat are both old so my Cameo didn't do a fabulous job on the wreath, but I thought it was still acceptable...I didn't dare ordering new mats and blades just before holiday, in case they don't arrive in time. So as a tip, if you want to die cut something more elaborate and delicate in small sizes like this, make sure your blade is relatively new. The mat shouldn't be brand new though, because it will be too sticky and it will be impossible to pull off tiny cut files without tearing them.


For my sentiment I used chipboard alphas, in colors that match the paper beneath. I also added a chipboard flower and some enamel dots.


That's pretty much it, easy peasy! What do you think?

Thank you for stopping by today! Stay safe!

X


Saturday, August 1, 2020

In the spotlight: Spellbinders Small and Large Die of the Month kits - August 2020

Hi there crafty peeps,

It's that time again! The Spellbinders August Club Kits are here! Are you guys excited?! The kits are again really great this month!

As a reminder, Spellbinders have several monthly kits, which are really great! You can subscribe to:
You can find all necessary information about these kits here.

I'll start with the Large Die kit projects! You can build 3D projects with these dies actually, a painter's easel with canvas and lots of little accessories. It's suuuuper cute! You'll find a short step by step pictorial in your kit. 

However, I wanted to make traditional cards, so I did not build the easel - well not completely anyway.


I've used patterned papers from an older Paige Evans collection, Oh My Heart - it's actually my most favorite collection from Paige! I die cut the frame/canvas, some part of the easel (whatever I needed for a "flat" easel) as well as some paintbrushes, paints and painter's palette.


I cut a piece of floral patterned paper and inserted it in my frame, suggesting a floral painting. I assembled the accessories and placed them on the easel - I used foam adhesive for this, to create some dimension.


Last but not least I added a foiled sentiment to my card.


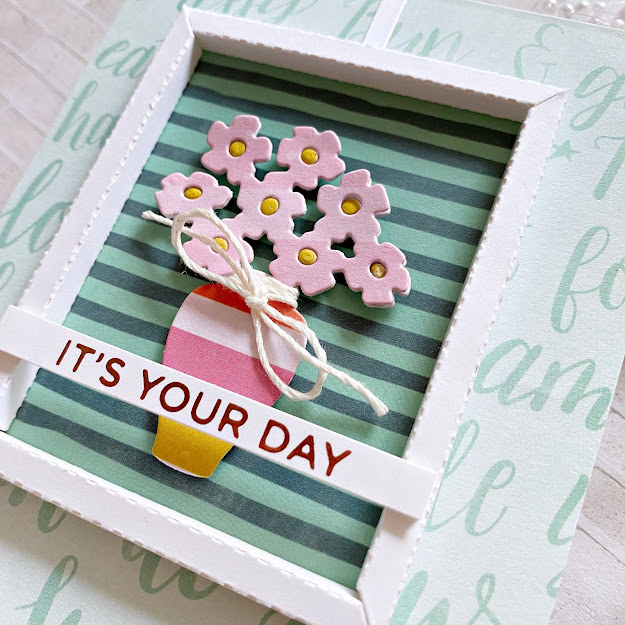
On my second card I didn't create the easel, instead I created a flower vase "painting". 


Same as before, I die cut my frame from white card stock, then I cut a piece of patterned paper and inserted it into the frame for my background. 


I die cut the vase and flowers from patterned paper and heavy weight card stock as well, and glued those layers together. I did this so I had more sturdy elements, I don't like to use foam tape on patterned paper only, because patterned paper is just not strong enough to hold its shape. I wrapped some twine around the vase and adhered everything down. To finish it off, I added a foiled sentiment.


Up next, the Small Die kit! Unfortunately this month I only had time for one card - and this won't feature everything you get in the kit. I only used one of the floral elements and the mini alpha dies to create this card.


I first built my background from paper scraps. Then I die cut all these flowers from white card stock and glued them down.


Next I die cut two oval shapes using the Nestabilities Fancy Edged Oval Etched Dies set (as I'm writing this, the set is actually 40% off!). I die cut the mini letters from various patterned papers to create this sweet, colorful sentiment. I adhered them to the white die cut label, added some foam tape and glued it all down on the patterned paper label which I previously adhered to my background. To finish off this card, I added some twine.


That's it for today guys! I hope I could inspire you in some small way!

Thanks for stopping by! Stay safe!

X