Showing posts with label Exclusive Indie collection. Show all posts

Wednesday, July 11, 2018

Spellbinders Exclusive Indie collection blog hop


Hi friends,

Welcome to this month's Spellbinders blog hop! You should have arrived here from the wonderful Yoonsun's blog! This time we are focusing on the Indie Line - this collection is only available at select online stores and local independent retailers! You can find the list of retailers here. This collection is not available for purchase at the Spellbinders online store!

I've used the Shapeabilities Layered Butterfly etched dies and the Friend Expression and Die set on my cards today.


First I cut out 3 butterflies from a variety of patterned papers, then from white card stock. On the stripey background I pieced them back together with the inlay technique. On the white card I simply layered them up and glued them on a 4.25"x5.50" white card stock.


I then die cut Friend from white and purple papers and glued these on my cards. To finish off these cards I added some jewels and sequins in coordinating colors.


Simple cards but I like the way they turned out, all these colors make me happy! I hope you like them too!

Now for the fun part! Giveaway yay! There's two chances for you to win, here's how:

1. To celebrate this release, Spellbinders is giving away a $50 gift certificate to a lucky winner. Please leave a comment on the Spellbinders blog by Sunday, July 15th 11:59 pm EDT for a chance to win. The winner will be announced in the blog hop post on the Spellbinders blog the following day. Winner is responsible for shipping cost, duties and taxes.

2. You can also win a $25 gift certificate to the Spellbinders shop right here on my blog! To be eligible please leave a comment on this post by Sunday, July 15th 11:59 pm EDT. Easy peasy! I will announce the winner in this blog post shortly after the giveaway closes. The winner is responsible for shipping cost, duties and taxes, if applicable.

***************** UPDATE!*******************
The winner from my post is Cindy Holmes! Please contact me at mzs6666@googlemail.com ASAP! Thank you X
Thank you all for your wonderful feedback, I really appreciate it! X
*********************************************

Your next stop is the amazing Anna Kossakovskaya!

Enjoy hopping! Thanks for stopping by today! XXX

Full blog hop list for your convenience:

Thursday, June 7, 2018

Spellbinders Exclusive Indie Collection - Part 3

Hi there crafty friends,

I'm stopping by today with the third and last blog post in my Exclusive Indie collection inspiration series. If you missed my previous two posts, you can check them here and here.

If you read my other posts you know that I love the layering dies in this collection :). Surprise surprise, I picked layering dies for today's projects as well! I can't help myself!

Here are the two cards I made for this post:


The patterned papers I used are from the Maggie Holmes Chasing Dreams collection. This is still one of my favorites from her to date. I just love the colors!

For my first card I picked the gorgeous Shapeabilities Layered Rose Etched Dies. I die cut two roses, one from pink patterned papers, the other from yellows. For the yellow I also used some textured card stock because I didn't have different patterned papers for 3 layers. I die cut 3 pairs of leaves as well.


I layered them up and glued them together. Note that I only glued each layer down in the middle, never on the sides. I do this because this way I get some dimension. I am not going for a realistic look on my projects to be honest. I love dimension and texture, and this is one way to achieve the look I like. I added some patterned papers to my A2 size top folding card base and started adhering my design elements on the panel. I used foam adhesive for the flowers and tucked the leaves behind them. I placed some yellow enamel dots here and there. I cut apart the "you a happy birthday" sentiment stamp from the Wishing Expressions Stamp and Die Set so that I only had "happy birthday" left because I only wanted to add a thin paper strip to my card. I heat embossed the sentiment on yellow card stock and glued it on the card front. Done!


On my second card I used the lovely Shapeabilities Layered Foliage Etched Dies . I die cut 3 of them from various patterned papers and assembled the layers. I created another A2 size top folding card base (which is what I go for in 98% of the cases) and added some patterned paper strips.


I die cut "Wishing" from the Wishing Expressions Stamp and Die Set 4 times as before, once from patterned paper, 3 times from white card stock. I glued them together to create a nice, dimensional word. Before adhering this to the card front, I stamped the rest of the sentiment directly on the patterned paper using black ink. I then figured out where to place the die cut word and before gluing it down, I adhered the leaves to the card. I only attached the die cut word in the middle, so that the leaves can hide behind it. Surely, one could glue it all down, I just prefer a more dimensional look. I added some black enamel dots and done! Don't enamel dots just look good on pretty much anything?!


I hope you liked this series as much as I loved creating these cards! I also hope you found some inspiration in there somewhere!

Thanks so much for joining me - I may or may not be back soon with another series! Check this space!

Have a wonderful day!

X

Spellbinders supplies:
  • SDS-157 Wishing Expressions Stamp and Die Set - Exclusive
  • S4-921 Shapeabilities Layered Rose Etched Dies
  • S5-361 Shapeabilities Layered Foliage Etched Dies - Exclusive
Other supplies:

  • patterned paper and embellishments - Maggie Holmes
  • enamel dots
  • white heavy weight card stock for card base
  • color card stock - American Crafts
  • diecutting machine
  • trimmer
  • liquid adhesive, double sided adhesive, foam adhesive

Wednesday, June 6, 2018

Spellbinders Exclusive Indie Collection - Part 2

Hello there,

I'm back today with another 3 cards I've created with the beautiful Spellbinders Exclusive Indie collection. If you've missed the first part of this series, you can find it here. Like I mentioned in my previous post, I love layering dies! So I picked another one today, the awesome Shapeabilities Layered Tulip Etched Dies.

Tulips are one of my favorite flowers so I was particularly happy for this die!


I die cut the tulips from yellow patterned paper and yellow card stock, then adhered the layers. I used two different patterned papers for the leaves and stem and this was the point where I decided to go with a black and yellow color scheme. I assembled the flowers.


I adhered a piece of striped paper to my A2 size top folding card base. I fussy cut out some black and white flowers from another patterned paper. I then die cut the word "Wishing" from the Wishing Expressions Stamp and Die Set, once from textured yellow card stock, then 3 times from heavy weight white card stock. I layered these up and glued them together to create a dimensional sentiment. I embossed the rest of the sentiment using white embossing powder. I glued down every piece and added some enamel dots to finish it off.


I created another two cards, for these I used the beautiful Shapeabilities Layered Monarch Etched Dies.


This set contains 3 layers to create a butterfly. However, I only used 2 layers for each of them: the same bottom layer but 2 different top layers. Also, I made 2 butterflies that mirrored each other - for this I had to flip over the die cuts. I generally avoid doing this because my die cuts never look nice on the wrong side. First of all they don't have the beautiful rounded edges and they are also full of impressions from the plate. I gave it a go anyway, and it looks acceptable (the yellow butterfly). However, if you check the black butterfly, it looks much nicer!


I made two A2 size top folding card bases from heavy weight white card stock, then adhered a patterned paper panel on them. From other patterned papers I fussy cut two frames and a bunch of black and white flowers. I added foam adhesive behind the frames and glued them on the card front with the fussy cut flowers tucked behind them.


I then die cut my sentiments using the Hugs Expressions Stamp and Die Set, just like before: I glued together 4 layers of die cuts to create a dimensional sentiment. Last but not least, I added bows and enamel dots, and done!


I hope you like these cards and they inspire you to create something! If you want to see more, I'll be back tomorrow with some new ideas!

Thanks so much for stopping by today, I wish you all a lovely day!

X
Zsoka

Spellbinders supplies:
  • SDS-154 Hugs Expressions Stamp and Die Set - Exclusive
  • SDS-157 Wishing Expressions Stamp and Die Set - Exclusive
  • S4-923 Shapeabilities Layered Tulip Etched Dies - Exclusive
  • S5-360 Shapeabilities Layered Butterfly Etched Dies - Exclusive
Other supplies:
  • patterned paper and embellishments - Maggie Holmes,Pink Paislee
  • enamel dots
  • white heavy weight card stock for card base
  • color card stock - American Crafts
  • diecutting machine
  • trimmer
  • liquid adhesive, double sided adhesive, foam adhesive

Tuesday, June 5, 2018

Spellbinders Exclusive Indie Collection - Part 1

Hi there crafty friends,


I'm checking in today with the first instalment of my 3-blog-post-series showcasing the gorgeous Spellbinders Exclusive Indie collection. There are so many different products in this collection, there's something for everyone! I was especially drawn to the new layered dies, they are fabulous!

Today I'm sharing three simple cards with you. Here they are:


I'm obsessed with patterned paper, on my scrapbook pages I can't handle white space either. On cards I like it more but if I can, I will always go with patterned paper. So I picked a collection I haven't had a chance to work with yet (Pink Paislee - Auburn Lane) and chose a few papers I thought would work together.

I really wanted to try the layered dies first so I went with the Shapeabilities Layered Butterfly Etched Dies. I die cut 3 of them from different patterned papers because originally I wanted to put 3 on one card but they are quite big so I decided against that idea. I cut a few different strips of patterned paper and adhered them onto an A2 size top folding card base. Next I glued down two butterflies. When I put together those layers, I only glued them together in the middle so I could fold up their wings and create a more dimensional look.


I then die cut my sentiment using the Hugs Expressions Stamp and Die Set. Once from patterned paper and 3 more times from white card stock. I stacked them up and glued them together to create a 3d sentiment, then I adhered it on the card front. To finish off the card I added a few enamel dots.


Up next is a similar card. Here I just arranged the papers differently and only added one butterfly.


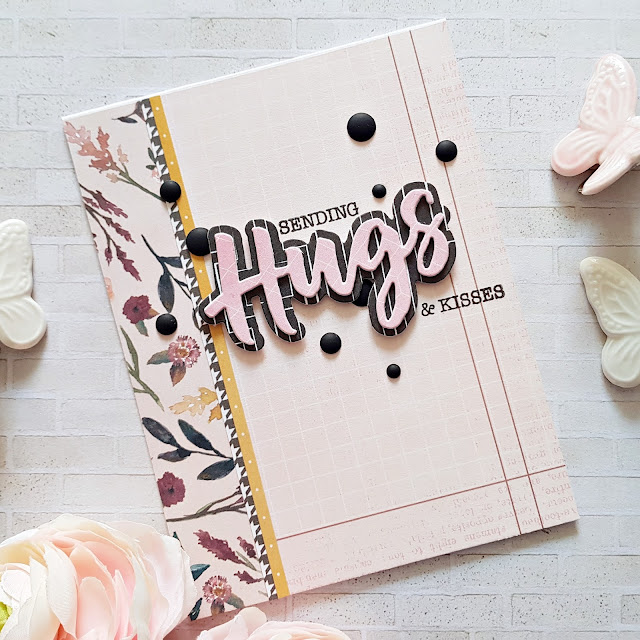
On my final card I arranged my papers vertically and I used a lighter, less busy paper on the right side. I then used the same Hugs die as before, again stacked up 4 layers of die cuts but this time I also die cut the outline of the sentiment to give it a bit of a different look.


I added the rest of the sentiment using stamps from the same set. Again, as finishing touch I added a few enamel dots.


That's it! These cards come together pretty quickly, so they are perfect for those times when you are in a rush but would still like to gift something handmade!

I hope I could inspire you in one way or another!
Thank you so much for stopping by today and I hope you'll come back for more in the next days!

I wish you a fabulous day!

X

Spellbinders supplies:
  • SDS-154 Hugs Expressions Stamp and Die Set - Exclusive
  • S5-360 Shapeabilities Layered Butterfly Etched Dies - Exclusive
Other supplies:
  • patterned paper - Pink Paislee Auburn Lane
  • enamel dots
  • white heavy weight card stock for card base
  • diecutting machine
  • trimmer
  • liquid adhesive, double sided adhesive