I'm back today with a new layout I've created for the Paige Evans Design Team! While I'm waiting for the amazing new collection, Bungalow Lane, to turn up on my doorstep, I created another page with Wonders!
This one is super simple and quick - honestly, it was not my plan, but sometimes things just happen...All I knew was that I wanted to use the fussy cut WONDERFUL letters for my title, in a rainbow sort of order.
I had a scrap piece of this green patterned paper and since my son is wearing a green T-Shirt in the photos, I thought it would be a good match. I hardly ever use white card stock for my background, I'm not even sure why I went with that! I guess I just wanted something light and airy, maybe, hmm. But I couldn't just leave that green paper as it was, so I figured I could add a cut file to it. The first one that caught my eye was the Flower Borders cut file:
I picked one of the borders, then repeated it 4 times and welded them together, to create a background. I guess I could have at least backed a few of them with different patterned papers, but I didn't even think to do this at the time. Guys, it was sooo hot when I made this, I think my brain was fried hahaha! You might even see in the video how the fan that was next to me, was blowing things away on my desk :D Well, I guess hindsight is 20/20?
Anyway, I glued down the cut file, mind you, not everywhere, so I could still have some movement and dimension. I added a few puffy sticker flowers on top. I layered a few things behind my photos, such as tissue paper, die cuts and some stickers. I also attached some stickers and chipboard stickers to the photos. For my title I used foam adhesive so that it pops off the background.
Finally, I added my journaling and stamped my date. That's it!
I guess sometimes all you need is a simple layout to document those memories. Most important thing is that you do document them, right?!
Here's the video as well, in case you're interested:
I'm stopping by today to share a new layout I've created for the Paige Evans Design Team! I've used the Wonders collection on this page.
I rarely scrap pictures of objects, but I love this photo of the newest DMC floss additions to my collection, the colors are so lovely! Plus, they were my birthday present (to myself haha), so I decided they deserve their own scrapbook page!
My idea was to recreate the colors of the floss on the right side of this beautiful floral heart cut file.
Paper 15 has all kinds of color stripes, so I cut it apart and pulled out the colors I needed. I was going to place the photo over this colorful section, but it didn't quite work the way I imagined, so I gave up on that idea.
I was then kind of stuck, because I never plan with the embellishments - I think I already mentioned this. So, I didn't have any idea how to finish my page ha! That's when flowers come in handy. They just work with anything in my opinion. I picked a few that matched my colors and started tucking them under my photo. It's a pity that I covered up that gorgeous cut file, really!
I didn't add a whole lot of embellishments, I layered a couple of die cuts behind my photo, I placed a sticker on top and a few of those colorful scallop chipboards in the top right corner of the page. To finish off my layout, I stamped my date and added my journaling.
I'm back today with a new layout I've created for the Paige Evans Design Team!
The first thing that caught my eye this time, was this gorgeous burgundy paper, with white polka dot and doily design from the lovely Wonders collection. I wanted this paper to shine, so I didn't want to cover a whole lot of it with photos, embellishments etc.
I had a bunch of white layered flowers left over from my recent rainbow layout, so I thought I might as well use them on this page! Otherwise I'd just forget!
I created a cluster at the top right, using the Doily cut file as a mat for my photo. I tucked a few die cuts under my photo, flowers, tags, stickers...Originally I wanted to go with a burgundy-white color scheme, but when I saw the Happiness Blooms From Within die cut, I decided to add navy in the mixture. Those three just looked great together! I ended up using that die cut as my title, too!
I wanted to add the white flowers somewhere around my photo - bottom left section or so. But I didn't like the look of that, so I decided to place them along the bottom left part of the Doily instead. I also added some burgundy enamel dots to the flowers. I think I used all I had in this color haha!
I stamped my date and added my journaling, following the curvature of the doily. I used navy ink and a navy pen, to match my colors in the layout.
I do have a process video for you as well:
That's it for today! I hope I could inspire you in some small way!
I'm back today with a new layout I've created for the Paige Evans Design Team!
I first picked the colors I wanted to work with, purple, orange and pink - one of my all time favorite color combos! The beautiful Wonders collection has all these colors, so I didn't even need to mix and match collections.
I then went through Paige's cut files - I usually don't have an idea what kind of cut file I'm looking for, unless I have a specific photo or theme in mind - I mostly just pick one that catches my eye in that moment. The cut file I chose for today's page is:
I cut the file from white card stock (I use Alexandra Renke card stock). I decided to cut a few of the hearts off, because I didn't want the entire background to be covered. First, I traced the 3 letters and fussy cut them out from a purple patterned paper. I glued them on top of the white fall out pieces to make them sturdier, because I knew I was going to add them to the page with foam tape later. I traced the heart onto my photo - for this I used my Sizzix Die Pick tool (I think that's what it's called, I just call it "my pokey tool" haha), to just scratch the surface of the photo, instead of marking it with a pen. I fussy cut the heart out.
I then started backing the hearts. This didn't take very long because these are simple shapes and there aren't too many of them!
Once done, I glued down the cut file onto the background and added the letters and photo on foam tape as well.
This is where it always gets a bit hard, because I never plan with embellishments, so I never know if there's any that match my colors or theme etc. I'm not big on planning, what can I say! But luckily, I found a few I could use: some floral die cuts, chipboard hearts and butterfly/dragonfly and a few sentiment stickers. I scattered these around my page, then all I had left to do was to write my journaling and add my date (for which I used a die cut label). I was worried the white pen wouldn't be visible on this light purple background, but I really didn't want to use any other color (maybe purple, but I don't have a purple pen), so I just went with it. Thankfully, it turned out fine!
That's it for today! I also have a process video on my YouTube channel if you're interested.
I'm stopping by to share a new layout with you today! Have you guys seen Paige's gorgeous new collection, Bungalow Lane?! I can't wait to receive it! What's your favorite product from this collection? Mine are the heart charms, they are sooo cute! I don't make mini albums often, but I guess I'll have to now haha!
While I'm waiting for the new collection to arrive, I'm working with the current Wonders collection, which is just as beautiful!
I have a process video for this layout, you can find it at the end of this post, if you're interested!
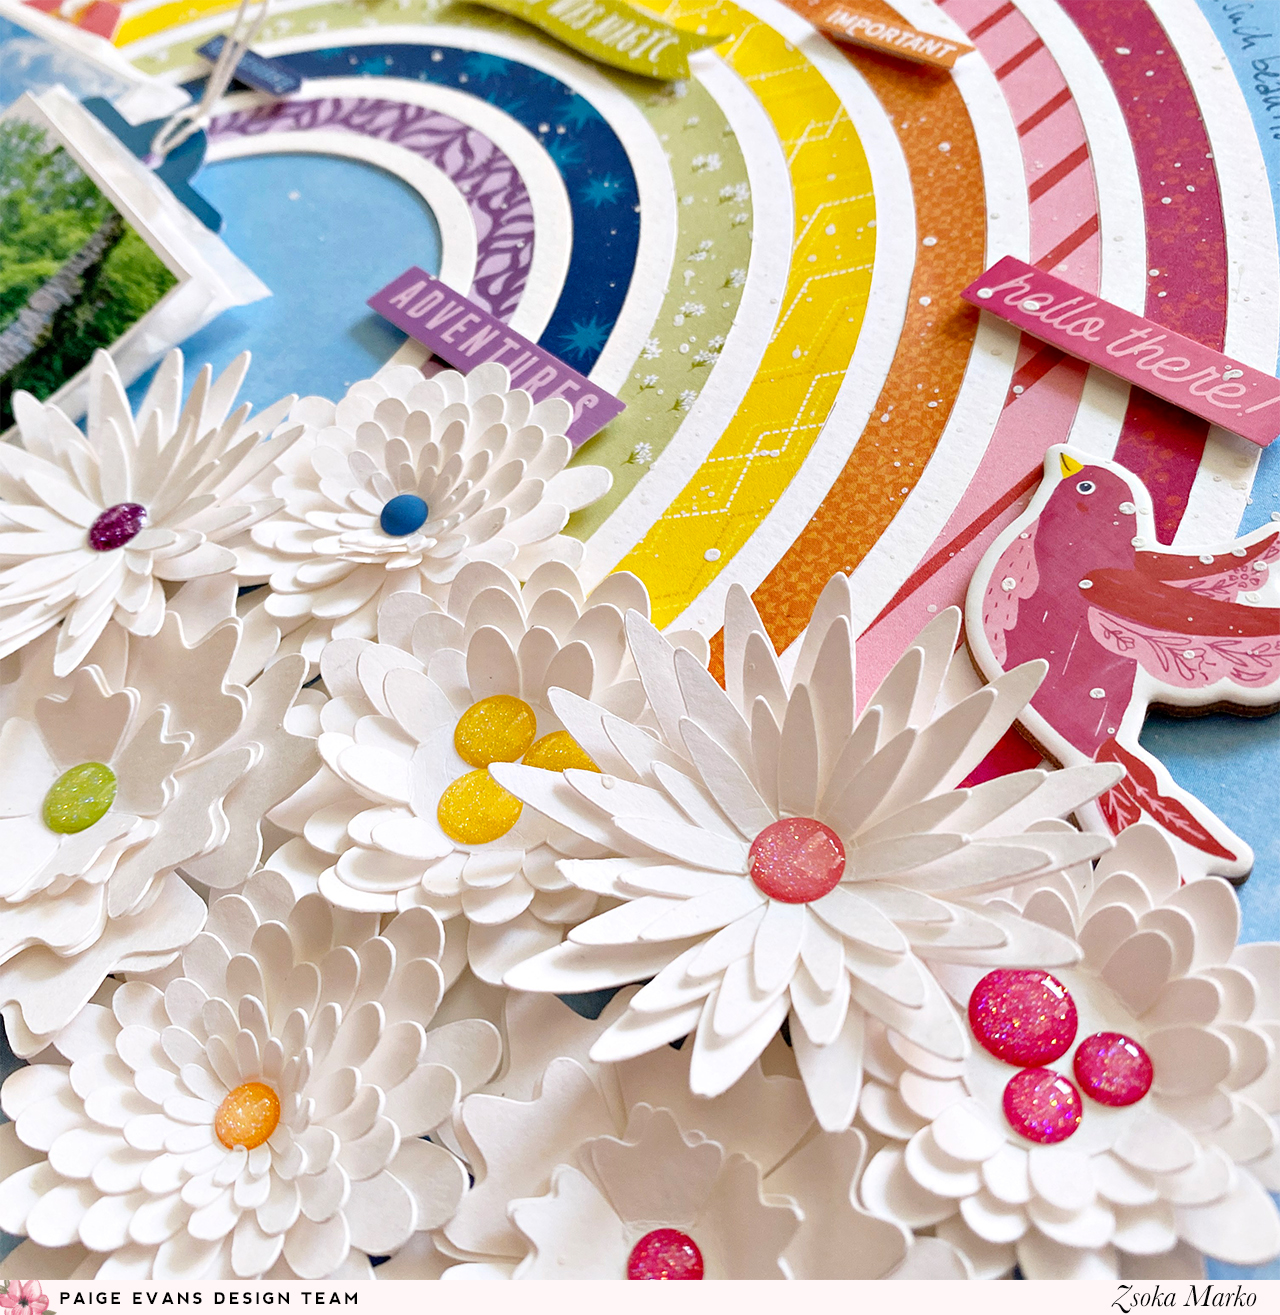
I don't know about you guys, but I think I will never get tired of rainbows. Rainbow colors, rainbow cut files, rainbow everything. I keep repeating myself I know, but Paige's collections just make it so easy to create rainbow layouts because all the colors are always there in every single one of them!
I started out by die cutting everything - I used several cut files:
I die cut everything from white card stock. I Each flower I die cut twice but then I didn't use all of them. I can never estimate what I'll need hehe!
I was considering making colorful flowers and lining them up with their respective colors on the rainbow but then I thought white would pop more. They are very easy to assemble and create such a lovely dimension and texture on any project!
I then put the rainbow together - this cut file actually comes with a solid piece for easy backing! It just takes a few minutes to put it all together.
I laid out everything on my chosen background paper (I realize I use this light blue paper a lot, but it just fits everything! I think this should come in every color in every collection haha). I added a few sentiment stickers, in a tone-on-tone design, like I always seem to do. Can't help it!
I haven't used many embellishments - a chipboard bird, two tags behind my photos, an ephemera piece and another chipboard layered behind one of my photos. Oh, and enamel dots of course! My title is a chipboard too.
Once I was happy with the placement, I glued down everything. Finally, I added my journaling as well as some white acrylic paint splatters! That's it!
Here's the promised process video if you're more of a visual type:
I hope I could inspire you in some small way with today's page!
I'm stopping by to share my latest project I've created for the Paige Evans Design Team, using the gorgeous Wonders collection.
I think I've mentioned this before; when I first receive a new collection, I almost always fussy cut some papers first, while I familiarize myself with the whole collection. So, this floral/mandala paper was actually the first thing I cut apart, but I only now got to use it on a layout!
Since these flowers, or mandalas, however you want to call them, come in a rainbow of colors, I wanted to create a rainbow layout. I decided to go with the rainbow stripe paper for background and arranged the flowers in tone-on-tone kind of way - as much as I could. They are quite large so sometimes I have some other colored stripes in the background too, but this doesn't bother me.
Once I decided on the arrangement, I started gluing down the flowers. For a few of them I used foam tape, just to give them a more dimensional look.
I layered some tissue paper behind my photo and adhered it to the background. I tucked a pink label in at the top right, which was intended for my date - however, I simply didn't find this photo anywhere, and I don't even have a clue how old my child was here. So sad. If at least I could guess the year!
Then I looked for tone on tone embellishments - mostly sentiment stickers - and added these to the flowers. My title is a chipboard piece. I really wanted to use one of the adorable lollies and the blue one fit perfectly in the middle of the blue flower! I really don't care that this is a boy page haha!
To finish off the page, I added a few chipboard dots and my journaling.
That's it! I hope I could inspire you with today's page in some way!
I'm stopping by today to share a card duo I've created for the Paige Evans Design Team! I've used the gorgeous Wonders collection on these.
I change my mind a lot. Like, ALL.THE.TIME. This started out as a layout - with the same design, only the triangles were bigger. I wanted to create a grid layout with them and use maybe 4 2x2 photos as well. Maybe that's an idea you can use? I didn't, because I liked the triangles on white background the most and I am no white background scrapper. Looking at it, it was just not me. Had I had super light gray card stock, or even better, patterned paper (there was one in one of Paige's older collections but I don't have it anymore), I would have gone with that. So, what's a girl to do with all the cut up paper pieces? Use them on cards of course!
I started out by cutting apart the paper with all the 2x2" squares on it, then I cut all of them in half. I didn't use all of them on these cards, I chose the more solid ones and those that didn't have a white background. For the card on the left, I cut this triangle in half again, for the card on the right I cut the smaller triangle in half once more.
I cut two slimline card panels (3.5x8.5") from Neenah Solar White 110lb card stock and started adding the triangles on them in a rainbow kind of order - to see if they would even fit this size. And they did!
Once I figured out the arrangements, I started gluing them down. I was planning to stitch them down in the middle and wanted to be able to curl them up too, so I only added a teeny tiny bit of liquid adhesive in the middle.
When the panels were done, I added some zig zag machine stitching. I then created two side folding card bases and glued my panels on top.
Now comes the fun part! Creating dimension! I just used my fingers to curl up each triangle. I actually really liked the look where I only did the top triangles of each square but then I wanted to see what it would look like if I did all of them...And then there was no turning back :D
Both sentiments are from the 2x2" phrases swatch book. I just cut out the part I needed. I think one said It's Time to Celebrate, the other had some icon right above it, as far as I remember. I went tone on tone with these, well kind of. The green sentiment sits on a green and a blue square, the purple is placed between blue and purple squares.
To finish off the cards, I added a few gold puffy sticker hearts and some gold paint splatters.
That's it! Super simple! Maybe one day I'll try this design on a layout too, hehe!
Thank you so much for stopping by today! I hope I could inspire you in one way or another.
I'm back with a new layout today for the Paige Evans Design Team! I've used the lovely Wonders collection on this page.
I seem to be on a circular type design roll lately, because my previous layout featured a butterfly spiral, the one before that a large, layered flower and this one today has a large rosette. So basically, all of them have a big circular design element hmmm. I should remember to do something different next time ha!
Anyway, Paige had a virtual layout class recently, where she created a wreath design from smaller rosettes. I really wanted to try to create rosettes, but then I decided to make just one large one. I followed her instructions - it doesn't matter what size you create; the steps are the same. The number of petals is always 8 as well, as it turns out (I've tried several sizes to see what fits best on a 12x12" page).
I chose 8 papers (in rainbow colors) for my rosette and measured 5.5" on two sides, starting from the corner. I connected these two marks using a pencil and a ruler, to get an isosceles. I then cut off these triangles using my guillotine trimmer.
I took each triangle and scored them right down the middle, just so I knew to which point I have to fold in the two sides. It's probably better if you watch the process video, because I'm terrible at explaining things. I'm a visual type, I absolutely cannot follow written instructions, so I suggest you have a look at the video, if you want to see how to create the petals! Super simple - it's just hard for me to explain.
I then die cut a circle, maybe 3-4" in diameter, and glued the petals on it, so I could move the rosette easier, checking what background I want to use. I settled on this light green patterned paper - I liked that the circular design tied in so well with the rosette. I glued down the rosette.
I added some foam tape to my photo and placed it in the middle of the rosette. For my title I chose a chipboard sticker. Next, I glued down the right side of each petal, because I wanted to tuck my embellishments into the openings. I selected a few chipboards, card stock stickers and ephemera pieces in coordinating colors and glued them down using liquid adhesive.
I adhered a chipboard tab next to my rosette and wrote the date on it. Finally, I added my journaling.
Super easy and quick! I hope you like how it turned out!
Here's the video if you're interested:
Thank you very much for stopping by today! Have an awesome day!
I'm stopping by to share my newest layout with you that I've created for the Paige Evans Design Team. Most important news, Wonders is in the house yay!!! I'm so excited! I couldn't wait to create with this gorgeous new collection!
I don't know about you, but I like to sit with a new collection for a few days. Like literally, I put it next to me on the couch and go through it many times over the course of a few days. I like to soak it all in and see what speaks to me. While I wait, I usually take the papers that are good for fussy cutting, start Netflix and just start cutting away! One of those papers was the butterfly paper. I was planning to use something else first, but then these beauties were calling my name!
Once you fussy cut all butterflies (I've used them all on this page), the layout comes together super quick. I arranged them into a spiral around my photo (which I die cut using a basic stitched circle die then added a cardstock circle behind it and some foam tape for dimension). Some of them have two layers, because I had more than I needed but I didn't want to save them for another project.
I then glued them all in place - adding just a little bit of liquid glue in the middle. Next, I stitched them down, then I bent up their wings.
I went through all the embellishments and picked out a few that went with my photo and also the colors of the butterflies. I added foam tape to all, then adhered them to the background. For my title I chose one of the chipboards. I looove chipboards!
Last but not least, I added my journaling and some white paint splatters. If you look closely, you'll see that the paint wasn't even dry when I took these photos hahaha!
You can watch the process video on my YouTube channel if you're interested:
That's it! I hope I could inspire you in some small way!
Thanks so much for stopping by! Have a beautiful day!