Wednesday, July 3, 2019

In the spotlight: Spellbinders Small and Large Die of the Month kits - July

Hey there friends,

I'm so excited to share my projects with the awesome Spellbinders July Small and Large Die of the Month kits today! Gosh, these kits are getting better and better! Seriously, this month I can't pick a favorite kit from the 3 I've had the honor to work with!

As I've mentioned before, Spellbinders have several monthly kits, which are really great! You can subscribe to:
These are all a great value, have a look! You can find all necessary information about these kits here.

Let's start with the Small Die kit!

This month you can create these adorable pets, a dog and a cat! There's a sentiment die, Besties Forever, and some accessories included too, like the bones, a bowl, leash and a grass border. It's a lot of tiny pieces to die cut but I think the result is so worth it! What do you think?


I've used some other dies on these two cards too: the Scored and Pierced Ovals Etched dies which is a very good basic shape to have, plus the Truckin Through the Seasons die set which is one of my favorite dies from Spellbinders! I've used it a few times before here and here for instance.


The patterned papers are from the My Mind's Eye Gingham Farm collection.


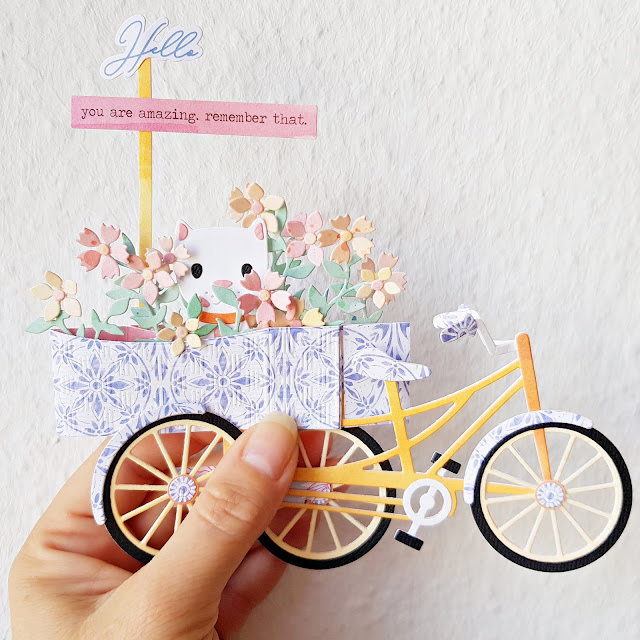
As for the Large Die kit...OMGOSH! It's a 3d bike!!! You can make a decor piece where the baskets can hold any small items! Or, like I did here, you can make it into a "card", it can be folded and then it fits into an envelope. You'll need a bigger envelope for this one, it won't fit into the standard A2 size. It's not huge though! Mine needs a bit more room because of the way I added the sentiments. Included in this kit are not only the pieces you need for the bike but also a "Fun Times" sentiment that would work with the above mentioned Truckin Through the Seasons die set, and flowers! Isn't this super fun?! I loved creating it! By the way, there is a pictorial included in the kit to help you build your bike, don't worry, if I could figure it out, you can too!


Here it is, folded! If you take off the pole with the sentiments, it's really not that big!


The patterned papers I used here are from the brand new Pinkfresh Studio Just a Little Lovely collection.

That's it! I hope you guys liked these projects and feel inspired to create something today!
Happy crafting!
Thanks for stopping by!

X

Tuesday, July 2, 2019

In the spotlight: Spellbinders Card Kit of the Month - July

Hello there crafty friends,

Today I'm sharing projects I've made with the gorgeous Spellbinders July Card Kit of the Month! I've only managed to make 6 cards because due to the upcoming summer holidays I've just had too much on my plate - however, I will tell you this: the kit is fab and there is SO.MUCH.STUFF in it! You can create many many cards for sure.

As I've mentioned before, Spellbinders have several monthly kits, which are really great! You can subscribe to:
These are all a great value, have a look! You can find all necessary information about these kits here.

Here's a list of what you get:


Let's talk about the dies guys! I'm generally not into cutesy cutesy but this adorable mermaid had me ooh ahh haha! Seriously, just how gorgeous is she?! I had had more time, I surely would have made more cards just with her. So in love! So here are my cards with the dies:


I used the patterned papers from the kit to die cut most parts. I love love love this month's papers! Also, Spellbinders always includes a pictorial in the kit on how to put the die cuts together - which is what I always follow because I'm really bad at figuring things out! Which mermaid do you like better, the blond or the brunette?! I don't think I can pick a favorite!


I stayed with the mermaid theme on all of my cards because there were so many beautiful mermaid embellishments in the kit! I used some die cut and some foam sticker mermaids on my next cards that are great for your bestie!


Look at those crystals! There are several colors included in the kit and they are fabulous!


There's always 2 of each die cut in the kit, so I had two more mermaids left. I made these two cards with them, pretty much the same design just different colors. Easy peasy!


I hope I could pique your interest in this kit! Seriously, so far I think this is my favorite. Beautiful colors, awesome patterns and wonderful embellishments! And the mermaid die. THE MERMAID DIE! Have I mentioned the mermaid die?!

You need this kit, believe me :).

Have an awesome day guys! I'll be back with my projects with the Small and Large Die Kits of the month of July soon! Oh, those kits are AWESOME too! Just you wait :D

Thanks for stopping by!

X

Monday, July 1, 2019

Altenew Build-A-Flower: Camellia Japonica Release Blog Hop + Giveaway


Hello crafty peeps,

Welcome to the Altenew Build-A-Flower: Camellia Japonica release blog hop!

You should have arrived here from the lovely Isha's blog! I'll add the full blog hop list at the end of this post, for your convenience!

I've made two card duos for you today. First up is this colorful pair. On the card on the left I first started stamping and masking directly on my card front but later decided to add some dimension so I pretty much covered up my hard work lol!


I stamped and die cut several camellias in yellow, orange, pink, teal and purple. I stamped my sentiment in purple, then before adding the die cuts I used the Dotted Swirls Debossing cover die to add some texture and interest to my card. I'm obsessed with this cover die, I hope there will be more designs in the future! When there's a lot of white on my cards I feel like they are not finished (I'm not a CAS card maker) and adding a bit of debossing (or embossing for that matter!) helps me with that problem. Once done, I layered some die cuts over my stamping and cut off the access. To finish off my card I added a twine bow and a few crystals.


For my second card I debossed a white A2 size panel. Then I cut a wide strip of aqua card stock and heat embossed my sentiment. I added foam adhesive to the back of this, then checked where I want to have it on my card base. Before adhering it, I tucks some die cuts behind it. To finish it off I added a twine bow and some crystals again.


On my next two cards I went with a springy color theme which was inspired by white camellias that have a bit of a pink edge. Those are my favorite! But how to stamp a white flower? Hmmm. I experimented a little, but because this is a layering stamp, I didn't get the result I pictured in my head. With a single layer stamp I could have just inked up the edges and it would have looked OK, but here I would have needed to ink up the edge of every layer (with pink that is) and this was quite hard to do on the inner layers. Anyway, at least they look a bit different hehe!


Also, I've been loving paper strips for a while now, because they allow me to create ANY color scheme I just want and the result looks like patterned paper. Love them. I hope you are not tired of seeing them yet!


For my sentiments I've used the Folksy Florals stamp set. I finished off these cards with some hot pink twine and pearls.


And now the fun part...Giveaways, yay! Read on to find out how you can win! Good Luck!

Prizes: 
1. To celebrate this release, Altenew is giving away a $30 gift certificate to 6 lucky winners! Please leave a comment on the Altenew Card blog and/or Altenew Scrapbook blog for a chance to win. 

2. Altenew will also draw a winner to receive a $15 gift certificate from comments on each designer's blog in the blog hop list.

All winners will be announced on the Altenew blogs on 07/07/2019!

That's it for today guys! Your next stop is Seeka's blog!

Thanks so much for stopping by! I hope I could inspire you in some small way!

Have an awesome day!

X

Blog Hop list: