Showing posts with label washi. Show all posts

Thursday, July 11, 2019

Focus on Eucalyptus Fantasy - DT projects for Pinkfresh Studio

Hello crafty friends,

I'm stopping by today to share a bunch of new cards I've made for Pinkfresh Studio.

Remember, recently we had a new release with washi tapes, stamps and dies. I didn't have much time to work with all the products then and I really wanted to, so for today's projects I've picked the Eucalyptus Fantasy sets (mostly). There are 3 products that work together:
Here's what I made:


To show you how all these products work together, I decided to do a bit of embossing. I used WOW! Embossing Powder Gold Rich Pale (WC01) embossing powder because this is the same pale gold as the Matte Gold washi tape, which I also used here.

I added some washi tape to white card stock, then die cut a wreath, two borders and a few smaller pieces with the Eucalyptus Fantasy die set. Using the Eucalyptus Fantasy stamp set and embossing powder, I gold heat embossed all these.

I then decided on what color scheme I wanted to go with. To be honest I didn't see a whole lot of options thanks to the green ha! So I just used some gray card stock and patterned papers (Indigo Hills 2 collection). 


To the below card base I added a few Matte Gold Washi Tape strips which I then stitched over with my sewing machine so that they surely stay in place. I embossed my sentiment in the middle, then popped the wreath on foam adhesive, tucked some gold metallic thread behind it and glued it all down in the middle. 


For my last card I fussy cut this hexagon shape - I cut out the middle of it too, only leaving me with a thin frame. I stamped and embossed a sentiment on vellum. I glued the frame on the vellum piece plus placed some gray patterned paper behind it as well, then stitched around it. I added foam tape behind this piece and attached it to my card base. The card base has a gray card stock panel plus a patterned paper piece that I cut smaller using the Simple Edgers die set! There's two leaf clusters in opposite corners on this design - I added some additional leaves for more dimension. To finish off these cards I splattered gold ink here and there and added see-through crystals which remind me of water droplets. I just wish they were smaller!


On my next set I used the Eucalyptus Fantasy stamp set differently because I need color! 


For my card on the left I stamped the wreath in black ink, then colored the leaves with alcohol markers. Simple flat coloring, nothing fancy! I added two strips of Rainbow with Splatters washi tape on the sides of my card front. Some paint splatters, twine and jewels (Essentials Jewels Mix) finish off this card.


For my card on the right I die cut two floral borders using the Rainbow with Splatters washi tape and the recently released Lacy Floral Border die set. I stamped my sentiment in the middle and glued down both borders. For final touches I added black paint splatters, some twine and crystals.


Last but not least I white heat embossed the wreath on watercolor paper, die cut it, and watercolored the leaves. I had these colors on my desk because I used them on another project and loved them so much, I thought I'd color one of these images too. 


Gray card base, a wide strip of navy card stock to which I added my sentiment, two slim white strips, white splatters, twine and the card is done!


I hope I could inspire you to create something with these washi tapes and coordinating stamps and dies!

Thanks for stopping by today!
Have a great day!

X

Monday, June 24, 2019

Pinkfresh Studio June Washi Release Blog Hop


Hello crafty peeps,

Welcome to the Pinkfresh Studio June Washi release blog hop!

You should have arrived here from the Pinkfresh Studio blog, but I'll attach the full blog hop list at the end for your convenience, in case you're lost.

Today's release is pretty fantastic (but I probably say that about each Pinkfresh release ha!). Besides the washi tapes, there are stamps and dies that you can use on their own OR!!! Brace yourselves! Or you can use them with the washi tapes! How you ask?! There are stamps that coordinate with some of the washi, so you can stamp on them, emboss them even (I haven't done this on today's projects, but I have on my cards for my July blog post, so watch this space!). You can die cut flowers with coordinating dies, so no more fussy cutting!!! Genius, right?!

Today I've focused on the Simple Edgers die set which works with the thin washi tapes (Matte Gold Washi, Watercolor Fantasy Washi) or pretty much anything else! There are also thin strips in the Adorable Frames Washi - which is what I've used on today's projects!


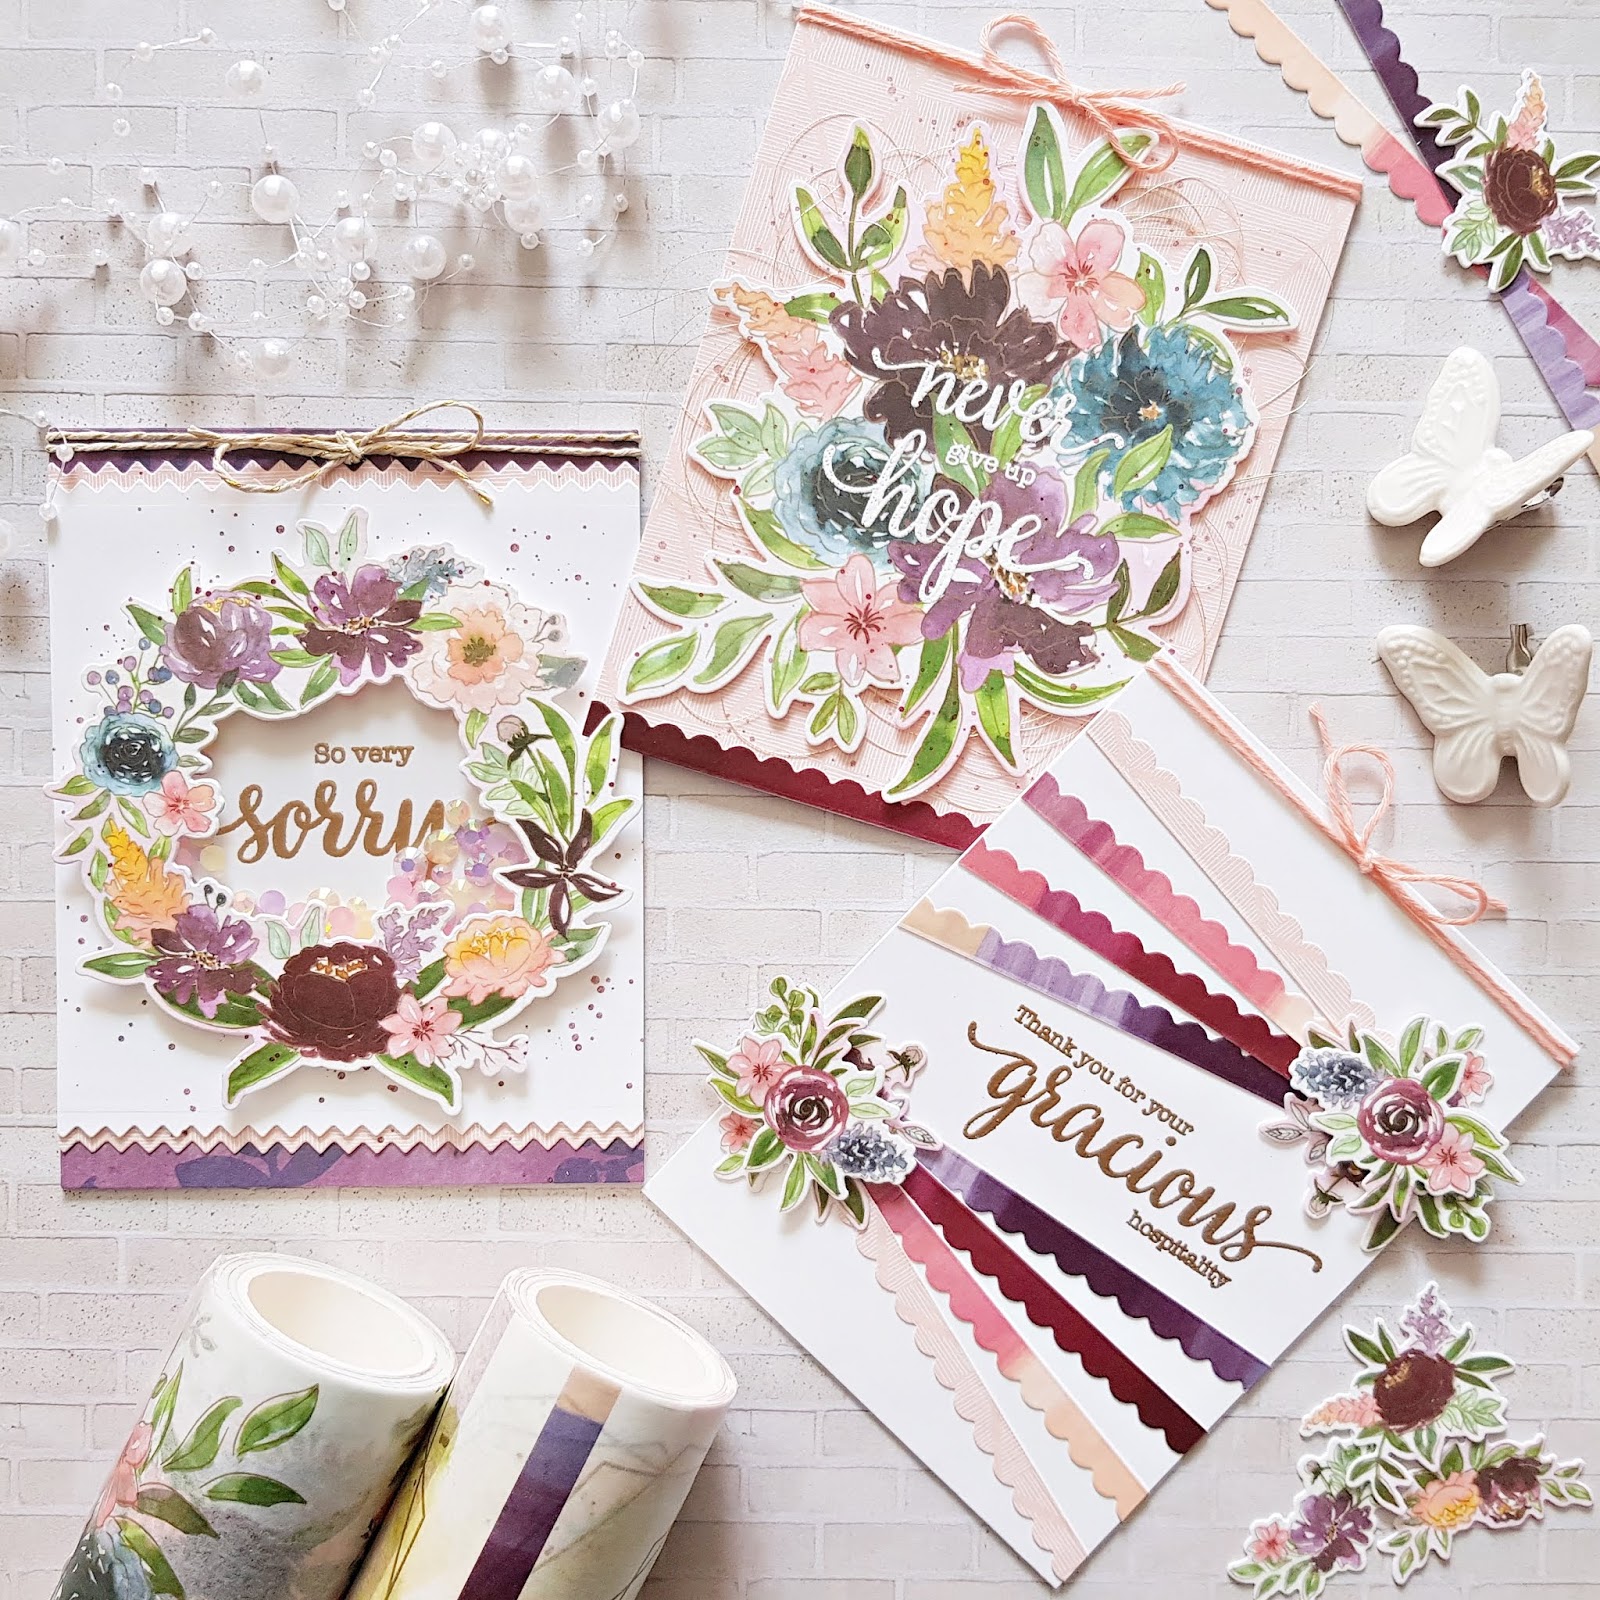
First up a shaker card! All my cards today are mounted on A2 top folding card bases. Here I added a  puprle patterned paper panel (Indigo Hills 2 collection). Using one of the Simple Edgers, I die cut a piece off of my white panel on both top and bottom. I also die cut two strips from a peach patterned paper (Joyful Day collection) which I then tucked in at the top and the bottom. But before doing this, I heat embossed my sentiment in the middle of the white card stock (sentiment is from the Floral Cluster Stamp set).


I die cut the wreath image from the Painted Florals washi tape and added acetate plus 2 layers of foam tape behind it. I placed some jewels in the middle (peach, pink and lavender colors from the Pinkfresh Essentials: Jewel Mix box) and attached my shaker frame. To finish off this card I splattered some purple paint around the wreath and added a twine bow at the top.


My next card is suuuuper simple! I added the same peach patterned paper panel I used before, then I die cut the big flower bouquet from the Painted Florals washi tape. I white heat embossed my sentiment in the middle ( sentiment is from the Floral Cluster stamp set). 


I placed some gold tangled thread behind the die cut, added foam adhesive and attached it to the card front. Using the scallop Simple Edger I die cut a thin strip from the Adorable Frames Washi and glued it down at the bottom. Last but not least I splattered some purple ink all over the card.


My last card is very simple too but I'll tell you it took me ages before I finally settled on this design haha! I die cut lots of thin strips from the Adorable Frames WashiMatte Gold Washi and Watercolor Fantasy Washi  but didn't end up using the latter two because I wanted to go with purple/peach tones. I also die cut two strips from the same peach patterned paper I used on the other two cards as well.


Once I figured out the design and how I wanted to use the strips, I gold heat embossed my sentiment (from the Eucalyptus Fantasy stamp set) on white card stock. Then I glued all the strips in place.


I created 2 floral clusters using 3 small die cuts (each) from the Painted Florals washi tape. To finish off this card I added a twine bow at the top.


That's it! I hope I could peak your interest and that you are as excited as we are about this new release!

And now for the fun part! 

Giveaways:

1. Pinkfresh Studio is giving away the full June Washi release on the Pinkfresh blog and Instagram as well!

2. On each blog we are giving away a $25 gift certificate too!


As always, the winners will be selected from the comments left on all blog posts. Winners will be announced on Monday, July 1, 2019 on the Pinkfresh Studio Giveaway Page. You must claim your prize within 2 weeks so don't forget to go check the above page! Comment away! Good luck!

Shopping Promo:

Pinkfresh Studio is offering free/discounted shipping from June 24 - 30th on orders $50+. You just need to use code JUNEWASHISHIP50. Shipping in the US is free, and there's $5.50 off on international shipping.


Phew I think that's it for today! I hope I didn't miss anything :).

Your next stop is Yoonsun's blog!

Thank you for stopping by!

Have a fabulous day!

X


BLOG HOP LIST:
You are invited to the Inlinkz link party!
Click here to enter
<!-- end InLinkz code →

Thursday, April 25, 2019

Altenew April 2019 Washi Tape/Embossing Paste Release Blog Hop + Giveaway


Hello friends,

I'm so excited to join Altenew's washi tape / embossing paste release blog hop today! You should have arrived here from Kymona's blog but I'm adding the full blog hop list at the end of this post for your convenience.

Let's get to it, shall we?! There are five gorgeous washi tapes in this release as well as an embossing paste. You can buy the washi tapes as a bundle at a discounted price. I used each product from this release on today's projects.

First up is a card duo using two of the washi tapes: Botanical Rhapsody and Misty Meadows, and the embossing paste too. When I'm not in a crafty mood I often fussy cut, so that's what I did here...


I wanted to add some white on white texture to the backgrounds, so I took two stencils: Floral Drape and Tiny Bubbles and added some embossing paste.


I then created clusters of flowers and arranged them on the card base. Some white embossed sentiment strips and done!


Next up is another floral duo! I just love flowers, can't you tell? On these ones I decided to create a more colorful background, which is why I colored the embossing paste to match the teal flowers I cut out of the Teal Shadow washi tape


Once the embossed panels were dry (I've used the Floral Drape stencil by the way). I mounted them onto A2 card bases. 


I arranged the flowers the way I wanted and glued them down. I added a couple of slim gold strips using the lovely Golden Trim washi tape. Gold embossed sentiments finish off these cards.


Since I had an insane amount of fussy cut flowers, I decided to use them up on layouts (I didn't manage haha!).

On this first layout I used an Instax camera cut file from Handipaper, which I backed with various pink card stock. The big flower I backed with the Gold String washi tape


I also die cut a bunch of flowers with the Layered Floral Elements die set, which I just adore! For these I've used some patterned papers from the Reflection kit.  


I created 3 flower clusters with lots of washi tape and die cut flowers. I added a bit of tangled gold thread too, for interest. 


I chose some embellies from Altenews various scrapbook collections and placed them around my page. To finish off this layout I added my journaling, date, and a lot of gold ink splatter.


On my next layout I wanted to create a floral frame from all the washi flowers. I generally don't like such lineal designs but I wanted something different from the circle and wreath designs I often do. 


Some of the flowers I adhered to the background with liquid glue, for others I used foam tape, to have some dimension on my layout. 


I had some blue embossing paste left from my card project so I embossed a piece of white card stock with the same stencil I mentioned above and used it to make a mat for my photo and to create a focal point on my page. Then I die cut my title using the Calligraphy Alpha die set. I die cut the letters several times to create a faux chipboard title.


I adhered a few embellies to the photo, wrote my journaling on one of the label stickers, added my date and some teal ink splatter.


And now the fun part...Giveaways, yay! Read on to find out how you can win! Good Luck!

Prizes: 
1. To celebrate this release, Altenew is giving away a $30 gift certificate to 6 lucky winners! Please leave a comment on the Altenew Card blog and/or Altenew Scrapbook blog by 05/01/2019 for a chance to win. 

2. Altenew will also draw a winner to receive a $15 gift certificate from comments on each designer's blog in the blog hop list.

All winners will be announced on the Altenew blogs on 05/04/2019!

Your next stop is the Altenew Scrapbook Blog!

That's it! I hope you enjoyed my projects and I could inspire you in some small way.

Have a fabulous day y'all!

X

Blog Hop list:

Thursday, November 29, 2018

Altenew Crafty Friends Blog Hop Day 1 + Giveaway


Hello dear friends,

I'm so excited to be joining the Altenew Crafty Friends blog hop today! You should have arrived here from Jessica's blog.

Over the years I've received many amazing opportunities in the paper crafting industry, which I am so very grateful for! However, what I am most grateful for is the friendships I have made through crafting. I wouldn't be here without the constant support of crafty friends, who cheer me on, are not jealous of my success and are there for me when I'm down. 

I've made several good friends through crafting, some of them I talk to daily. I will only mention the two closest, otherwise I'll never finish this blog post hehe! Both of these Ladies I've been friends with for about 3 years. One is Altenew's very own Enza Gudor, who besides being a talented crafter, is also an amazing person! We are the same age, grew up with the same values, we have quite similar way of thinking. Fun fact (she will kill me for this), as much as we have in common on the inside, we couldn't be more different on the outside. Apart from the fact that she is a brunette with gorgeous Italian olive skin, I'm blond and have very fair skin - I'm pretty tall, and she is tiny (I won't say how tiny cos she really WILL kill me), so I often tease her that we are TWINS. You know like Arnold Schwarzenegger and Danny DeVito :D. My dear Peperina, if you read this, I love you lots!

And then there's this crazy chick that calls herself the crazy paper lady, Thi Tran, who I started talking to on a Facebook platform all those years ago. She loves crafting but doesn't  share a lot of her work online. We talk a lot about life, crafting and Netflix hahaha! I actually met her in person because she lives in one of my fave places in the whole world, New Orleans! We visited last year and of course Thi took me to all the craft stores! She is just such a funny, cheerful, down to earth person - I love her! By the time this post goes live, she will just have delivered her 3rd baby! I'm so excited for her!

THANK YOU to all my crafty friends for making my life better - you know who you are <3. I can only hope you feel the same way! 

I promise I'm getting to my projects too :). Right now!
Here's what I've created:


These cards are my type of cards. They incorporate everything I love: stamps, dies, flowers, fussy cutting, embossing, color, texture, dimension and and and...

I made two top folding, A2 size card bases. I created two A2 size panels which I embossed in gold. The two stamps I used for this: the Rustic Linen and the Dainty Swiss Dots stamp sets. I then die cut  two panels from white card stock, using the Watercolor Stripes Cover die


I then assembled my cards and stamped the sentiments directly onto the card fronts. I stamped and die cut the word YOU twice, using the super stunning Botanical You stamp and die bundle. I placed these above my stamped sentiments and popped them up with pop dots. 

I fussy cut out a bunch of flowers from the Glitter Flurries washi tape and arranged them on my cards the way I liked them. Once I was happy with the way they looked, I glued them down. And this finishes off my cards for today!


Promotions and Giveaways: 

Altenew is offering free US shipping with code CRAFTY18 or $5 OFF international shipping with code FRIENDS18 at checkout. Offer valid from 11.29.2018 at 12:01 am EST through 12.01.2018 at 11:59 pm, EST. Not valid on prior purchases. Cannot be combined with other promo codes.


Prizes:
Altenew is giving away a $50 gift certificate to 5 lucky winners and one Altenew Academy Class to 5 lucky winners. There are also 12 awesome friends who are celebrating with us, and they are offering the following prizes:


Be sure to leave comments by Sunday, December 9th, 2018 for a chance to win! 37 winners will be chosen at random from the comments left on all blogs listed below and will be announced on the Altenew Card Blog and the Altenew Scrapbook blog on December 15th, 2018. 

I will also draw a winner here on my blog, to receive a $20 gift certificate. So comment away!

*********************************************************************************
GIVEAWAY NOW CLOSED!

Thank you all for your sweet comments! I apologize for not answering all, I'm only able to answer from my phone and it takes ages. For some reason answering from my PC hasn't worked for months and I can't figure out why :(. I'm really sorry!

So the winner is Melissa Smith! Congratulations! Please contact me at mzs6666@googlemail.com so I can tell you how to pick up your prize!

*********************************************************************************

I hope you like today's inspiration! Thanks so much for stopping by today! Your next stop is Meghann Andrew! I'm going to include the full blog hop list down below!

Have a wonderful day!

X