
Hello there crafty peeps,
I'm stopping by today to share some projects with the super cool Spellbinders February 2020 Small and Large Die kits! These dies are so unique and trendy, I love them! They are versatile too because you can create literally any number of patterns with them. Plus I saw that this month's Glimmer kit coordinates with the Large die kit - with which you can achieve some really great effects! Check it out!
I'm stopping by today to share some projects with the super cool Spellbinders February 2020 Small and Large Die kits! These dies are so unique and trendy, I love them! They are versatile too because you can create literally any number of patterns with them. Plus I saw that this month's Glimmer kit coordinates with the Large die kit - with which you can achieve some really great effects! Check it out!
As a reminder, Spellbinders have several monthly kits, which are really great! You can subscribe to:
- Small Die of the Month
- Large Die of the Month
- Card Kit of the Month
- Stamp of the Month
- Amazing Paper Grace Die of the Month
- Glimmer Hot Foil Kit of the Month
You can find all necessary information about these kits here.
Let's start with the Large Die kit this month! How fun are these abstract shapes?! I think I don't have to write down how I made these card, because it's quite obvious or? It's pretty much just die cutting the same shapes over and over from various patterned papers and then arranging them in any which way you like.


Let's start with the Large Die kit this month! How fun are these abstract shapes?! I think I don't have to write down how I made these card, because it's quite obvious or? It's pretty much just die cutting the same shapes over and over from various patterned papers and then arranging them in any which way you like.


Recently I dug out some older scrapbook collections I've been hoarding with the intention of using them in the next months. Well it didn't quite happen the way I was planning because life happens sometimes, but at least I've made these cards! This super colorful and fun collection is called Saturday Mornings by Basic Grey. Ah BG I miss you so very much! All these years later I'm still heartbroken they don't do scrapbook collections anymore.


Next up the Small Die kit! I've actually only used 3 of the dies here, but there are some pretty cool geometric patterned circles in the kit too. Make sure to check it out!

I decided to create some striped panels and die cut from them. For the card on the left I created the striped panel, then placed the 3 dies on it and die cut them. I haven't used the outer circle die so the pieces did not fall out but rather created windows in the panel. I ALMOST didn't turn this into a shaker card because I don't love making them! I find it's such a waste of expensive foam tape haha! But then I thought what the heck. OK, so I cut out those windows, then I cut the same 3 shapes using the outer circle die too, from white card stock. I layered these on top of the striped panel, but turned them a bit so the striped cuts are also visible.

I glued acetate on the back and added two layers of foam tape everywhere but behind the windows, obviously. I placed some beads and droplets on my card base, constantly checking if they are in the right spots. I then mounted the card front on it. A die cut sentiment finishes off this card.
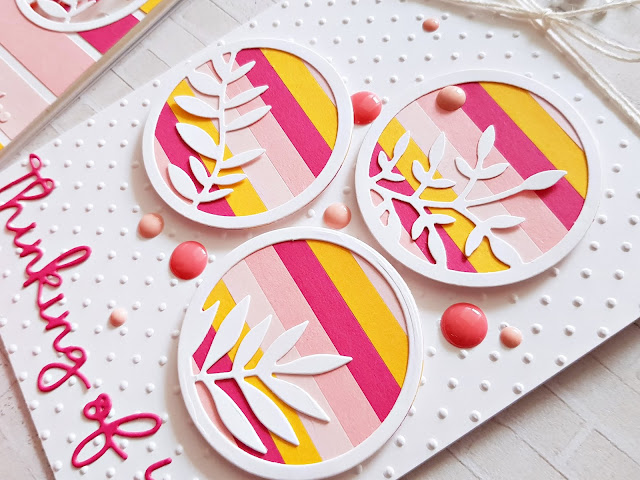
The next card is quicker! I created a striped panel again but with thinner stripes. I die cut the same 3 botanical circles from white card stock, plus using just the circle die, I also die cut 3 striped circles to back my white pieces. I added some foam tape to the back of these and adhered them down to my white, embossed card base. Last but not least I placed some enamel dots and a die cut sentiment on it.

That's it guys! I hope you like today's inspiration!
I didn't have time to work with the card kit, in fact it's quite likely I won't have time for it in the next months unfortunately. However, I am giving away the January Card Kit on my Instagram account to my European followers right now (giveaway ends on Wednesday, Feb. 5, 2020) in case you're interested!
Thank you so much for stopping by today! Have a great day!
X