Monday, January 29, 2018

Valentine's cards - DT project for Fancy Pants Designs

Hi there friends,

I'm back today with some cards you could create for Valentine's day. Since we don't celebrate Valentine's Day however, I've made sure I can give these cards on other occasions too. Love is always celebrated in one way or another right?!


I've used the gorgeous Sweet Nothings collection for these cards. These colors just make me smile. I haven't been working with this line since the beginning of the year so I was pretty keen on using it! A bit of change from all the holiday crafting haha! 

I only wanted to make 2 cards but once the first one was ready, I just couldn't stop!

To create the flowers I used the Hooray ribbon dies from Concord and 9th. I've been addicted to dies since I bought my little Cricut this past summer.


I've seen the idea to create a flower with these dies from Jennifer McGuire and thought it was pretty genius (it's a ribbon die). So this is my take on her design.


I made top folding, 5.5x4.25" card bases from white textured card stock and adhered my panels on top. These are slightly smaller than the card base and all are the same, just different colors. 

I cut a bunch of flowers using different patterned papers and created similar flowers for each card, some just a single row of petals, some doubled up. 


The leaves I created using different circle dies - another cool idea from Jennifer. I never would have thought of this! For the middle of the flowers I used different size circle dies and various patterned papers from this collection. Some I decorated with puffy stickers, one with a tag and twine and this one below I embossed, using a sentiment from the stamp set in the Sweet Nothings collection.


I love how these turned out! I love love love the dimension the flowers create!

Some more close ups:


I hope these cards put a smile on your face today!

Have a wonderful day and thanks for stopping by!

X


Capture - DT layout for Just Nick

Hi there friends,

I'm back today with a new layout for Just Nick!
I've picked a cut file I've worked with several times before, but I just love it so much: the Lotus Lace.


Here's my finished layout:


There's really no reason why I picked this cut file and used this collection, other than I love them and I felt like it at the time! I haven't used Maggie Holmes Gather in a long time and I try to bust out older collections for my Just Nick projects. The blues and yellows in this collection are just my favorite! So I can't wait to get my hands on the blue papers in Maggie's new line!


I backed each flower the same way, because it's a busy background anyway. For background I chose a paper with blue pattern too to tone it all down a notch.


Since I had spent quite some time on the background, I was not going to cover it all up with photos and embellies! I just created one cluster and kept everything there, photos, title, journaling, embellishments.


I added a few layers of patterned papers, tags, tissue paper behind my photos to help them stand out from the background. I then went through my embellishments and checked what fits. I might have used some from other Maggie Holmes collections too, because I don't have much left of Gather.


I picked out some chipboards, buttons, die cut pieces and arranged them around my photos. The journaling I wrote on a label sticker, I think this is from Chasing Dreams.


To finish off my page, I added some enamel dots and stamped my date!

That's it for today folks! Hope you like how this turned out!

XOXO


Friday, January 26, 2018

Valentine's slider cards with free cut file! - DT project for Scrapbook Werkstatt

Hey friends,

I thought I'd drop in to share a quick tutorial with you on how I made these slider cards! Unfortunately without step by step photos because I had no time to make any new cards for this purpose. I hope you'll understand it anyway! Just let me know, and please also let me know if you have trouble downloading the cut file - I am a bit challenged when it comes to technology!

First, some examples that I created for Scrapbook Werkstatt, using the wonderful February kit.


Click HERE to (hopefully) download the free cut file :).

Sooo, here's a screenshot of the different parts you'll find in this Studio file:


These are sized to what you see on my finished cards. Of course you can size them however you want, just always remember to mark all pieces when you scale them up or down, so you keep the same ratio!

WHAT YOU NEED:
  • 1 card base (I made 5 different ones, with different windows for you to choose from)
  • 2 U pieces, which I call channels but I don't really know what they are called ;P
  • 1 slider
  • 2 tabs for the slider (not necessary!)
The scallop circle is just an extra piece if you want to change up your circle window a bit, like I did on one of the cards above.

If you like, cut all pieces you need from a piece of card stock, just to test how it all comes together, then you can decide what patterned paper you want to use for which piece - if you like patterned paper like I do!

HOW- TO:
So, it's actually very simple. Start by adhering the two U pieces together, so you have one thicker U piece. Then adhere this piece inside your card base, in a way that the legs of the U face the middle cut in the card base, if that makes sense? Then place the slider piece in the middle, close your card and pull the slider through the middle cut. Then glue the front and back of the card together, with the slider in between the U piece. Gosh it's so hard to describe these simple steps! I hope you understand, once you have the pieces in your hands!

Now this is only to describe how all pieces work together, but if you want to decorate the single pieces, you need to do that before assembling the card! 

For instance, the first, color changing slider card is put together as follows: I adhered a piece of patterned paper from the Crate Paper Main Squeeze collection to the inside of the card base, in between the channel. Just close the card base to see what peaks through the window to adhere it in the right place! I then took a piece of acetate and an embossing pen and drew around the cute image.  Then I embossed it with black embossing powder. I hate to emboss acetate, no matter what type I try, even ones for embossing, I have warping and I can't stand it! That is why I only made one card like this hehe! I then used my ATG to glue this behind the window. You could also add some machine stitching if you like! Now you can place the slider piece inside the card base - this will hide your image. Then glue your card base together and once you pull the slider out, it will reveal the color piece behind it. MAGIC :).

The other three cards I just decorated with patterned papers, stamps, embossing and embellishments, no acetate window, whatsoever.

I hope you'll give these a try! I hope the tutorial makes sense, at least once you have the pieces cut out! Don't be overwhelmed by all this text, I simply talk too much! Just cut the pieces and you'll see it all comes together easily!

If you create something with this cut file and share it, please link back to this blog post - I'd appreciate it X. Also, tag me in your post on Instagram so I can leave you some love!

Most of all: HAVE FUN!

XXX


Saturday, January 20, 2018

Cards - DT project for Paige Evans + Silhouette

Hi there friends,

Today I'm back with a couple of cards I've made for Paige Evans + Silhouette! Since it's Valentine's Day soon, I thought I'd make something with LOVE theme. Not specifically for Valentine's Day because I myself don't celebrate it, but any occasion really where love is involved!

I went with the beautiful Oh My Heart collection this time because I haven't used it in awhile! For the first card I've used the Hearts Wreath cut file (ID: #241003). I scaled it down to fit on an A2 card front and cut it twice in slightly different sizes from white textured card stock. One of them I backed with different patterned papers, the other one I just kept all white without any backing.


I made an A2 top folding card base from heavy weight white card stock and glued an A2 size (4.25x5.50") piece of patterned paper on it.

I adhered the larger wreath to a piece of minty green patterned paper and fussy cut around it, to have a solid panel that I then popped up with foam adhesive. I then glued the smaller wreath on top of this too.  


I  picked out a die cut from the ephemera pack and adhered it to my wreath panel with 3d foam adhesive. I had a couple of fussy cut flowers left from a previous project, I tucked these behind the die cut and glued them down. To finish off my card I added a rose gold ampersand chipboard. A bit random I know, but I like the way it looks :). 


I also made a coordinating envelope from patterned paper. I've used the envelope cut file from the Envelope Gift Mini Album (ID: #240883) cut file set for this, I just sized it to a little larger than my A2 card. 

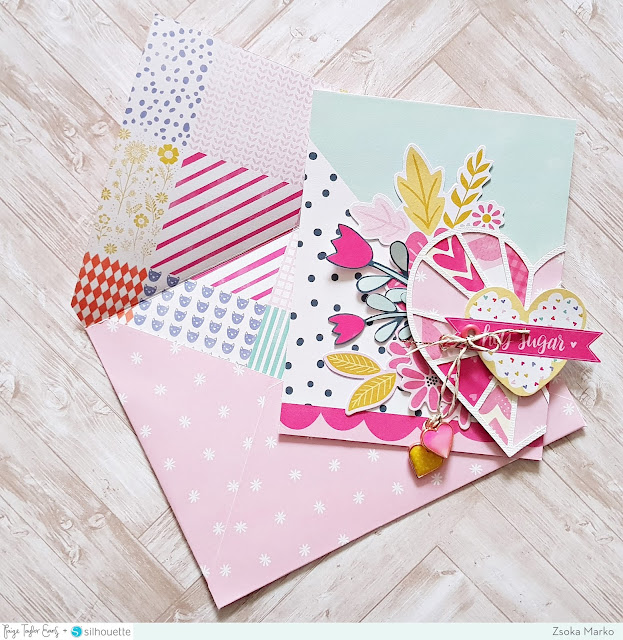
For my second card I chose the Pie Chart Heart cut file (ID: #219822). I backed the openings with several different pink patterned papers, then I cut off the right side of the heart. Again, I made an A2 top folding card base and adhered the same size of patterned paper panel on it. I love this paper and I haven't used it on any layout yet if you can believe it!


I used some 3D foam adhesive to adhere the heart to my card base, then I tucked some die cut flowers from the ephemera pack, as well as some fussy cut flowers, under the heart. I found this Hey Sugar heart die cut in the ephemera pack too and I thought it would be perfect for a sentiment. I popped this up with 3D foam adhesive too. 


I wanted to add a little something to finish off my card and decided that the super adorable heart charms will do the trick! I've been obsessed with eyelets again lately, so I added one to the die cut and hung the little charms from that hole. 


I created a coordinating envelope using the above mentioned cut file for this card too. This I had to scale up quite a bit because the Hey Sugar piece hangs off the card base.

This is it for today, I hope I could inspire you in some little way!
Thanks for stopping by!
I'll be back with a layout shortly!

X


Tuesday, January 16, 2018

Funtastic - DT layout for Fancy Pants Designs

Hi there,

I'm checking in today with a new layout I created for the "out with the old, in with the new" theme at Fancy Pants! Our assignment was to mix new with old supplies. I loved this! I don't often have the time to create stash layouts but I always love when I have the possibility. They do take longer in general because I have to go trough my stash to see what I can or want to use, but one can achieve a much more unique look!


I've used the following collections on this layout:
  • Everyday Circus (patterned paper)
  • Nautical (patterned paper)
  • Spellbound (patterned paper, buttons, die cuts)
  • Timbergrove (patterned paper)
  • Meology (chipboard button)
  • Making waves (alphas)
  • Burlap & Bouquets (flair button)
  • True Friend (flair button)
  • Flutter (button, chipboard)
  • Dream Big (paper clip, die cuts, puffy stickers)
  • Family & Co (label, die cut)
  • Joy Parade (die cuts)
  • Good Fellows (puffy stickers)

The first paper I chose was the teal wood grain paper - isn't it amazing?! It was like seeing it for the first time! Then I started picking out papers I liked and at some point I had a color combo in my mind what I wanted to go for. 

I designed the layout in Silhouette studio, just to see what it would look like. Then I cut all the circles with my Cameo. Of course you can hand cut these using different sized plates as template. I used to do this before I had my Cameo.


I then glued down everything and felt like I have no dimension at all. So I added a few hand stitched circles here and there, for a bit of dimension and texture.

My photo I already cropped in my photo editing program, because I like to have a white border around. I then matted my picture and placed it on some foam adhesive so it stands out more.


At this point I was still just hoping I'd find embellishments that matched my chosen colors! I'm not big on planning ahead haha! Luckily I have quite a big stash of Fancy Pants supplies since it's been my favorite company ever since I started scrapping! So I dug out everything and to my surprise I've found so many things! Even alphas which I really wasn't expecting. In this alpha pack there are other colors too, red and yellow, so I picked out all colors that fit and tried to come up with a title. Boy, this is what took me longest! I even tried to use one of those scrabble helps where you enter your letters and it gives you suggestions for words. But I had a lot more letters you can enter there so it was no help at all. Eventually I came up with this title. I had to engineer a T because I only had one. I believe I've used an R and a 5 to create it.


I then added all kinds of embellies, all over my page: puffy stickers, die cuts, flair buttons, buttons, chipboards...I love how the colors tie all these together!


To finish off the layout I wrote my journaling and stamped my date.

That's it for today! I hope you are inspired to dive into your old Fancy Pants stash now, because there surely are treasures to be rediscovered! Happy crafting!

Thanks for stopping by today,

X


Friday, January 12, 2018

You & Me - DT layout for Paige Evans + Silhouette

Hi there friends,

I'm back today with a new layout for the Paige Evans + Silhouette Design Team.

When I first saw the new Paisley cut file (Design ID: #239731) my heart skipped a beat! It was love at first sight! It reminded me of some Hungarian embroidery my grandma used to make when I was a kid. 

While I'm waiting (impatiently I might add!) for Paige's new stunning collection, I'm working with old ones. For today's project I used several collections which I will list at the end of my post.


I first played around with the cut file in the Studio software to see what background I want to create.  Once I settled on a design, I cut all pieces from white textured card stock. At first I had no idea what papers or colors I wanted to use. This coral paper is one of my favorites from the Turn the Page collection. This was the starting point for my color combo, coral and navy, which has been one of my faves for many years.


I backed the flowers with a variety of papers first, then the paisley. Since this is a rather lengthy process, I decided to go with the same papers on each die cut. Less thinking involved! Once done, I adhered these to the background the way I originally planned them out in Studio.


Then came the hard part, embellishing! Since I spent so much time on the background, I wanted most of it to show and not add a lot of embellishments. But at this point I wasn't quite sure if I find anything that fits my background. I was lucky, because I could pull out some coral and navy pieces from different collections: puffy stickers, stickers, die cuts, tags, and a cute little button. 


I also cut apart a tag to get the cross stitched heart and the crossed stitched I LOVE YOU sentiment and use them as embellishments. 

I layered some white tissue paper behind my photo and tucked it all behind one of the cut files. I didn't have a lot of space left on the left side so I only added a couple of tags and stickers here. I created a small flower cluster at the top right and at the bottom I added the sentiment and a super sweet suede bow.


For my title I used these gorgeous pearl white puffy thickers and the two twigs are from this pack too. At last I stamped my date. I decided not to add any journaling because I will have plenty of layouts documenting the same event and I liked the finished layout as it was.


That's it for today! I hope you like this layout as much as I do!
Thanks for stopping by today, have a great day!

X

Supply List: 
patterned papers: Turn the Page, Fancy Free
phrase thickers: Take me Away
bow, button, tags: Take me Away
stickers, puffy stickers: Turn the Page