Friday, July 19, 2019

Smile - DT layout for Paige Evans

Hey there crafty friends,

I'm back today with a new layout I've created for the Paige Evans Design Team! I've used the Horizon collection again, and remember my challenge for myself was to not go with a rainbow color scheme. Today I'm sharing an orange/coral/pink/purple combo! I'm so in love with these colors!


This layout is actually a lift of an older layout of mine (I just checked the date, and I can barely believe it is from 2 years ago OMG), which was similar in colors actually, except it had teal instead of purple! Check it out:


This was one of my most favorite layouts ever, so I thought I'd give it another go. And my best friend wants it so...Haha!

I die cut loads of leaves using some dies (again, you can totally go with cut files if that's easier for you, I just had a lot of small scraps and it was quicker this way!) in each color. Once done, I looked for a paper I could use for background and I found this gorgeous purple ombre paper in the Whimsical collection. 


I roughly arranged the leaves on the background so I knew how many I needed. I started gluing down the bigger ones. I'll be honest, I just eyeballed all of it, but if you don't feel confident in doing that, just use temporary adhesive first. I'm OK with imperfection! Once the big leaves were adhered, I added the smaller ones in between too.


I adhered some foam tape to the back of my photo and placed it in the middle of the flower. Then I started embellishing. I pulled out everything that matched my color scheme. Some are totally random but I don't mind. I went with a tone on tone look and used chipboards, stickers, die cuts, epoxy stickers and some sentiments from one of the Whimsical patterned papers. Actually they were probably on the manufacturer's strip at the bottom of the purple background paper because I did not go through Whimsical at all trying to find embellies. I glued everything down, for some I used liquid adhesive, for others foam tape, to add dimension. Oh here's something I was pretty happy about! There's a paper in Horizon with different colored frames, which I used on my next layout so I had it on my desk. There were frames in all the colors I used here and all of them had a phrase on them that fit my photo perfectly! I love love love happy accidents likes this! So I cut out the phrases and created a strip at the bottom of my layout.

To finish off my page I added some white ink splatters and wrote my journaling with a white gel pen. That's it!


Aaaaand because I had a bunch of leaves left and I don't throw away anything...I thought I might as well make a quick and easy card using them!


I created a top folding A2 size card base and added a white, embossed panel on top. Then I created a big flower and cut off the access on the left side.


Again, total luck, I found this beautiful journaling spot in the ephemera pack! I added foam tape to it and glued it down in the middle. For sentiment I used a sticker which I also popped up. To finish off this card I tied a twine bow at the top and added gold paint splatters. Seriously the quickest card I've ever made, I even feel guilty about it hahaha! I mean everything was already die cut, the design was there on the layout, so it really didn't take long to put it all together!


I hope I could inspire you with my layout and card today! If you give these a try, tag me on Instagram (@zsoka_marko).

Thank you so much for stopping by!

Have an awesome day!

X

SUPPLY LIST:
Whimsical collection: Paper 8


Thursday, July 11, 2019

Altenew July 2019 Stamp/Die/Stencil/Stamping Mat Release Blog Hop + Giveaway


Hello crafty friends,

I'm so excited to be joining the Altenew July 2019 release blog hop today! This will also be my last Altenew blog hop for awhile, because I've been struggling to find the time. I hope you'll enjoy my last projects!

You should have arrived here from the talented Jaycee Gaspar's blog. You can also find the full blog hop list at the end of this post in case you're lost.

Well let me start with the card I mentioned in my June Standalone Die release blog hop post, that I had messed up because I also used dies from this release (banging head in the wall)! Anyway, these layered flower dies were already released last month, but in case you've missed them, here is your chance to buy them: Virginia Rose 3D die set.


The dies I should not have used last month are the cool Geometric Frame dies! The sentiment is from the cute Bright Blossoms stamp set.


Next up is this duo I've made using the Bright Blossoms stamp set (also available: coordinating dies and stamp&die bundle at a discounted price). 


I can't stay away from those stripes!


For those of you that prefer muted colors, I've made this gray and gold card! Same Bright Blossoms stamp set as before, and for sentiment I just used the Mega Hope die and gold glitter paper. Which look do you prefer? I personally am all for color!


That's it for today! Should you have any question on how I made something, just leave a comment below and I'll get back to you. I apologize for not thanking each and every one of you for your sweet comments - I haven't been able to from my PC for months and it takes ages from my phone. But I always appreciate them, they make my day, please know that!

Now for the GIVEAWAY!

Prizes: 
1. To celebrate this release, Altenew is giving away a $50 gift certificate to 6 lucky winners! Please leave a comment on the Altenew Card blog and/or Altenew Scrapbook blog by 07/16/2019 for a chance to win. 

2. Altenew will also draw a winner to receive a $20 gift certificate from comments on each designer's blog in the blog hop list.

All winners will be announced on the Altenew blogs on 07/16/2019!

Thanks so much for stopping by today! I hope I could inspire you in some small way!

Have an awesome day!

X

Blog Hop list:

Focus on Eucalyptus Fantasy - DT projects for Pinkfresh Studio

Hello crafty friends,

I'm stopping by today to share a bunch of new cards I've made for Pinkfresh Studio.

Remember, recently we had a new release with washi tapes, stamps and dies. I didn't have much time to work with all the products then and I really wanted to, so for today's projects I've picked the Eucalyptus Fantasy sets (mostly). There are 3 products that work together:
Here's what I made:


To show you how all these products work together, I decided to do a bit of embossing. I used WOW! Embossing Powder Gold Rich Pale (WC01) embossing powder because this is the same pale gold as the Matte Gold washi tape, which I also used here.

I added some washi tape to white card stock, then die cut a wreath, two borders and a few smaller pieces with the Eucalyptus Fantasy die set. Using the Eucalyptus Fantasy stamp set and embossing powder, I gold heat embossed all these.

I then decided on what color scheme I wanted to go with. To be honest I didn't see a whole lot of options thanks to the green ha! So I just used some gray card stock and patterned papers (Indigo Hills 2 collection). 


To the below card base I added a few Matte Gold Washi Tape strips which I then stitched over with my sewing machine so that they surely stay in place. I embossed my sentiment in the middle, then popped the wreath on foam adhesive, tucked some gold metallic thread behind it and glued it all down in the middle. 


For my last card I fussy cut this hexagon shape - I cut out the middle of it too, only leaving me with a thin frame. I stamped and embossed a sentiment on vellum. I glued the frame on the vellum piece plus placed some gray patterned paper behind it as well, then stitched around it. I added foam tape behind this piece and attached it to my card base. The card base has a gray card stock panel plus a patterned paper piece that I cut smaller using the Simple Edgers die set! There's two leaf clusters in opposite corners on this design - I added some additional leaves for more dimension. To finish off these cards I splattered gold ink here and there and added see-through crystals which remind me of water droplets. I just wish they were smaller!


On my next set I used the Eucalyptus Fantasy stamp set differently because I need color! 


For my card on the left I stamped the wreath in black ink, then colored the leaves with alcohol markers. Simple flat coloring, nothing fancy! I added two strips of Rainbow with Splatters washi tape on the sides of my card front. Some paint splatters, twine and jewels (Essentials Jewels Mix) finish off this card.


For my card on the right I die cut two floral borders using the Rainbow with Splatters washi tape and the recently released Lacy Floral Border die set. I stamped my sentiment in the middle and glued down both borders. For final touches I added black paint splatters, some twine and crystals.


Last but not least I white heat embossed the wreath on watercolor paper, die cut it, and watercolored the leaves. I had these colors on my desk because I used them on another project and loved them so much, I thought I'd color one of these images too. 


Gray card base, a wide strip of navy card stock to which I added my sentiment, two slim white strips, white splatters, twine and the card is done!


I hope I could inspire you to create something with these washi tapes and coordinating stamps and dies!

Thanks for stopping by today!
Have a great day!

X

Tuesday, July 9, 2019

Nope! - DT layout for Paige Evans

Hi there crafty peeps,

I'm stopping by to share a new layout with you that I've created with the gorgeous Paige Evans/Horizon collection! I've challenged myself to not create any rainbow colored layouts for my next assignments, and come up with different looks every time. I'm a bit tired of rainbow lately! As much as I love it, I need a break from it now, if you can believe it!

First up I have an all blue layout for you! It's hard for me to pick a favorite color because I love pretty much all colors, but if I had to, it would be some kind of blue. There's so many different shades, it just doesn't get boring.

Horizon is so full of color and there's so many papers, you can really come up with many different color combos.


I die cut a lot of these layered flowers from various blue patterned papers. You could totally use one of Paige's layered flower cut files for this, but I went with dies because I have so many small scraps and it's easier to use them with dies than arrange them on my Silhouette mat and in Silhouette Studio. Plus while die cutting, I can also watch some series so I don't get bored haha!


I've arranged the flowers in a big heart shape and checked where I wanted my photo to go. I removed the flowers from that section and glued my photo down. I also glued down the rest of the flowers and tucked some behind the photo on the right side and at the bottom. 


I added a cute paper clip, a label with my date, a few word stickers, epoxy stickers and die cuts. I also placed enamel dots in the middle of the flowers. I adhered my title at the bottom. I didn't need journaling because this photo is part of a series I've already scrapped that have journaling on them. Last but not least I added some navy paint splatters.


That's it! Super simple but I love all the dimension!

I hope I could inspire you in some small way!

Thank you for stopping by! Have a wonderful day!

X

SUPPLY LIST:


Wednesday, July 3, 2019

In the spotlight: Spellbinders Small and Large Die of the Month kits - July

Hey there friends,

I'm so excited to share my projects with the awesome Spellbinders July Small and Large Die of the Month kits today! Gosh, these kits are getting better and better! Seriously, this month I can't pick a favorite kit from the 3 I've had the honor to work with!

As I've mentioned before, Spellbinders have several monthly kits, which are really great! You can subscribe to:
These are all a great value, have a look! You can find all necessary information about these kits here.

Let's start with the Small Die kit!

This month you can create these adorable pets, a dog and a cat! There's a sentiment die, Besties Forever, and some accessories included too, like the bones, a bowl, leash and a grass border. It's a lot of tiny pieces to die cut but I think the result is so worth it! What do you think?


I've used some other dies on these two cards too: the Scored and Pierced Ovals Etched dies which is a very good basic shape to have, plus the Truckin Through the Seasons die set which is one of my favorite dies from Spellbinders! I've used it a few times before here and here for instance.


The patterned papers are from the My Mind's Eye Gingham Farm collection.


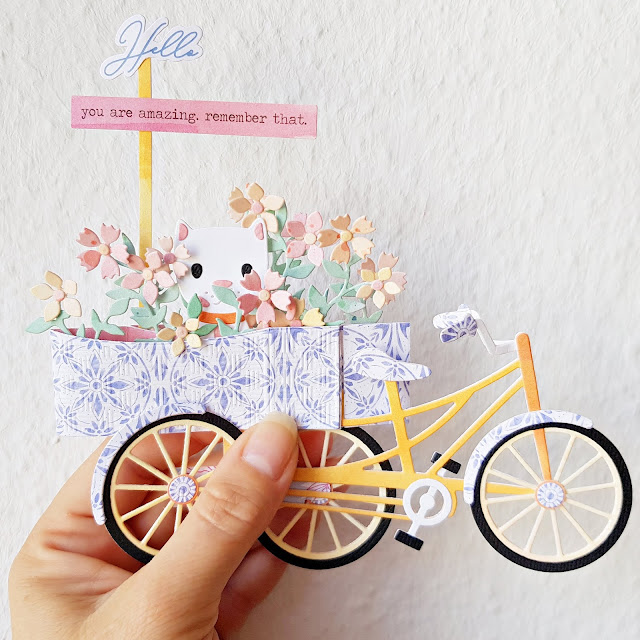
As for the Large Die kit...OMGOSH! It's a 3d bike!!! You can make a decor piece where the baskets can hold any small items! Or, like I did here, you can make it into a "card", it can be folded and then it fits into an envelope. You'll need a bigger envelope for this one, it won't fit into the standard A2 size. It's not huge though! Mine needs a bit more room because of the way I added the sentiments. Included in this kit are not only the pieces you need for the bike but also a "Fun Times" sentiment that would work with the above mentioned Truckin Through the Seasons die set, and flowers! Isn't this super fun?! I loved creating it! By the way, there is a pictorial included in the kit to help you build your bike, don't worry, if I could figure it out, you can too!


Here it is, folded! If you take off the pole with the sentiments, it's really not that big!


The patterned papers I used here are from the brand new Pinkfresh Studio Just a Little Lovely collection.

That's it! I hope you guys liked these projects and feel inspired to create something today!
Happy crafting!
Thanks for stopping by!

X

Tuesday, July 2, 2019

In the spotlight: Spellbinders Card Kit of the Month - July

Hello there crafty friends,

Today I'm sharing projects I've made with the gorgeous Spellbinders July Card Kit of the Month! I've only managed to make 6 cards because due to the upcoming summer holidays I've just had too much on my plate - however, I will tell you this: the kit is fab and there is SO.MUCH.STUFF in it! You can create many many cards for sure.

As I've mentioned before, Spellbinders have several monthly kits, which are really great! You can subscribe to:
These are all a great value, have a look! You can find all necessary information about these kits here.

Here's a list of what you get:


Let's talk about the dies guys! I'm generally not into cutesy cutesy but this adorable mermaid had me ooh ahh haha! Seriously, just how gorgeous is she?! I had had more time, I surely would have made more cards just with her. So in love! So here are my cards with the dies:


I used the patterned papers from the kit to die cut most parts. I love love love this month's papers! Also, Spellbinders always includes a pictorial in the kit on how to put the die cuts together - which is what I always follow because I'm really bad at figuring things out! Which mermaid do you like better, the blond or the brunette?! I don't think I can pick a favorite!


I stayed with the mermaid theme on all of my cards because there were so many beautiful mermaid embellishments in the kit! I used some die cut and some foam sticker mermaids on my next cards that are great for your bestie!


Look at those crystals! There are several colors included in the kit and they are fabulous!


There's always 2 of each die cut in the kit, so I had two more mermaids left. I made these two cards with them, pretty much the same design just different colors. Easy peasy!


I hope I could pique your interest in this kit! Seriously, so far I think this is my favorite. Beautiful colors, awesome patterns and wonderful embellishments! And the mermaid die. THE MERMAID DIE! Have I mentioned the mermaid die?!

You need this kit, believe me :).

Have an awesome day guys! I'll be back with my projects with the Small and Large Die Kits of the month of July soon! Oh, those kits are AWESOME too! Just you wait :D

Thanks for stopping by!

X