Thursday, October 31, 2019

Last minute Halloween decor idea - DT project for Paige Evans

Hello crafty friends,

Happy Halloween to all of you who celebrate it! It's funny, I seem to have a blog post scheduled every year on Halloween! I don't mind though, I love working on Halloween projects even if we don't actually celebrate it. 

Some months ago I bought a few different gold hoops at my favorite store here in Germany, thinking I could create wreaths for all kinds of occasions. Well, this is the first haha! 

Paige has soooo many awesome Halloween themed cut files, it was really hard to choose. I was looking for a spider web in the shape of a heart I remembered seeing but didn't find it, so I went with an older cut file, Spiderweb (Design ID: 216765) - once I cut it, I found the other one I was looking for hahaha: Spiderweb Heart with Spider (Design ID: 304677), plus a second one, Spiderweb Heart (Design ID: 278648)!


My ring is just a bit smaller than 12" so I cut the spiderweb as big as I could from a 12" black card stock so that it has some overhang. Not all ends are long enough but there's a few I could attach to the ring.

I die cut some bats too in various sizes from the same card stock - for these I used the Bat Background (Design ID: 221100) cut file. 


I then went through Paige's collections to find some purple, orange and green papers for my flowers.  There's actually quite a few of these, and, in retrospect, I probably should have used more to add different hues of these 3 colors. :( I also regret using my Oh My Heart orange paper when I only had one while I have several orange papers from other collections. Ugh!

Now, I don't quite remember which cut files I used exactly but I'll try to be as precise as possible! Honestly, you can use any of Paige's layered and rolled flower cut files, they are all amazing!
I used my hot glue gun to assemble all the flowers. I then covered about half of the ring with a lime green elastic band I bought for my traveler's notebooks years ago. You could use ribbon too, whatever you have in your stash!

Oh, one more thing I die cut, the BOO sentiment - I just used the Impact font for these.


Once everything was die cut and assembled, I could start putting my wreath together! I attached parts of the spider web to the elastic band, others to the ring, using hot glue. I arranged my flowers and glued them in place. The big letters followed, finally the bats. I added a few enamel dots to the middle of the layered flowers. Last but not least I attached some ribbon in coordinating colors, so I could hang the wreath on our door.


That's pretty much it! I already forgot how much I love working on rolled flowers!

I hope you'll give this idea a try!

Thanks for stopping by today and have a fang-tastic day!

X

SUPPLY LIST:
Truly Grateful collection: 12x12 Paper Pad, Paper 3, Paper 10
Whimsical collection: Paper 8, Paper 22
Oh My Heart collection: Paper 20

Thursday, October 24, 2019

Non-traditional Christmas cards - DT projects for Pinkfresh Studio

Hello there Pinkfresh fans,

I'm back today with some non-traditional Christmas cards I've created for Pinkfresh Studio. Do you guys prefer traditional or non-traditional color combos and designs? I'm not very picky, I love them all! I generally don't like red and green together except on Christmas projects. Lately however I replaced green with blue and I'm loving it. I've always loved navy+white clothes (lots of stripes!) with red accessories, so why not try these colors on Christmas cards? What do you think, yay or nay? I won't be offended ha! To each their own right?!


First I stamped my background using the Adore Alpha stamps. I really prefer using a stamping tool but I wanted to stamp "HO" many times randomly and I wanted the two letters always to be lined up the same way. So I had to hand stamp these. Luckily the inks are wonderful and I really wouldn't have needed to double stamp the images. Oh by the way, the inks I've used on all these cards:
You can also buy these in a variety of bundles:

Back to the card. I stamped some details on the lighter letters using a color in a darker shade. I cut off a piece of this panel and glued the bigger part on my white (dry embossed) card front. I added two thin red strips for interest. I then die cut 3 wreaths from white, light and dark blue card stock using the Layered Wreath die set. I layered them up and glued them together. I added some red berries that I had left over from previous projects (I colored these with the Candy Apple ink). To finish off this card, I die cut a sentiment from pink card stock, using the Classic Holiday Words die set (seriously my favorite sentiment die set!) and glued it down in the middle. 


For my next card I dug out an older stamp set, Constellation. I first stamped the image with Sapphire ink, then inked up only the edges of the circle with Stargazer. The colors are soooo gorgeous in person, unfortunately my photos don't do them justice. I was planning to add some die cut wreath to this but they would all have covered up the beautiful dark blue edge, so I had to come up with a different solution! I white heat embossed the sentiment from the lovely new Season's Greetings stamp set and I stamped the wreath from the same stamp set in embossing ink. I was going to white heat emboss this too but again...the dark blue edges would have been covered up plus I really liked the tone on tone look! I die cut this circle and a larger red one - layered these up, using foam tape. I prepared my card base, added a dry embossed, white panel to it as well as two pink strips. I glued the circles on top and added some twine bow as a finishing touch.


For my last card I die cut a white panel with the Geo Star 1 die, and a pink one with the Geo Star 2 die. I also die cut HO HO HO from white card stock using the Adore Alpha die set, then using Berrylicious, Slumber and Stargazer inks and the Adore Alpha stamps I added color to these letters. If you know the Adore Alpha die set, you know it cuts not only the letter but also a super cool outline. I did not want to throw these away! I layered the Geo Star die cuts on my card base. I die cut the letters from heavy weight card stock a bunch of times, so I could create dimensional letters. I then attached both the letters and the outlines in a random way, adding some playfulness to my card. To finish it off, I added some twine at the top.


That's it for today guys! I hope I could inspire you in some small way!

Thank you for stopping by and have a wonderful day!

X


Friday, October 18, 2019

Cards for boys - DT project for Paige Evans

Hello there crafty people,

I'm stopping by today to share a bunch of cards I've created for the Paige Evans Design Team. None of which features flowers...wait whaaaaat?! I'm all for flowers. I mean, I'd always go with flowers on any card, especially when I don't use stamps. When I was a little girl, I got a book from a botanist friend of my parents, called "Zsófi kertje" (Zsófi's garden), because I loved flowers so much (plus she thought the little girl on the cover looked liked me haha). She figured maybe I'd become a botanist myself - a thought that never actually crossed my mind for some reason. In fact, I am so bad with plants it's comical. So I'll just stick to paper flowers that can't die on me :D. BUT lately I've realized I never have cards that my son can give to his friends, so I decided to make a few to have on hand when he needs them.


I've mostly used the Truly Grateful collection plus a few things from Horizon too. I went with a blue-green color scheme because there's plenty of papers and embellies in these colors in both collections. All of my cards are mounted on A2 size top folding card bases, which is my preferred format for my cards. 


I then selected and cut a few of Paige's cut files: Anchor (Design ID: 300203), Llama Alpaca (Design ID: 293591), Today is a Good Day (Design ID: 290292), Star (Design ID: 289468) and Fish Background (Design ID: 299191). I more or less designed the cards in Silhouette Studio already, so that I knew what size the cut files should be. I then backed them all with patterned papers.


The sentiments were a bit tricky and I swear I spent the most time on selecting those! I would have preferred to write Happy Birthday on all of them but I didn't want to use a stamped sentiment so I just went through all embellishments from both collections, multiple times, before I finally settled on these five. I like my sentiments to be meaningful - as in, I want to use something that makes sense when I give the card to someone. I didn't just want to add some random die cut. So you see why this part took me ages haha! But I think most of these will work for birthdays or at least as "just because" friends cards or so.


I was going to back this big Today is a Good Day sentiment but quickly changed my mind when I saw the size once it was cut ha! The thought of cutting al those miniature letters was just too overwhelming! Instead, I cut a bunch of strips of various patterned papers - which I've been loving to do for awhile - and created a colorful background. I then just glued the cut file on top. I added some of the inner pieces too, for interest.


I had to make a llama card because Maxim loooooves llamas. I'm not sure he will be too excited about the bling I put on it but he does have a friend who appreciates everything shiny, glitter etc :D. I used some dies to create my background as well as an embossing folder to add texture to the white paper at the top. This sentiment comes from one of the 2x2 paper pads!


Personally, I love this last card the most. I fell in love with this cut file when Missy used it on her amazing layout a while back and I've been wanting to use it ever since. Fish work for boys cards just fine :). 


That's it! I didn't go into details because I think it's easy to see how these cards were put together. But if you have any questions, just ask below or send me a message, I'm happy to help!

I hope I could inspire you in some small way!
Thanks for stopping by today and have a great day!

X

SUPPLY LIST:
Horizon collection: Paper 5Paper 8, Epoxy Stickers

Tuesday, October 15, 2019

Layton's Legacy Fundraiser & Card Drive 2019


Hello crafty friends,

Today I'm joining the Layton's Legacy Card Drive & Fundraising efforts organized by Lea Lawson, marketing manager of Pinkfresh Studio, in honor of remembrance of her adorable baby, Layton Caleb. 


This is not an easy post to write, not for any parent, I'm sure. It is hard to stop our minds from going there and think about what ifs. What if something this terrible had happened to you? 

October is Pregnancy & Infant Loss Awareness month and October 15th is what many in the loss world call Wave of Light. It is a public way to share the memory of your lost pregnancies and/or babies. This card drive and fundraiser is Lea's version of Wave of Light and I am happy to spread the word and help wherever I can. 

  • You can find Lea's original post with all the information HERE.
  • You'll find the fundraiser HERE.


I hope you have a few minutes to spare to check it out, and maybe even help. Ways you can help:

  • DONATE - through Layton's Legacy GoFundMe Fundraising link
  • SHARE - not everyone is able to financially donate, but sharing on your social media outlets is welcomed and helpful
  • CREATE - this year's card drive theme is "Sensitive Sympathy" geared towards parents who have lost a pregnancy due to miscarriage or stillbirth, infant or child. You can get all the card drive info HERE.

Pinkfresh Studio created a stamp and die set for this card drive and they will be donating $5 from every stamp set sale to the Layton's Legacy fundraising efforts. 

I've created a card duo with the gorgeous Forever in Our Hearts stamp and die sets. It's really hard to know what to say to parents that are going/went through this - the sentiments in this stamp set are sensitive to this topic. 


I hope you can join us in spreading the word about this card drive and fundraiser, I think that's the least we can do to support these parents going through unimaginable pain. We appreciate all your help!

Thank you for stopping by today and I wish you a wonderful day!

X

Monday, October 14, 2019

Pinkfresh Studio Ink Pad Release Blog Hop


Hello Pinkfresh Studio fans,

Finally the big day is here! Seriously, I've been waiting for this all year haha! You should have arrived here from my sweet and talented friend Yaz's blog! Since I'm the last stop in this big blog hop, I'm probably not going to be able to show you a whole lot of new things, but I took a LOT of photos to show you the AMAZING new ink pads as best as I can! I wanted you to see all 48 colors because they are just THAT fabulous and I wasn't able to pick just a few hehe!

I apologize for the length of this post but it will be more photo than text heavy. Bear with me!

I stamped the same design with each ink pad set, making 12 cards in total. The lovely stamp set I've used here (and in fact on every project in this post haha!) is my most favorite Pinkfresh stamp set ever (clearly!): Embroidered Blossoms.


I also stamped some white card stock with the darkest ink in each set, then die cut my sentiments using the Kelly Alpha Lower Case die set  for a tone on tone look. Can you pick a favorite?! I honestly don't think I can! I love me a rainbow :D.


I also took photos for you guys showing each card against the ink pad sets. I haven't brightened or saturated these photos so that you could see the colors as they are in person. I think they are pretty realistic.

You can buy the full collection of full sized ink pads HERE and the full mini ink cube collection HERE. I'm using Affiliate Links - these don't cost you anything, but help me a little to bring you more inspiration! I appreciate your support! I'm linking the single ink pads and mini cube sets below, with each picture.

1. Rise and Shine - while yellow is not my favorite color, I actually was most excited about this set because it has a gorgeous variety of yellows which I don't have from any other brands.


2. Indian Summer - I love that the oranges are muted in this set! Absolutely stunning!


3. Heartbeat - All the heart eyes for this set, I love corals and use them a lot too.


4. Fairy Dust - Lovely pinks, my absolute favorite is Raspberry Bliss!


5. Soul of Provence - I love purple and what I love most about this set is that it has different purples, not just different shades of the same color. All 4 look so pretty and interesting together, I especially love the plum colors (Candy Violet and Regal Kiss).


6. Over the Hills - Perfect greens for foliage!


7. Garden Stroll - Who doesn't love a good mint set?!


8. Island Oasis - Or aqua?!


9. Morning Sky - And then there are all the blues of course, oh my goodness! I hope you're as excited as I am haha!


10. Starry Night - This set has some of my most favorite blues, cornflower, royal, navy...What's not to love?!


11. Wild Truffles - Wonderful browns for all your fall (and coffee!!!) themed projects :D. I even made some Christmas cards with the two lightest pads, check here. That polka dot background is stamped twice, I think the coverage is amazing! These pads are so juicy!


12. Urban Raincoat - Beautiful cool grays!


By the way, these ink pads coordinate with the 12 Pinkfresh liquid water colors, if you needed another reason to buy these hehe!

I was stamping a background for fun the other day using these ink pads (but stamps from another company) and I fell in love with the color combo so much, I took out the Embroidered Blossoms stamp set AGAIN (as well as the coordinating Embroidered Blossoms dies) and stamped and die cut  a million flowers in those colors. I used them on a layout, 3 cards and I still have plenty left haha! Take a look:


I popped up the flowers using foam tape, the foliage I glued down with liquid adhesive. I felt that this layout didn't need embellishing, so other than the title (Puffy Alpha stickers are from the Office Hours collection), I only added a die cut and a wood button (both from the Just a Little Lovely collection). 


For all these projects I've used the inks you see here in the picture:


For the LOVE sentiment I've used the Adore Alpha die set, but I haven't used the outlines. 


The "Do what makes your soul shine" and "Today is a good day for a good day" sentiments are from the My Favorite Things to Say stamp set


Some gold splatters finish off all three cards. I hope you like how they turned out!


Giveaways:

1. Pinkfresh Studio is giving away the full sized ink pad release on the Pinkfresh blog and the  complete mini cube release on Instagram!

2. On each blog we are giving away a $25 gift certificate too!


As always, the winners will be selected from the comments left on all blog posts. Winners will be announced on Monday, October 21, 2019 on the Pinkfresh Studio Giveaway Page. You must claim your prize within 2 weeks so don't forget to go check the above page! Comment away! Good luck!

Pinkfresh Studio is also offering free shipping on orders $100+, within the United States. No code is needed.

That's it for today! I hope you enjoyed all the inspiration along the hop!

Thank you for stopping by and have a fabulous day!

X

BLOG HOP LIST:


You are invited to the Inlinkz link party!
Click here to enter

Wednesday, October 2, 2019

In the spotlight: Spellbinders Small and Large Die of the Month kits - October

Hi there crafty peeps,

I'm excited to share my projects with the awesome Spellbinders October Small and Large Die kits with you today!

As a reminder, Spellbinders have several monthly kits, which are really great! You can subscribe to:
You can find all necessary information about these kits here.

Let's start with the Small Die kit! This month we are starting Christmas crafting! Well, technically I started in June already haha! These dies are so fun! You can make a lady in apron and a bunch of different accessories and things to put in her hands, like presents, pie, Christmas tree... 


I've used a variety of basic Spellbinders dies to create my backgrounds, the Nestabilities Fancy Edged Ovals Etched Dies and the Nestabilities Fancy Edged Rectangles Etched Dies. These are my go to dies on a lot of my Spellbinders cards. I love the dimension and interest they add, and I just can't get tired of them!


I die cut all the little pieces from different patterned papers - I love these kind of projects, especially when they finally come together after all the die cutting hehe! It's like playing dress-up! :) The dies I used for the sentiments on these two cards come with the October Card Kit. I love them so much, the font is so nice!


I had to make a card with the pie too! Especially because I've never had a chance to use that pumpkin embossing folder before. It's not from Spellbinders unfortunately (in fact I have no idea where it's from), but I've found a few that would work for the fall theme! Check out the Cozy Knit Embossing Folder, the Pretty Plaid Embossing Folder, the Changing Seasons Embossing Folder or the Diamond Netting Embossing Folder for instance - they would all work for this season! I'm slightly obsessed with embossing folders hehe!


And then it's all about layering...Very simple! For this last card I've used patterned papers from the lovely Truly Grateful collection by Paige Evans for Pink Paislee.


Moving on to the Large Die Kit...I have a card duo to share with you.


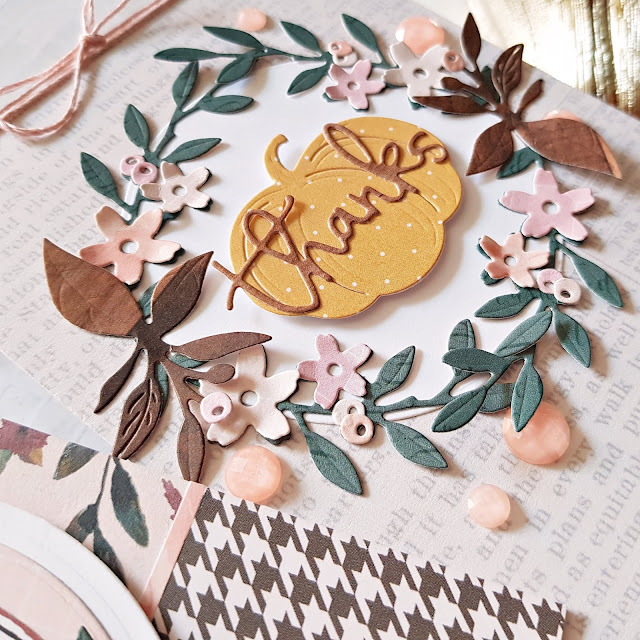
Perfect die set for fall! There's some foliage, flowers, a pumpkin and the word "thanks" - for all your Thanksgiving cards! I used my favorite fall paper collection for these: Pink Paislee's Auburn Lane from last year. 


That's it for today! I hope you liked my projects with these awesome die sets!

Thank you for stopping by!

Have a lovely day!

X