Friday, March 25, 2022

My Boy - DT Layout for Paige Evans

Hi there crafters,

Today I'm back with a scrapbook layout, as promised!

As (almost) always, my starting point was the cut file. Actually, in this case, two. I knew I wanted to use the My Boy cut file (Design ID: 401445), because I figured it would go with any collections, any designs. But then I saw the Stripes Background (Design ID: 401436) cut file and I just had to use that too! 


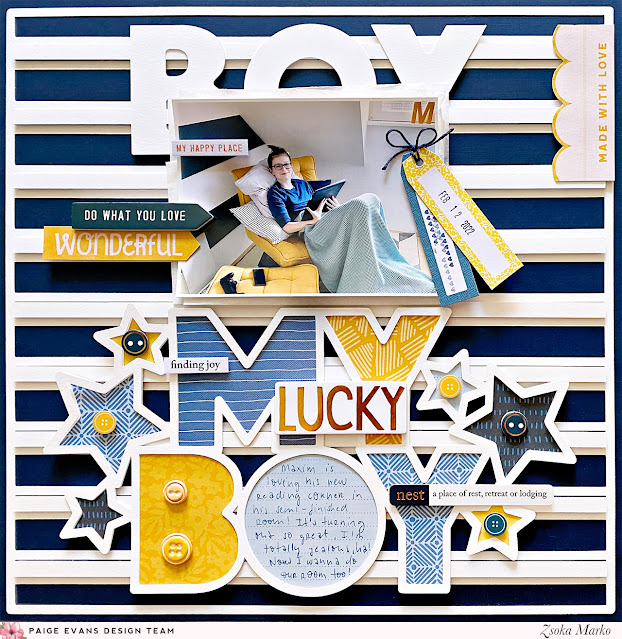
We recently redecorated Maxim's room and we painted one of his walls in navy-white stripes. So, I thought the cut file would be perfect for a photo of him in his room (back then it was just semi-finished, ha!). Now, apparently, I have already used up all dark blue patterned papers from Paige's collections, I only have some scraps left - so I had to go with a navy card stock. I was actually pretty lucky, because I had just one full sheet! I die cut the cut file from heavy weight white card stock and glued it in the middle of the navy card stock. I added the thinner strips back in, using foam tape, to create a bit of interest, texture, and dimension.


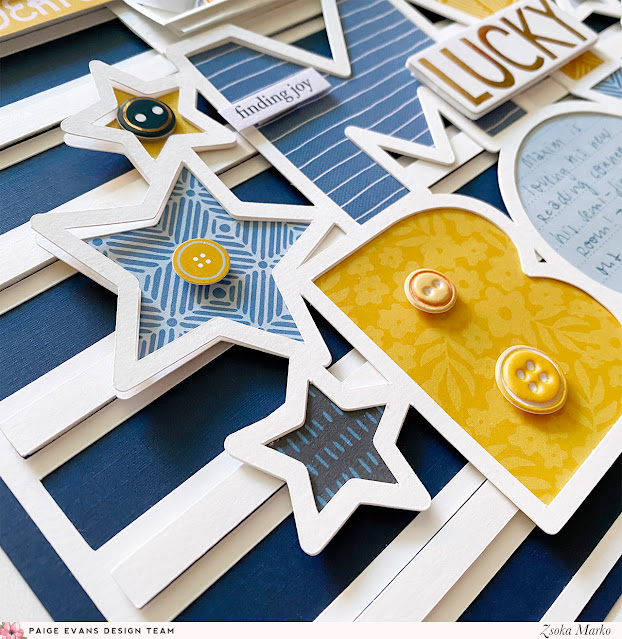
I die cut the My Boy cut file twice from white card stock. This is not something that needs to be done, I just like the dimensional look this creates. I do this on cards all the time but obviously I didn't use to do this on layouts until a year or so ago. Sometimes my cut file doesn't look very nice by the time I finish backing it, it's full of creases etc. This second layer hides those too. Anyway, I pulled out patterned papers from Bungalow Lane that are present in my photo, blues and mustard. I backed the letters and the stars in the cut file, with various papers. I then attached this to the background with foam tape.


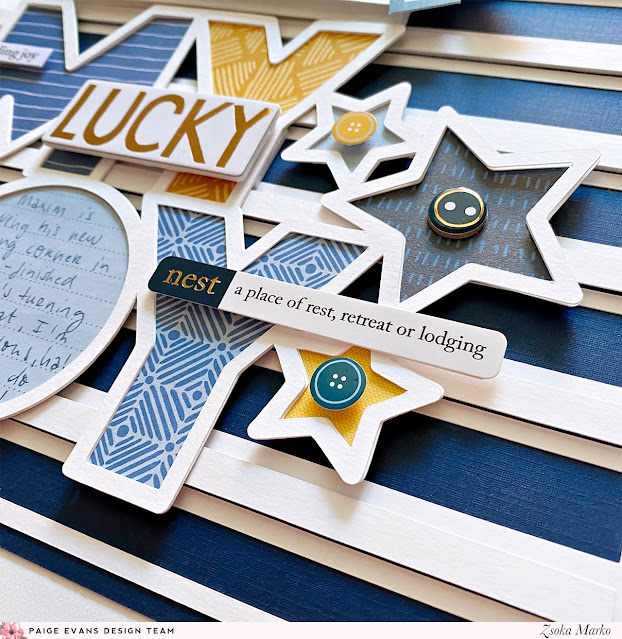
I layered some tissue paper behind my photo and adhered it down, above the cut file, also using foam tape. I didn't want to throw away the white fall out pieces from the cut file, at least not all of them - so I glued together the two B's, O's and Y's and tucked them behind my photo. Maybe it makes no sense from a design point of view, but I like the way that looks haha!


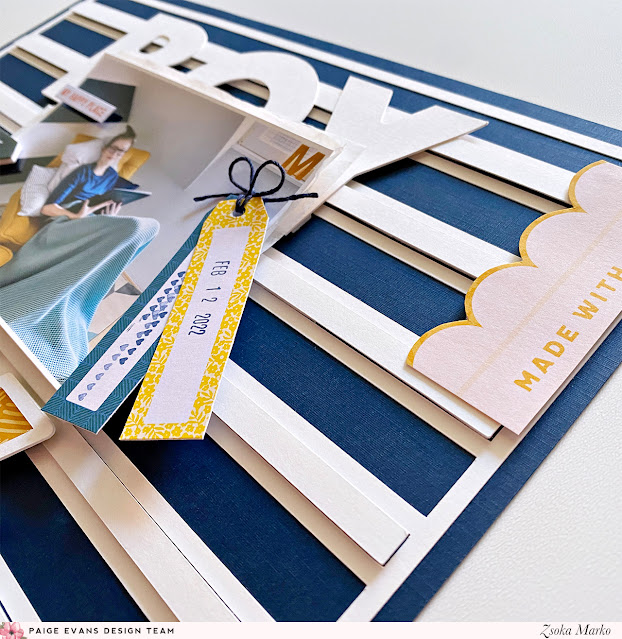
I fussy cut out some labels/tags from one of the patterned papers and used them as embellishments. I also added some sentiment stickers, foam stickers, various button stickers. I stamped my date on one of the tags and I stamped some hearts on the other tag, using Paige's roller stamp from her Take Me Away collection. I added navy twine and glued these down with foam tape. I added foam tape to most of the embellishments actually. I like all that dimension!


I wrote my journaling in the letter O - I specifically chose a lined blue paper to back this letter for this reason. 

That's it! I hope you like how this page turned out!
Thank you very much for stopping by! Have a wonderful day!

X

Monday, March 14, 2022

In Focus: Spellbinders March Release

Hi there crafters,

Today is release day at Spellbinders and I have quite a few projects and videos to share with you! So instead of the usual one blog post per collection, I'll just write one longer blog post, full of photos. Since I have process videos for everything, I won't write a step by step here.

First up Vicky Papaioannou's new collection, Paint Your World! Wow wow wow is all I have to say!


Next is the Celebrate You collection. This collection  has a lot of tags, labels, sentiments in it and I paired them with some of my favorite, older products! All deets in the video!


Next up is the Open Road collection!


Last but not least, the Spring Into Stitching collection! I also created 3 cards with stitching dies from last year. because I stitched those panels last year already but never turned them into cards - I thought it was time to do so :D


That's it for today! I hope I could inspire you one way or another!

Thanks for stopping by!

Have a wonderful day!

X

Wednesday, March 9, 2022

Paige Evans vs A Pocket Full of Happiness collab dies

Hi crafty friends,

Today I have a bit of a different post for you! I know a lot of you are scrapbookers but I still think this might be of interest to you too :)

You probably know by now that I've been a huge fan of Paige's work for many years and I've been lucky enough to be on her Design Team for quite some time. A couple of years ago I started my own small business and last year I finally could add my favorite product to my shop: my own steel dies. Since Paige has been creating cut files for a long time, and I love her style, I had this idea of turning some of them into dies! Paige loved it and now with each release there's some beautiful Paige Evans design in the collection. I can't lie, these are always my favorites to work with! You can use them on any type of paper projects really, not only cards. The samples I'll share today are all cards, because that's what I love making the most - but you can create wall art, PL pages, scrapbook pages and more with these!

Paige has them all in her shop now, so if you like them, you can order them from her directly!

Let me show you the newest ones first. They are called Quilt Background and Stitched Quilt Background dies - and they work on their own, or together too.


Here I've used them in a variety of ways: layered together, so you see the faux stitching peeking through, with inlay technique to add lots of colors, and on the right card I actually used the Quilt Background die to add gold foil! You just have to use your Spellbinders Glimmer Hot Foil System (or similar) and you can add foiled outlines to your paper with any dies.


Now imagine these projects with scrapbook papers! Wouldn't they look lovely? I certainly will create some in the future!

In the previous release we had the Heart Bouquet die set. I actually used Paige's Bungalow Lane collection to create some monochromatic designs. These are super quick cards, easy to mass produce even. Depending on what colors you use, they totally work for men too, in my opinion.


The little bow with two different tails and the love sentiment are also part of this die set. I die cut the heart bouquet from white card stock and then the single hearts from different patterned papers. You can do several at a time so this doesn't take long. Then you just puzzle them together. I absolutely adore inlay technique and for some reason it calms me down. I'm sure it's not everyone's cup of tea though!


Going back in time, the next two cover plates are from the Christmas release. One is called Sweater Weather, the other is Nordic Christmas. They both feature the same pattern, but they look quite different on your projects! Sweater Weather is probably my all time favorite die, it came out so beautifully! You can stitch different patterns on this panel, or use it as is. It is a bit of a diva :) Since it's a super detailed and intricate die, you'll need a metal shim and you'll need to run it through your machine multiple times. I will say though, if you don't use a shim and only run it through the machine once, you'll get a gorgeous, textured, embossed looking design!


I used simple back stitch on all my cards, but you can get creative and try something else, of course!


Same here, but in rainbow colors! So many options with colors!


I'll also show you a card that I did not stitch and you'll see how pretty this die is on its own!


It looks like lace! I absolutely love it!

Here's some cards with the Nordic Christmas cover plate as well! I like dies that allow me to add lots of colors! Again, the sky is the limit here. My biggest tip: add double sided adhesive sheet to a 4.25x5.5" piece of card stock, then add the die cut on top. This way you'll have glue in all the little squares, so it doesn't take long to do inlay technique!


Playing with colors and patterns is my most favorite thing!


Next up, the very first dies we did together, Floral Border and Floral Corner! These florals are so Paige! Stunning with inlay technique (first duo) but just as gorgeous in all white, on their own (second duo).


Then there is this simple card I made for my cousin's wedding! I die cut the border from both sides of an A2 size card stock first. Then I added double sided adhesive to an A2 size card stock and adhered my die cuts on top. Then I just poured glitter all over it, pressed it all in with my fingers and last but not least I just brushed off the excess glitter.


What do you guys think? Have you ever worked with steel dies? Do you like them? I love the beautiful edges they create!

I promise I'll be back with a layout next time hehe! But I hope you enjoyed this post anyway!

Thank you so much for stopping by!

Have a wonderful day!

X