Monday, September 30, 2019

Pinkfresh Studio Holiday Stamp & Die Release Blog Hop


Hello Pinkfresh Studio fans,

We are back again with a fabulous new blog hop full of gorgeous new products and loads of inspiration! Hope you'll love it!

You should have arrived here from the lovely Vicki Papaioannou's blog but you can find the full blog hop list at the bottom of this post in case you're lost!

So let's get to it then! Today I have a card trio for you that I've created with the beautiful Layered Wreath die set. All my sentiments are from the Classic Holiday Words die set


By the way...Do you see something fun sneaking in the picture?! Pinkfresh Studio ink pads, say whaaaat?! Psssst! They are coming October 14 so you don't need to wait long. I will tell you however, that they are AMAZING. Colors and quality all there. Why I'm actually mentioning this...I've only used white card stock on today's projects! Me! No patterned papers, ha! 

I simply colored my whites with 4 different ink pads, just stamping them until there was no more white space. It takes awhile to dry, you can use your heat gun to speed up the process if you want, but definitely wait until they are dry. Otherwise the paper will tear easily. 


I've cut different size strips of papers and glued them down kind of randomly on an A2 size piece of white card stock. I've die cut two wreaths from white card stock, layered them up and stitched them together in the middle. I glued the wreath onto my card front and added a pink bow on top which I've created using the Partial Cut Bouquet and Bow die set from an earlier release. My sentiment, some twine and gold splatters finish off this card.


Next up a white card that I've dry embossed. I then die cut a dark green wreath and added some light green bits and pieces on top - these smaller dies are also part of the die set. And so are the little berry dies - I've used light pink paper for these. 


Possibly my favorite sentiment from the Classic Holiday Words die set is Season's Greetings. I love that font and the size of the sentiment is perfect too - I think this set is a must-have! I've glued this down in the middle, splattered some gold ink and added red twine. By the way red twine....If any of you knows where I can buy red twine, like this one I've used here - something firm, not the soft baker's twine type that doesn't hold it's shape...Please let me know. I keep looking but only find baker's twine. :(


On my last card I've used the Folklore die from last year to add a subtle something something to my background. Just a little bit of texture a color! I then die cut the wreath again, this time the opposite colors as above. I added some light pink and red berries. You can take this to the next level and add some glaze or Nuvo drops!


Die cut sentiment, gold inks splatters, red twine and done!


And now for the fun part! 

Giveaways:

1. Pinkfresh Studio is giving away the full Holiday release on the Pinkfresh blog and Instagram as well!

2. On each blog we are giving away a $25 gift certificate too!


As always, the winners will be selected from the comments left on all blog posts. Winners will be announced on Monday, October 7, 2019 on the Pinkfresh Studio Giveaway Page. You must claim your prize within 2 weeks so don't forget to go check the above page! Comment away! Good luck!

Pinkfresh Studio is also offering free shipping on orders $100+, within the United States. No code is needed.

That's it for today! I hope you enjoyed all the inspiration along the hop!


Thank you for stopping by!

Have a fabulous day!

X

BLOG HOP LIST:

You are invited to the Inlinkz link party!
Click here to enter
<!-- end InLinkz code →

Friday, September 27, 2019

Make Your Own Magic - DT layout for Paige Evans

Hello there crafty peeps,

I'm back with a new layout for the Paige Evans Design Team! I haven't made a layout in like 2 months?! I've realised I can't focus on both cards and layouts at the same time, I have to be finished with all my cards before I can start working on my layouts. This is mainly because of lack of space - if I had a craft room, I could just set everything aside and work on other things. Now however, I have to clean up my tiny space in the kitchen ALL.THE.TIME before I can start on a new project uuuggghh. Anywho, I am just glad I finally managed to create some layouts! This is one of them:


I checked Paige's latest cut files and picked out the gorgeous Cut and Fold Butterflies Galore cut file (Design ID: 300213). I only kept one of the butterflies and deleted the rest. I then replicated it and lined them up the way I was planning to use them. 


To be honest I was going for something completely different but when I was checking the patterned papers and placed this floral one behind the cut file, I knew I had to use it. I just love all the colors peeking through - they remind me of paintball splatters for some reason! So I trimmed down the white card stock and adhered it to the left side of the floral patterned paper. I also added a thin strip of pink paper on the right side.


I layered some tissue paper, as well as a couple of journaling spots behind my photo, then glued it all down. I tucked some labels behind it too. Using foam tape I attached a small die cut banner with an epoxy sticker heart on top.

For my title I chose one from the Epoxy sticker pack -I love love love the font so much, I wish there were several packs like this in the collection haha! I adhered it to my layout, wrote a few words below it and stamped my date. Last but not least, I splattered some gold paint all over my page. Now that I have a couple of extra bottles of my favorite gold spray, I'm not stingy with it anymore hehe!


That's it lovelies! I hope you like how this page turned out!

Thanks for stopping by today! Have an awesome day!

X

SUPPLY LIST:
Truly Grateful collection: 12x12 Paper PadEpoxy StickersJournaling Spots


Wednesday, September 25, 2019

WOW! Embossing Powder and Newton's Nook collaboration

Hello there crafty peeps,

Today I'm sharing three cards I've made for the WOW! Embossing Powder and Newton's Nook collaboration!

I've used the super cute Loveable Laundry stamp and coordinating Stitched Onesie die sets. First I die cut lots of onesies from various patterned papers from the Paige Evans Truly Grateful collection. I also embossed a few with Opaque Bright White EP, again, on patterned paper. I die cut these too. 


On my first card I attached all die cut onesies with foam tape to a patterned paper card front, creating a full background pattern. I then trimmed off the overhang. To finish it off, I added some twine and a cute little clothespin. 


For my second card I stamped and heat embossed some onesies on white card stock, using Gold Rich Pale EP. I had a few patterned paper onesies left and I thought it would be fun to add some of those too. I gold heat embossed my sentiment on a white strip, I glued it on a wider patterned paper strip and attached it to my card. Again I added a clothespin and some twine to finish it off.


For my last card I used an embossing folder from my stash to create a textured background. I then made a clothes line on my card front and hung 5 embossed onesies from it, using clothespins. I gold heat embossed the sentiment on two vellum banners and tucked these under one of the pins. Et voilĂ ! 


I hope I could inspire you with my cards one way or another! 

Thank you so much for stopping by today! Have a wonderful day! 

X

Thursday, September 19, 2019

Card inspirations - DT projects for Pinkfresh Studio

Hello there Pinkfresh fans,

Today I have a few new card ideas for you! 
First up this blue duo! To be honest, when the gorgeous Lovely Blossoms stamp set (there's also coordinating dies) was released, I just stamped a million of them in all kinds of colors without a plan in my head. It was obvious I would use them for today's post but I had no idea what colors to go with!


But then blue is one of my most favorite colors and that blue tile paper from the Just a little Lovely collection (6x6 paper pad, 12x12 paper pack both available!) is my absolute favorite, so I just opted for blue. I didn't want to do monochromatic blue or pair it with coral like before though, so I went with orange. It is not my favorite combo, I will be honest. Anyway...I die cut all those lovely mini florals and leaves and played around with different arrangements. I created an A2 size top folding card base and attached patterned paper to the card front. I die cut a smaller white and a larger blue circle and layered them up, adhered them down. I started gluing down the little flowers, some with liquid glue, others with foam adhesive, for a bit of dimension. I die cut my sentiment using the Essentials: Classic Words die set. I added some enamel dots and twine to finish off this card.


Recently I had to make some shaped cards for a company and I loved them so much I decided to make one today as well. For this I've used the Essentials: Braided Tag die set. I first created a card base from heavy weight card stock - for this I partially cut the shape, so the top part didn't cut, then turned around the die and repeated the process on the other side (for the back of the card base). Then I just folded the long oval shape in half and done! I die cut the tag with the braided insert from blue card stock and adhered it to the card base. For sentiment I used a die cut piece from the Just a Little Lovely ephemera pack. I tucked some stamped flowers under it as well as some gold enamel dots. To finish this off, I channelled my inner Ivana Camdzic and added a shabby ribbon at the top. :)


For my next duo I picked out coral and red papers from the Office Hours and the Everyday Musings collections. Both are mounted on A2 size top folding card bases. 


I've used the stunning Modern Bloom standalone die to create a simple floral background. I've cut this from white, light coral and red papers, so that I could add some color to the flowers. I wanted to keep this light and airy so I didn't fill the leaves. Using one of dies from the Basic Label Frames die set and some vellum, I created a spot for my sentiment to sit on. I wanted to use the same red paper for my letters, so I had to tone down that part of the background. However, I didn't want to cover up the beautiful flowers - hence my choice of using vellum. I then die cut the letters with the help of my favorite Kelly Alpha dies ("H" from the Upper Case set, "i" from the Lower Case set), then backed them with white card stock. I adhered the vellum to the card front, then using foam tape, I attached the letters too. A few enamel dots and done!


For my last card I die cut a few scalloped strips in different shades of coral, using the Simple Edgers die set and adhered them at the bottom. I fussy cut out one of the circles from the Dreams paper (Office Hours collection), added some foam tape to it and before gluing it in place, I tucked some stamped flowers behind it. I then die cut Hello (Essentials: Classic Words die set) from red patterned paper as well as from white card stock multiple times, layered them up to create a dimensional word. I glued this down on the circle and added some more flowers around it. Last but not least, I've added some enamel dots and twine.


That's it for today! I hope I could inspire you to get crafty! See you next month, possibly with holiday cards, who knows ;P

Thanks for stopping by, have a wonderful day!

X

Tuesday, September 17, 2019

Guesting on the Altenew card blog

Hey lovelies,

I'm so excited and honored to be guesting on the Altenew card blog today!

Since it's September, I thought I'd create a few Fall/Thanksgiving themed cards for today's post!

My first duo features watercoloring which I hardly ever do, but the Weekend Doodles stamp and coordinating die set is one of my absolute favorite Altenew sets of late.


I stamped the images on watercolor paper and heat embossed them with gold embossing powder. I then colored them in loosely. For my first card I added some kraft card stock to my A2 size, top folding card base. I embossed my sentiment in white, then splattered white ink all over. I glued two flower die cuts in opposite corners, added some twine and done! Super easy!


I stamped some kraft card stock with the Rustic Linen background stamp and embossed it with white embossing powder. I trimmed it down and attached it to the white card base. I stamped the sentiment in brown. Next, I die cut a T from white card stock, using the Mega Alphabet T die. I kind of wrapped the flower around the T, glued them together, added some foam adhesive to the back and attached it to my card. Some twine finishes off this card too.


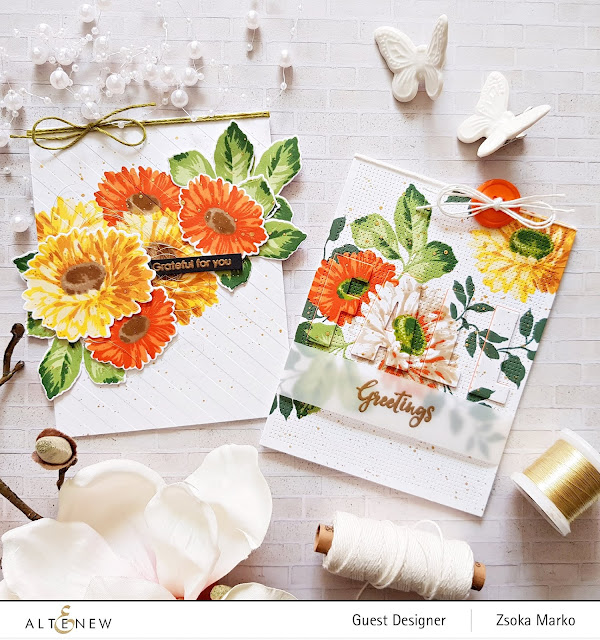
Next up a duo with the amazing Sunflower Daisy stamp and coordinating die set. I mean, just how realistic do those flowers look?! So much depth and dimension!


I started by stamping some flowers on white card stock. I had to create masks so they could be stamped behind each other. I then decided to stamp and die cut single flowers too so I could add some dimension to my card. But first, I dry embossed the stamped panel for additional interest. I glued down the die cut leaves, then started adding the flowers with foam adhesive. I also tuck some gold thread behind one of them. Once done, I splattered gold ink all over the card front. I added a gold embossed sentiment and some twine to finish it off.


I'm not a technique oriented card maker but I do love the following technique, I think someone told me it was called Eclipse? Anyway, I stamped my design on white card stock, then die cut FALL out of the panel, using the Caps Bold Alphabet die set. I also die cute FALL from orange card stock 5 times. I glued the layers together with the stamped image on top. In the meantime, I ran the background panel through my die cutting machine with the Cross Stitch Canvas die on top. This is one of my favorite Altenew dies, it instantly gives so much texture and interest to a card, it's absolutely stunning over stamped images! I adhered this panel to my card base, then glued down the letters too. I added gold splatters. Then using a sentiment from the Bountiful Branch stamp set (I actually cut apart Season's Greetings for this one) I gold heat embossed Greetings on a vellum strip, which I wrapped around my card. To finish off this card, I added twine an orange button at the top.


And so we've arrived to my last duo for today! For the card on the left, I stamped a background with the A Walk in the Woods stamp set - I stamped it twice, in 2 different inks, turning the stamp 180 degrees between the two layers. I then die cut a circle out of the middle with the circle die from the Welcome Home die set. The fall-out piece I used on my second card. I gold heat embossed a sentiment (from the Bold Bunch stamp set) on white card stock, I adhered it to my card base, then glued the stamped piece on top.


I used the Frilly Frame die to die cut a frame for the white circle. I stamped lots of sweet little flowers with the Painted Flowers stamp set and fussy cut all of them (I didn't realize there's a coordinating die set so I don't have it - this would come in handy if you have so many flowers!). I layered them over the die cut frame at the bottom and glued them down using liquid glue as well as foam tape, to add dimension. As a finishing touch I added gold ink splatter, some shabby ribbon and a button.


For my last card, I die cut a panel from kraft card stock using the Cozy Flannel cover die and glued it on my white card base. I die cut another frame with the Frilly Frame die and attached it to the fall-out piece I had left from my previous card. I stamped the sentiment in black ink (from the Sunflower Daisy stamp set). I added foam tape to the back and adhered it down on the card base. As before, I layered some flowers around the frame, added gold splatters and some twine.


That's it! It was so fun mixing and matching new and old products on these cards! I hope I could inspire you to dig into your stash and start creating! 

Thank you so much for stopping by today! And thank you Altenew for having me!

Happy crafting!

X

Friday, September 13, 2019

Truly Grateful card inspirations - DT project for Paige Evans

Hi there crafty people,

I'm stopping by today to share my latest projects for the Paige Evans Design Team.
This time I was asked to make some cards - which of course I don't mind, I love making cards, especially using patterned papers! I've used the stunning Truly Grateful collection to create this trio.


All these cards are top folding A2 size cards. On the first one I created a shaker window, with the help of some older Waffle Flower dies. I cut out a circle from patterned paper then layered a piece of acetate behind it and attached it to the card base using foam adhesive. Obviously before I did this, I placed some gorgeous Truly Grateful sequins on my card base, where the window would go :). I glued down the big die cut flower, then embellished the card front with flowers from the ephemera pack. Last but not least, I added a sentiment sticker and some gold splatters.


On my next card I also used the same die - I actually die cut this flower from 3 patterned papers and white card stock, then mixed up the pieces as you can see in the photos. Here I first adhered patterned paper on my card base, then added a slightly smaller piece of white card stock. I glued down the big flowers, sentiment sticker, small flower, some epoxy sticker dots and attached a big button in the flower center. To finish off this card, I placed some teeny tiny butterfly die cuts on the flowers and splattered gold ink all around the card front.


My third and last card is the simplest of them all! I covered my card base with patterned paper, added two thin strips of paper in the middle as well as a big, layered butterfly (the die is from Concord&9th). A sentiment sticker, gold splatters and some twine finish off this card. Easy peasy!


That's it for today! I hope I could inspire you in one way or another. 

Thank you for stopping by today!

X

SUPPLY LIST:


Tuesday, September 3, 2019

In the spotlight: Spellbinders Card Kit of the Month - September

Hello there crafty friends,

Today I'm sharing projects I've made with the gorgeous Spellbinders September Card Kit of the Month! The colors in this kit are just fab and just wait till you see the exclusive dies included, sooo fun!

As I've mentioned before, Spellbinders have several monthly kits, which are really great! You can subscribe to:
These are all a great value, have a look! You can find all necessary information about these kits here.

Here's an overview of what you get:


SO. MUCH. STUFF! I'm especially happy about the crystals, this is now the second time I think that Spellbinders have these in the card kit - these are my most favorite embellies ever, they are stunning! 

Without further ado, my projects!


What did I tell you about the dies?! Sooo fun right? I'll be honest, it did take a while to die cut and assemble all the little pieces but I love how those letter boards turned out! You can create your own fun sentiments that you have no stamps for! Of course the kit includes a pictorial on how to assemble these.


Next up two cards featuring loads of die cut pieces from the ephemera pack! All the flowers, leaves and sentiments come from this pack. Look at those colors!


Next up two fall inspired cards. This green is not my favorite color but I think in this color combo it looks very elegant! That floral paper though! Love!


I kept these pretty simple so that the papers could shine!


Last but not least this 2 for 1 duo:


Again, very simple cards, but I loved that floral paper so much, I didn't have the heart to cover it up more! I used the exclusive dies for the flowers and that big sentiment.


That's it for this month! I hope I could inspire you in some small way!

Thanks for stopping by today! Have a lovely day!

X