Showing posts with label patterned paper. Show all posts

Friday, March 25, 2022

My Boy - DT Layout for Paige Evans

Hi there crafters,

Today I'm back with a scrapbook layout, as promised!

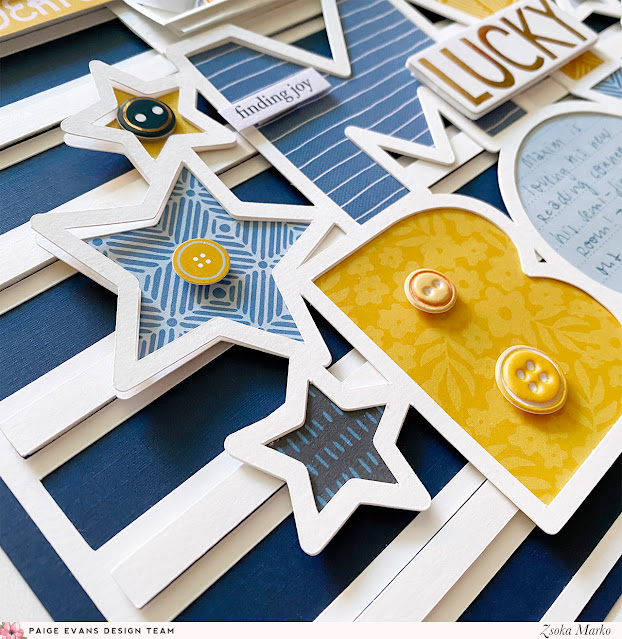
As (almost) always, my starting point was the cut file. Actually, in this case, two. I knew I wanted to use the My Boy cut file (Design ID: 401445), because I figured it would go with any collections, any designs. But then I saw the Stripes Background (Design ID: 401436) cut file and I just had to use that too! 


We recently redecorated Maxim's room and we painted one of his walls in navy-white stripes. So, I thought the cut file would be perfect for a photo of him in his room (back then it was just semi-finished, ha!). Now, apparently, I have already used up all dark blue patterned papers from Paige's collections, I only have some scraps left - so I had to go with a navy card stock. I was actually pretty lucky, because I had just one full sheet! I die cut the cut file from heavy weight white card stock and glued it in the middle of the navy card stock. I added the thinner strips back in, using foam tape, to create a bit of interest, texture, and dimension.


I die cut the My Boy cut file twice from white card stock. This is not something that needs to be done, I just like the dimensional look this creates. I do this on cards all the time but obviously I didn't use to do this on layouts until a year or so ago. Sometimes my cut file doesn't look very nice by the time I finish backing it, it's full of creases etc. This second layer hides those too. Anyway, I pulled out patterned papers from Bungalow Lane that are present in my photo, blues and mustard. I backed the letters and the stars in the cut file, with various papers. I then attached this to the background with foam tape.


I layered some tissue paper behind my photo and adhered it down, above the cut file, also using foam tape. I didn't want to throw away the white fall out pieces from the cut file, at least not all of them - so I glued together the two B's, O's and Y's and tucked them behind my photo. Maybe it makes no sense from a design point of view, but I like the way that looks haha!


I fussy cut out some labels/tags from one of the patterned papers and used them as embellishments. I also added some sentiment stickers, foam stickers, various button stickers. I stamped my date on one of the tags and I stamped some hearts on the other tag, using Paige's roller stamp from her Take Me Away collection. I added navy twine and glued these down with foam tape. I added foam tape to most of the embellishments actually. I like all that dimension!


I wrote my journaling in the letter O - I specifically chose a lined blue paper to back this letter for this reason. 

That's it! I hope you like how this page turned out!
Thank you very much for stopping by! Have a wonderful day!

X

Tuesday, February 22, 2022

School's Out For Summer - DT Layout for Paige Evans

Hello crafty peeps,

I'm stopping by to share a new layout with you today, that I made for the Paige Evans Design Team, using the older Whimsical collection. 

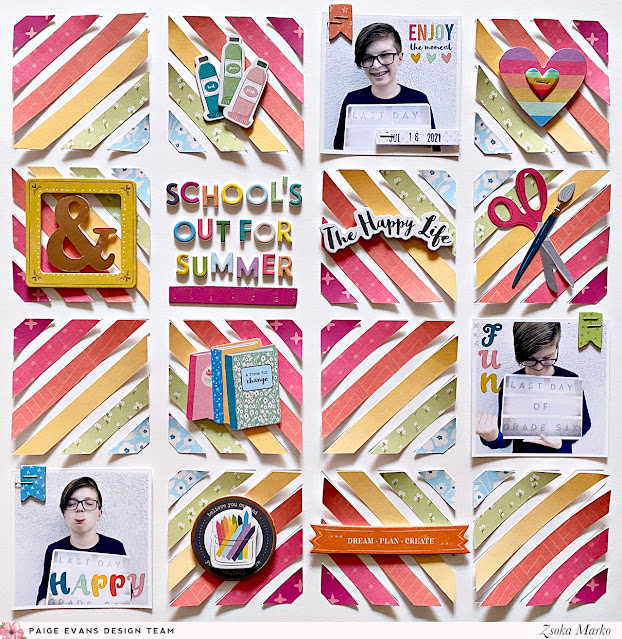
I chose the Diagonal Stripes Background cut file (Design ID: 219450). In Silhouette Studio I deleted some parts of the cut file, where I was planning to add my 3 photos and title, then I sent the design through my Cameo. Also in Studio, I colored all the pieces to see how the pattern I imagined would look like and once I was happy with the design, I grouped the colors together and cut them out of various patterned papers, to create a rainbow color scheme. 


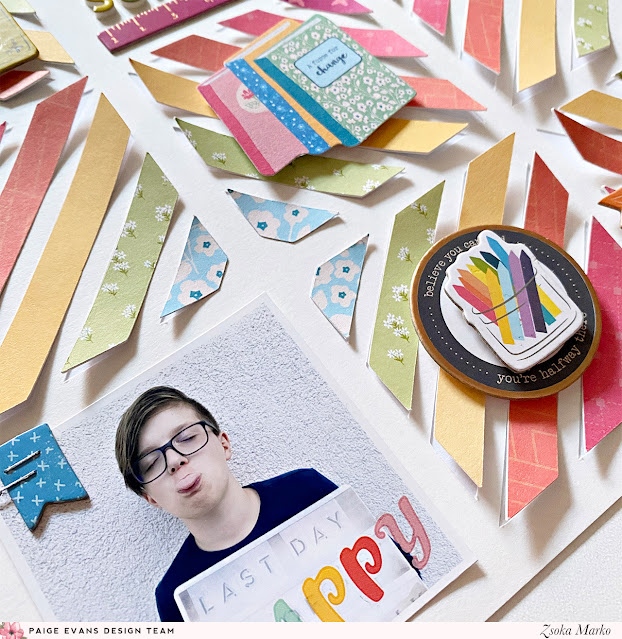
I then backed each colorful paper with the white fall out pieces that I had left from the cut file. I originally wanted to add foam tape to all these shapes, but then I liked the way it looked without. I added a dab of glue in the middle of the shapes and bent up their ends to create dimension.


I went through all the embellishments in the Whimsical collection and pulled out all, that had some kind of relation to school or happiness. I adhered these down in the middle of some of the squares, using foam tape.


I glued down my title in one of the empty spots. I added some colorful rub-ons to all of my photos. I love the rub-ons in the collection, they are just so perfect after all these years too! I'd love rub-ons in every collection, ha!


I stamped my date onto a card stock sticker strip and attached it to one of the photos. I didn't write journaling because I think the pictures speak for themselves :)


That's it for today guys! I hope I could inspire you in one way or another.
Thank you so much for stopping by! Have an amazing day!

X

Wednesday, February 2, 2022

Dec 1 - DT Layout for Paige Evans

Hello crafty peeps,

I'm sharing a new layout with you today, that I made for the Paige Evans Design Team, using the Bungalow Lane collection. As I was browsing through Paige's cut files, I was drawn to the Star Layers cut file (Design ID: 375233). Stars are always good for boys, right? Then I remembered that there's a fun star patterned paper in the collection, so it was decided; I needed to make some kind of star layout!


I resized the cut file and die cut a few different sizes. Originally I planned to only use the outlines and add some layered patterned paper stars in the middle but I changed my mind along the way. I liked the look of the white stars, so I cut the patterned paper stars in a smaller size. Eventually I didn't create layered stars either - you know, the ones that are stitched down the middle and then both sides bent up? I just glued together all 3 layers and adhered these stars using foam tape, to the middle of each white star.


I added some tissue paper to my photo and glued it all in place. My title is just Dec 1, because I prefer short titles and this photo was about my son showing off his advent calendar on December 1.

I went through all the embellishments and tried to find some things that fit either my topic or my design. Well, I guess you could say I also used some random embellies that don't go with either, but they are great anyway, for dimension and interest! That's how I ended up using chipboard buttons in the middle of my stars, for instance! 

I also added a bunch of puffy sticker stars, sentiment stickers and chipboard stickers. 


Oh, and before adhering down the big red star, I wrapped some twine around it, like it was a present. I actually did this with several stars but it felt too much and too messy with the already busy background. So I only left the red star like that. 

I wrote my story on a journaling spot and tucked it behind my photo. I stamped my date on a label sticker and attached it as well. Not that I really needed this since my title is the same hehe! Well, maybe the year is good to remember too!


Okay, that's all there is to this page! I hope I could inspire you in some small way!

Thanks for stopping by! Have a great day!

X


Sunday, January 16, 2022

Merry & Bright - DT Layout for Paige Evans

Hi there crafty friends,

I'm stopping by to share a new layout with you, that I've created for the Paige Evans Design Team, using the Bungalow Lane collection. I love Paige's Christmas cut files, so I made it my mission to use at least one! This is actually the only Christmas layout I made this year. It's sad, isn't it? I haven't had time to do a December Daily either, I forgot to take photos too, so even if I had time sometime, I won't be able to create one without photos! Maybe next year.


I cut the Merry & Bright cut file (Design ID: 393977) from white card stock, then backed the lights with lots of different patterned papers. The more colors and patterns, the merrier! I then cut the title from a red(ish) patterned paper and glued the letters onto two layers of white card stock as well, to make them sturdy, because I knew I was going to add foam tape to them later.


I created a stencil using Paige's Star Confetti cut file (Design ID: 286629); I rearranged the stars to fit around the bottom and the sides of the Christmas lights. I only kept the smaller stars. I then added some Shimmerz texture paste to a white 12x12 card stock. My favorite texture paste (Faber Castell Whipped Spackle) was completely dried in because I haven't used it in years and apparently it's not available anymore :(. I found this shiny white paste that a friend of mine sent me a few months ago and I thought it'd be a great fit!


Once all was dry, I adhered my cut file to my background. I die cut the design once more and layered it over the other one, to create some dimension and texture. I only used glue in a few places, so I have some movement on the page. Next, I added my letters on foam tape, like I mentioned earlier. I layered some tissue paper behind my photo and glued it in place. 

I wrote my journaling and added a few embellishments. Even though Bungalow Lane is a fall collection, I still found some stickers that worked fine with my Christmas photo.

I stamped my date onto a label sticker and tucked it in behind the photo.


That's it! I hope you like how this page turned out!

Thank you so much for stopping by! Have a fabulous day!

X

Friday, December 17, 2021

Home Sweet Home - DT Layout for Paige Evans

Hi there lovelies,

Stopping by today to share a new layout with you that I've created for the Paige Evans Design Team, using the lovely Bungalow Lane and Wonders collections.

You can achieve so many different looks with Paige's collections, because they are always so full of color and you can put together so many different color combos from feminine to masculine, there's something for everyone!


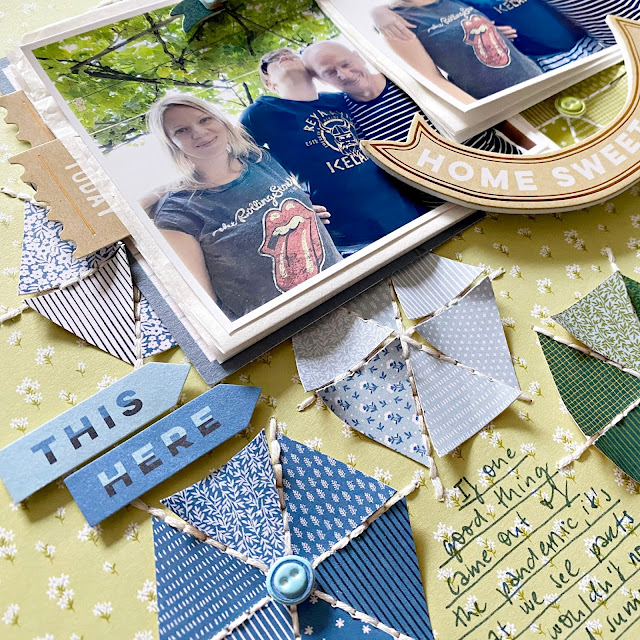
I knew which photos I wanted to scrap, I knew that I wanted to use one of Paige's stitching cut files, but I had no idea which papers I wanted to use! So I printed my photos and I was trying to figure out what background to use. As I was going through the papers, I realized that Paper 3 was a pretty perfect match for the colors in my photo. But of course I could forget about stitching cut files if I were to use it. The dilemma!

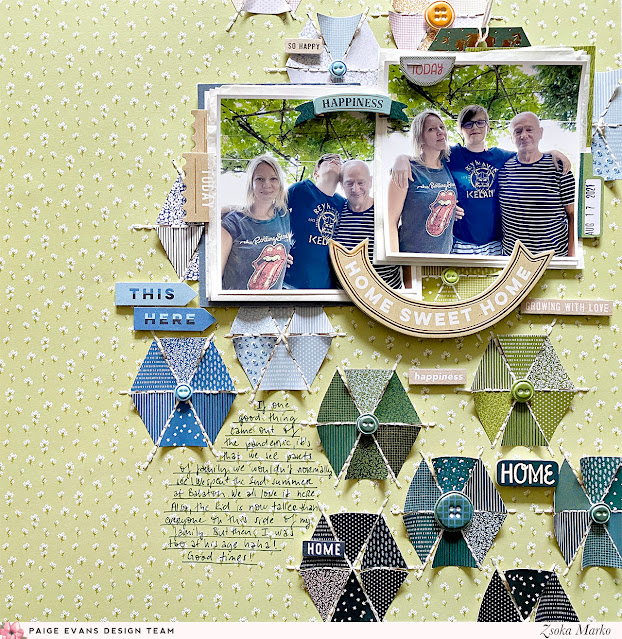
Looking at the paper, all I saw was hexagons (even though it's triangles). Since I love hexa layouts, I decided to go with that idea. I cut the paper in strips, then into little triangles. I sorted them by color, then created various hexagons to see what they would look like.


Unfortunately I already used up all the papers I wanted to use for background (Paper 7) so I had to look for something else. Eventually I decided on a green paper from the previous, Wonders collection, Paper 14

I arranged my hexagons and once I was happy with their placement, I started gluing them down. I only added a teeny bit of glue in the middle of each triangle because I was planning to bend up the sides for some dimension and interest. I also left a bit of space in between each triangle so I could add some hand stitching without stitching over the shapes, or I wouldn't have been able to bend up their sides.


So I eventually ended up with some hand stitching, only I didn't use any cut files. Maybe next time! 

I added some tissue paper behind my photos, as well as some pieces of ephemera, then adhered them to the background. I pulled out a variety of embellishments that I thought would go well with my chosen colors; cardstock stickers, foam stickers, layered banner stickers and puffy stickers. I added little puffy sticker buttons to some of the hexagons. Not all, because I didn't have enough buttons, ha! 

For my title I used a foam sticker, saying Home Sweet Home. These pictures were taken at my late grandparents' vineyard at Lake Balaton, Hungary, this summer. I spent all my childhood summers here, with my grandparents, aunt and uncle and my cousins. I absolutely loved it. I haven't visited much as an adult, mainly because I've been living in Germany and when we go home to visit my parents, it's usually winter and no one goes to the vineyard then. We normally go on summer vacation elsewhere. However, with covid, we haven't been travelling and instead we went home to visit family the past two summers. My boyfriend (or I guess at my age I probably should start calling him my partner haha!) had never been to Lake Balaton in the summer before last year and he absolutely loved it. The vineyard is on the hill so it has the most amazing views on the lake. Plus my uncle is pretty fun, there's lots of wine, good food, so you know, it was easy for him to fall in love with the place. Me, I get super nostalgic, I get tears in my eyes looking at the lake, remembering my beloved grandparents. I miss them so much.

Long story short - this is why Home Sweet Home was the perfect title for this page!

Oh and another story while I'm at it! The reason this picture was actually taken, was to prove to my uncle that my 13-year-old kid had outgrown all of them :D Granted, it was unavoidable, I mean, at his age I was also already taller than this side of my family haha!

Gosh, sorry for the long post, like I said...nostalgia!


Back to the layout! I used foam tape to adhere all my stickers, my title as well. To finish it off, I stamped my date on a tab sticker from the sticker book and tucked it under one of my photos. Then I wrote my journaling using a navy fine tip pen. Done and done!

I hope I could inspire you to look at your patterned papers differently!
Thank you so much for stopping by!
Have a great day!

X

Friday, November 26, 2021

Oh What a Day! - DT Layout for Paige Evans

Hello there crafty friends,

I have a new layout to share with you today, that I've created for the Paige Evans Design Team! I've worked with the beautiful Bungalow Lane collection on this page.


Now that it gets dark so early, I seem to like to sit down with Netflix/Prime and just stitch away more than any other time of the year. So I was in need of a stitching project! Now you must be asking yourselves "Huh? What is she talking about? There is no hand stitching anywhere on this project!" True, ha! BUT that's the idea I had for this page! So I was browsing through Paige's cut files and I soon decided to go with some simple butterflies that are easy to stitch. My idea was to add an offset to the cut file in Silhouette Studio and then stitch that, then add some patterned paper butterflies inside. But by the time I finished cutting my butterflies it got so late, I didn't want to stitch anymore hahaha! Oh dear. I did stitch on my next layout though, not a whole lot, but it's something :D


Anyway, the cut file I chose for this page is the Butterfly Cluster (Design ID: 252982). I wanted to cut some from the gorgeous foiled acetate sheet and add them as the top layer to every butterfly. I haven't cut acetate with my Cameo in years but I did remember I had used the highest blade setting (10) for it before. So that's what I did now too with double pass...Didn't work. I sent the mat back several times after seeing they didn't cut through, and without me noticing, every time the blade just cut in a slightly different position. Maybe it's to do with the material because this has never happened to me before. Anyway, I started over, and this time I changed the settings to SIX passes, just to be sure. Welllll...I could kind of pop them out but it wasn't easy. I have an old Cameo 2, so maybe the newer versions work better!

There are three butterflies in the ephemera pack so I wanted to use those too. All 3 colors are in the acetate sheet so it was perfect! I went through the papers and selected a few that matched those colors. The dark petrol color is not in the patterned papers, at least not on a big enough surface to cut butterflies from. So basically I went with pinks and yellows. I chose the less busy ones, because I was going to add the acetate on top which is busy enough. I ungrouped the cut file and rearranged the butterflies. I knew I wanted to use two bigger ones for my photos, the rest I cut from patterned papers.


I then layered them up (3 paper layers plus 1 acetate), glued the paper layers together, but only in the middle. I glued them in place on my layout, my photos as well. By the way, the photos I just fussy cut out using the die cut butterflies as templates. Then I added the acetate, one butterfly at a time, and stitched everything down. 


Next, I added my title using the alpha thickers. I also placed some phrase stickers and little heart foam stickers here and there, to add interest to my page. To finish it off, I added my journaling and stamped my date on a tab sticker. I'm obsessed with these by the way. I wouldn't mind if there was a full pack of them in every collection haha!


That's it for today! I hope I could inspire you in some small way! 
Thank you so much for stopping by!
Have a wonderful day!

X

SUPPLY LIST:

Friday, November 12, 2021

Wonderful Quiet Moments - DT Layout for Paige Evans

Hey there lovelies,

I'm checking in today, to share a new layout with you that I've created for the Paige Evans Design Team. I've used the lovely Bungalow Lane collection on this page!

I went with a super quick and simple design. Sometimes I wonder what happened to me. I used to make such time consuming pages and I loved every minute of the process. Nowadays I seem to go for simpler things. It's also true for my lifestyle if I'm being honest. I live a simpler life these days. I think I'm getting old haha! Anyway, back to the layout!

You know how there's always a whole pack of die cut flowers in Paige's collections? My main focus was this pack today. I wanted to just use all the flowers!


I started out by shaping each flower, bending up the sides with my fingers basically. Some of them I layered up - I added foam tape in between the two layers to create dimension. I arranged them on my background paper and decided on where I wanted to place my photo.


I then started to glue them down. Some of the flowers I cut in half so I could add the same colors in multiple places, where the whole flower wasn't visible anyway, like around the photo or at the sides of the page. I layered some tissue paper behind my photo and adhered it all to the background.


I then looked through the embellishments and selected a few items I thought would work with my design. I pulled out lots of buttons from various packs; chipboard stickers and puffy stickers to be exact. I placed one in the middle of each of my flowers. Well, most of them anyway. I skipped the ones that were not visible, obviously.

Then I added a few foam sticker sentiments. You probably have noticed, that this is my most favorite thing to do hehe! For my title I used a chipboard and a foam sticker. I stamped my date on a label sticker (another favorite!). Now that I'm looking at the layout, I entirely forgot about journaling. Or maybe I thought it wasn't needed because I would anyway remember the story. Well...Like that's going to happen! I should know better by now. I think I'll need to write something on the back of the page! Has this ever happened to you? It's certainly not my first time :D.


To finish off my page, I added some white acrylic paint splatters. I intended to only add a few in two areas, but I never know when to stop and then I always end up with more than I wanted. Oh well! It's just paper right?!

Okay, that's it for today! I hope you like how this layout turned out!

Thank you so much for stopping by! Have a beautiful day!

X


Tuesday, November 9, 2021

In Focus: Spellbinders Fluted Classics Collection by Becca Feeken

Hi there friends,

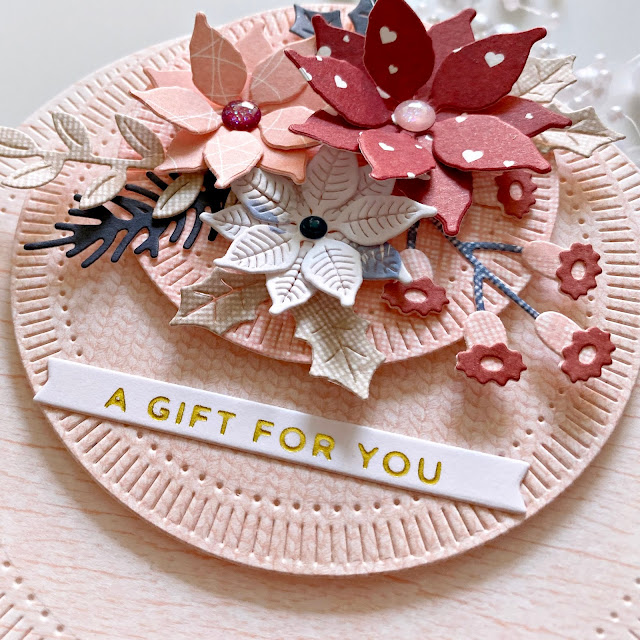
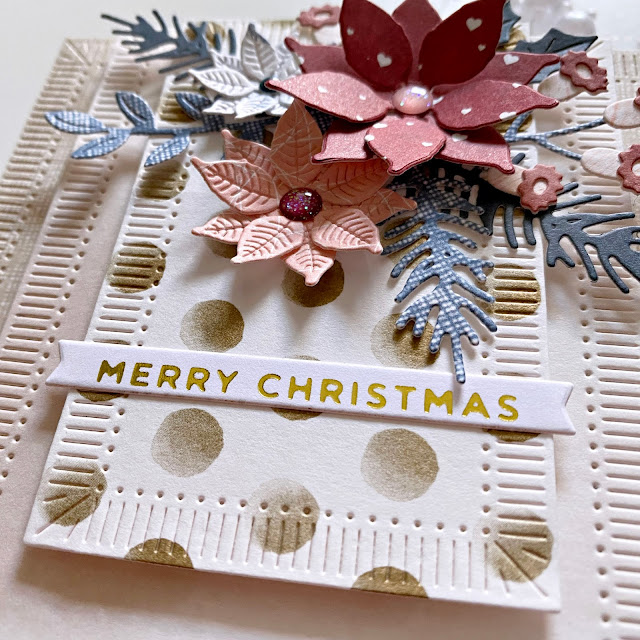
Today I have some cards to share with you that I've created with a brand new Spellbinders collection: Fluted Classics by Becca Feeken. There are 5 die sets in this collection:

However, I've only used the first three sets on today's projects!

I also used a few additional die sets:

I have a process video for you at the end of this post, so I'll just leave you with photos here. If you're interested in how these came together, what supplies I've used, please stop by my You Tube channel! All supplies are linked in the description box below the video.  


Here's the process video:


That's it for today guys! I hope I could inspire you in some small way!

Thank you so much for stopping by!
Have great day!

X

Monday, November 1, 2021

Die Cutting Two Ways - Using Metal Dies and Digital Cut Files on a Scrapbook Layout

Hi there crafty people,

Today I have a new layout to share with you that I've created for Spellbinders. My brief was to create a layout using both traditional metal dies as well as digital cut files. Usually, if I do both of these die cutting techniques on my layout, I go with a large cut file to create a design element for my background and add smaller die cuts, like shapes, leaves, hearts, flowers, you name it, as accents. 

On my page today, however, I actually created my background with a metal die set and used a cut file for my (not too large) title. I love the Color Block Slices die set, I've created several cards with it before. Since these two dies are quite big, they are also perfect for larger projects, such as 12x12 scrapbook layouts.


I have a process video, which I'll link in at the end of this post, in case you're interested in seeing how I've put this page together.


First, I selected the papers/scrapbook collection I wanted to work with. I went with the beautiful new Paige Evans collection, Bungalow Lane, as well as a few color card stocks from Spellbinders. 
I then die cut a bunch of these slices from the chosen papers and arranged them in a sunburst kind of shape. Once I figured out how many I needed, I glued them down onto a white card stock, and eventually  fussy cut them out. I did this, because I wanted to be able to move this shape around on my background, to see where I like it the most. I also added some zig zag stitching with my sewing machine, for a bit of texture and interest.


I decided to create a split design in the background, blue patterned paper at the top, sand color at the bottom. I only later realised that this actually matches my photos well. Happy accidents!

I adhered the sunburst to my background, then added my photos. I almost always use a few layers of white tissue paper to mat my photos. I like the dimension it gives the pictures. I then backed my cut file with the same papers I used in the sunburst. I adhered it below my photo and added a few alpha thickers to finish off my title. I like the different fonts and textures together. 


I went through all the embellishments in the Bungalow Lane collection and pulled out some that I thought would work with my design: a few cardstock stickers, foam stickers, chipboard stickers and a bird paper clip. I then scattered them around my layout. 

Finally, I stamped my date on a label sticker and tucked it behind one of my photos. I also wrote my journaling using a white gel pen below the "The Story" foam sticker.

Here's the video, as promised!


That's it for today! I hope I could inspire you in some small way, whether it be using patterned papers, creating a scrapbook layout or using metal dies and digital cut files together! 

Thank you so much for stopping by!

Have an amazing day!

X