Monday, August 26, 2019

Pinkfresh Studio August Release Blog Hop


Hello Pinkfresh friends,

Welcome to the August release blog hop! We have lots of amazing new products to show you today as well as some prizes and promotions! Enjoy!

You should have arrived here from the lovely and talented Yasmin's blog  but you can find the whole blog hop list at the end of this post in case you're lost.

Without further ado...My projects for today!


I was assigned the suuuuuper duuuuuper gorgeous Kelly Alpha Lower Case and Kelly Alpha Upper Case dies, which ultimately are my favorite products from the new release. Not only are they stunning, they are the perfect size for both cards and layouts and they work together perfectly (upper and lower case I mean). I'm super excited about these dies, I hope you love them as much as I do!


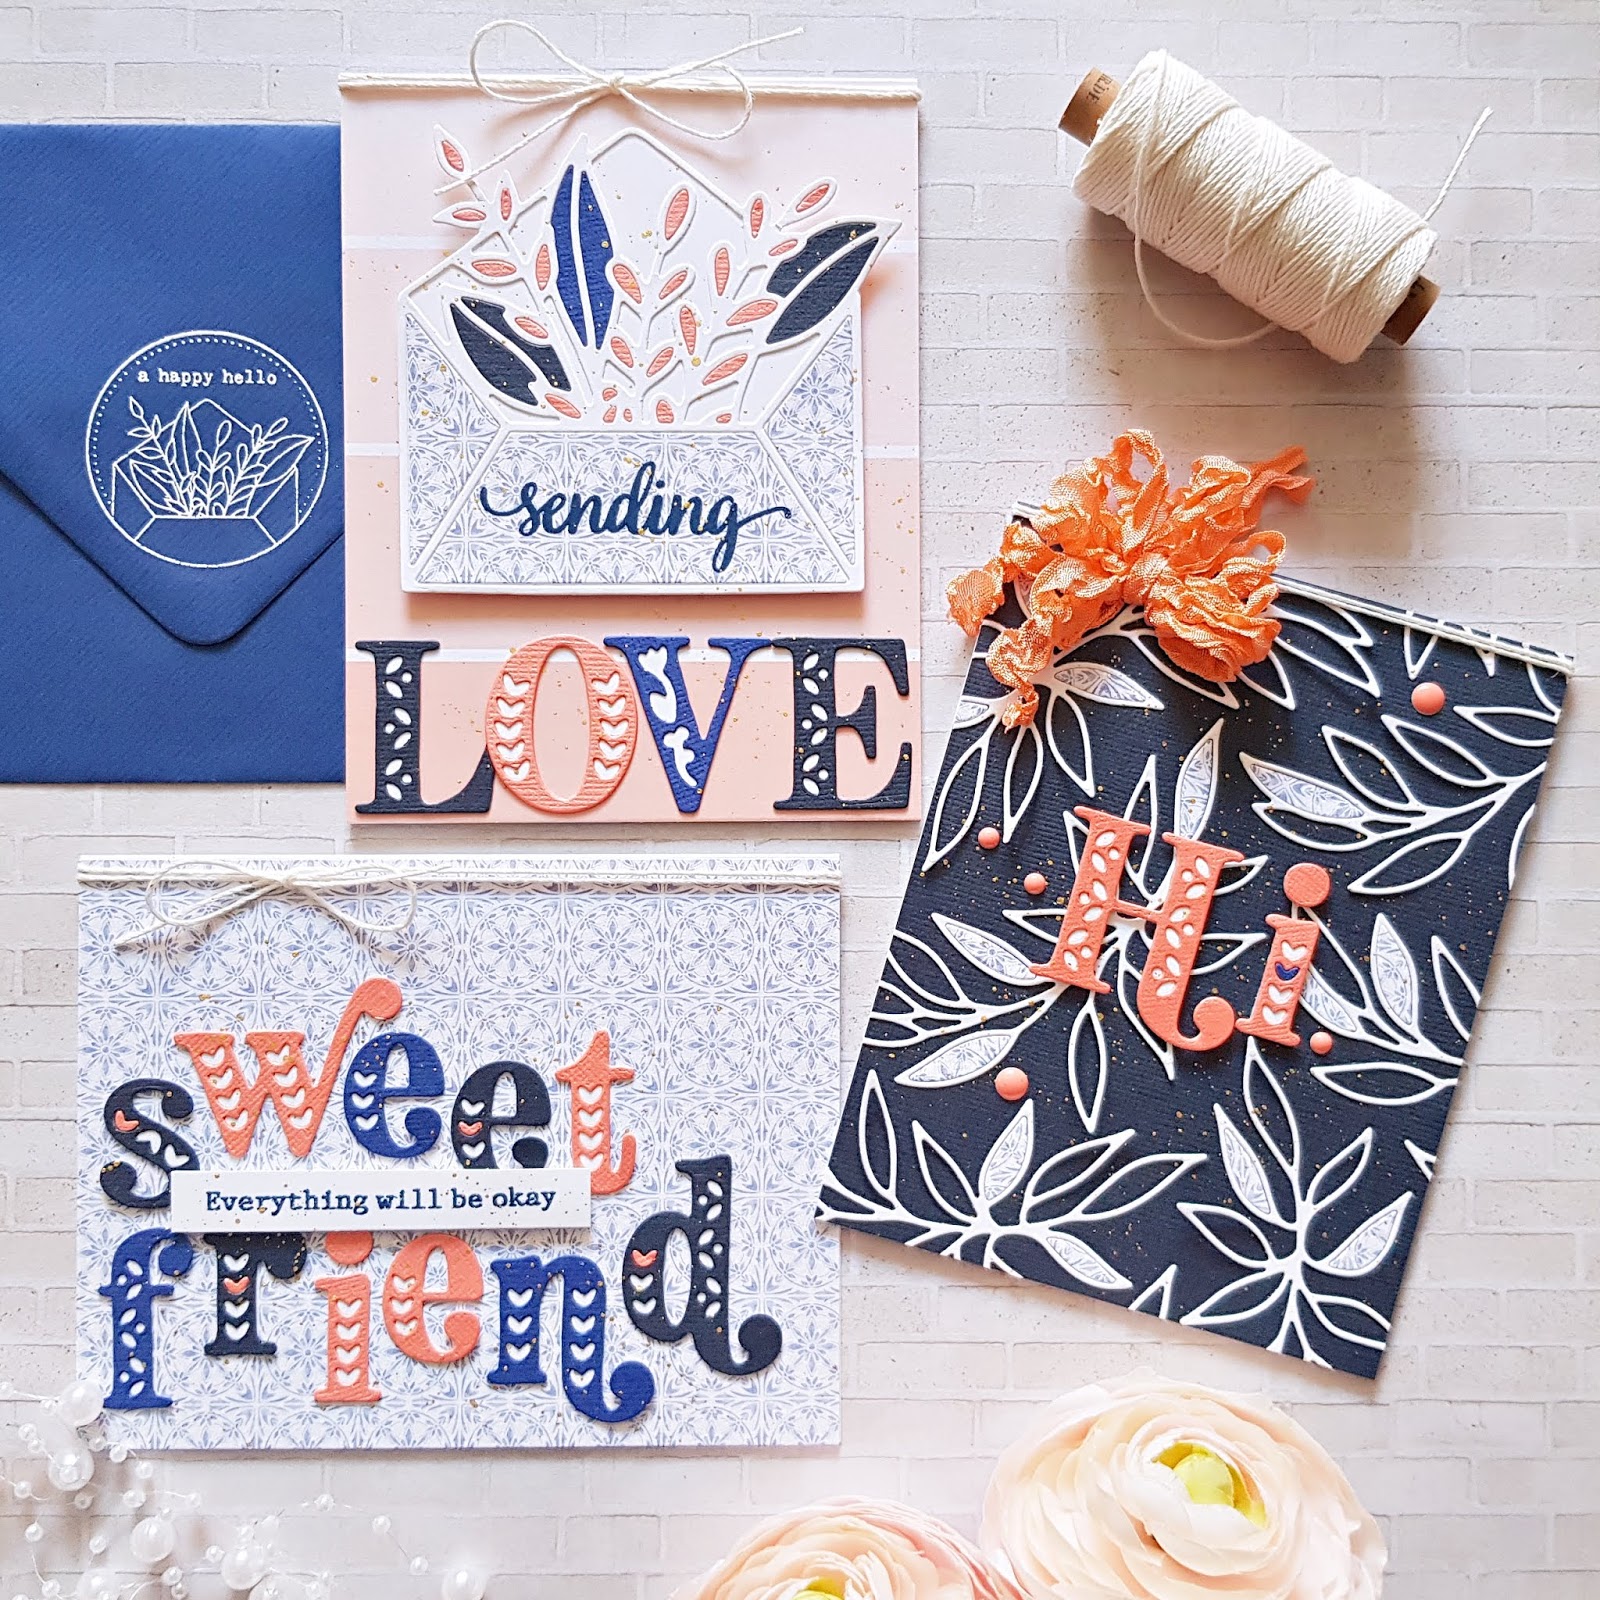
Another die I LOVE from this release, is the Leafy Envelope - it might look familiar to you! And you're not wrong, this same design was used for the Mail Delivery stamp set, which was a collaboration stamp set among the participants of The Stamping Village at CHA 2019. You can still buy this adorable set on the Pinkfresh homepage! In fact, there is now a new collaboration set available too, which is just as sweet and perfect for the upcoming holiday season: Holiday Seals. Such an awesome idea!


But back to my cards! All 3 are A2 size top folding cards (portrait and landscape). I first create a card base from heavy weight white card stock, then I add all my layers on those - this is always the case, even if I make white cards. I only have access to the 80lbs version of the Neenah Solar White card stock, and it's not thick enough for a card base, in my opinion. I don't like flimsy cards, I like them to be firm and stand up on their own. Soooo, I cut a 4.25x5.5" piece of patterned paper from the Office Hours collection, and attached it to my card base. I then die cut the letters from various card stock and backed them with white card stock. I die cut the envelope from white card stock and one of the patterned papers from the Just a Little Lovely collection - as well as some color card stock. I glued the envelope on a piece of white card stock, then did some paper piecing to add some colors. I stamped and embossed "Sending" on the bottom flap. This sentiment is from the Floral Vase stamp set and it's the perfect size!  I added some foam tape behind the envelope and glued it down on my card front. I added the letters too. To finish off this card, I added some twine and gold ink splatters.


For my next card I die cut a few branches from white card stock as well as a blue patterned paper from the 6x6 Just a Little Lovely paper pad, using the Leafy Branch die. I then added a piece of navy card stock to my card base.


I glued down the white branches on the card base and did a bit of paper piecing with the blue. I die cut my title from coral card stock and backed it with white. Using foam adhesive, I attached the letters to my card front, then I splattered some gold ink all over.  I also added some enamel dots, for pops of color.                                                              


Last but not least I created a bow which I glued down at the top.


On my third card I used the same blue patterned paper as above. 


I die cut all the letters for my sentiment from various color card stock then backed them with white. I put back a few of the teeny tiny hearts in contrasting colors. I played around with arrangements a bit and once I settled on this design, I glued down the letters. I splattered some gold ink all over. 


I chose a sentiment from the Floral Vase stamp set and embossed it on a white strip. I adhered this in between the two die cut words using foam tape. To finish off this card, I added some twine at the top.


And now for the fun part! 

Giveaways:

1. Pinkfresh Studio is giving away the full August release on the Pinkfresh blog and Instagram as well!

2. On each blog we are giving away a $25 gift certificate too!


As always, the winners will be selected from the comments left on all blog posts. Winners will be announced on Monday, September 2, 2019 on the Pinkfresh Studio Giveaway Page. You must claim your prize within 2 weeks so don't forget to go check the above page! Comment away! Good luck!

Shopping Promo:

1. Free exclusive die with ANY purchase, while supplies last.


2. Pinkfresh Studio is offering free shipping on orders $100+, within the United States. No code is needed.


Phew I think that's it for today! I hope I didn't miss anything :).

Thank you for stopping by!

Have a fabulous day!

X


BLOG HOP LIST:


You are invited to the Inlinkz link party!
Click here to enter
<!-- end InLinkz code →

Friday, August 23, 2019

Yes - DT layout for Paige Evans

Hello crafty friends,

I'm back today with a new layout for the Paige Evans Design Team! I actually made another boys layout - I hope some of you will be happy about it! There were some comments in Paige's Facebook group how there is not enough boy layout inspiration out there and sadly, I have to agree. I guess one of the reasons is that we, women, often love flowers, butterflies, hearts and all things girly! I know I do. When I started scrapbooking I hardly ever used feminine things on my layouts and boy, it was hard! I say, use whatever you want on your layouts, don't limit yourselves by what other people consider to be the "norm" or acceptable! Then of course there's the other thing...Most companies make very feminine collections, there really isn't many products to choose from when it comes to boys! Or if there is, the colors are always the same, blue, orange, maybe gray and green. Which is why I actually love Paige's collections, because there's literally all the colors of the rainbow in them and as such, you can easily come up with color combos that are great for boys. Truly Grateful, the collection I've used on today's project, has lots of generic embellies too that work on any layout!


The cut file I chose is called Diced Circles (Design ID: 246538) - I just added an outline so that I could use the die cut as a separate layer, and it was not just a shape in my background - if that makes any sense! At this point I didn't have ideas as to what to do with it, I just wanted to back it first. I chose various shades of blue and green papers and went from darkest to lightest. Well, kind of. And then the unimaginable happened...


What a mess! Glue all over my cut file and patterned paper, ohemgee!!! It happened at night and with my boy asleep, I could not use my Cameo, so I had to come up with something to save whatever I could. I cut out the damaged piece and right away I had an idea! What if I cut it apart and puzzle it all back together, like a pie chart or so? 


I printed a big photo to fill in the empty space - it's kinda awesome how Maxim's T-shirt has similar color stripes as the papers I chose for my cut file! Total accident. 


I played with the arrangement for quite a while...I kept cutting the cut file into more pieces because I didn't like the shape haha! Some of the pie pieces have a white border, some don't, but this seemed like the only way to go and to be honest it doesn't bug me much. I added foam adhesive behind some of them for some dimension and interest. I went through all embellies, picked out whatever matched my chosen colors and scattered them around the circle. I added my title plus some additional words, just because I liked the colors and they fit the theme of my picture. I stitched these down so they stay put for sure.


To finish off my page, I wrote my (barely visible) journaling and added my date. Done!


I hope you like this layout and I could inspire you in some small way!

Happy crafting!

X

SUPPLIES:


Tuesday, August 20, 2019

Card Inspirations - DT projects for Pinkfresh Studio

Hello crafty friends,

I'm stopping by to share my newest projects with you that I've made for Pinkfresh Studio!

I've made two card duos - one with a set I haven't used before and a bonus set which I in fact have used before but didn't have enough for all my friends that called dibs on them, ha! 

But first things first. I used the Folk Hummingbird stamp and die sets on these cards. 


I wanted to do some paper piecing using the gorgeous new Just a Little Lovely collection, but when I stamped the images on white card stock, I decided to leave one of the cards black ad white because I loved it so much. For both of my cards I created an A2 size top folding card base (landscape). I then cut two 5.5x4.25" pieces of white card stock and splattered black ink all over them. I did this because I still can't handle too much white on my cards and thought this way it looks almost like patterned paper. I then used the Essentials: Inverted Stitched Scallop Circle die set to die cut a window from one of the panels. You could easily turn this into a shaker card if you like, I am a bit tired of them at the moment, so I just left it as is. 

I actually stamped all images multiple times to create layers and dimension - I just curled up the  edges of the top layers. I stamped the sentiment in black, added some twine and done!


For the second card I stamped the images on various patterned papers from the Just a Little Lovely collection (6x6 paper pad also available). I then fussy cute them out and pieced them back together on one of the white die-cuts. On this card I have two layers of just black stamped images and a third, top layer with the paper pieced version. I only added glue in the middle parts so I was still able to curl up the edges.


I stamped the sentiment in black ink. I then die cut a circle from patterned paper and adhered it down on my card front. I added the flower and the hummingbird using foam adhesive. Done and done!


I love the Lovely Frames die set and it seems many of you do too! At least my friends do, all of them wanted one of my previous cards I made with it. So here's some more hehe! 

Both cards are on A2 size top folding card bases and have patterned paper attached in the same size.  The one on the right is a very light gray grid, barely visible. This time I used the Office Hours collection (6x6 pad also available but I don't have it so I've used 12x12). I die cut the frame from white card stock for the card on the left and multiple times from various papers so I could add some color. For the card on the right I actually mainly used the small sample images you get on the cover paper of the 12x12 pack! I don't like to waste anything, what can I do?! :)


I picked out some die cut ephemera pieces, epoxy stickers, chipboard and puffy stickers from the Office Hours Embellishment Bundle. I glued them down in the little frames. I added foam dots to the title so it stands out better.


On the other card I added foam dots to the inner pieces so the card has some dimension. I wanted the papers to shine so I didn't add embellies, other than the sentiment which is actually a puffy sticker. 


I hope you like today's cards and I could inspire you one way or the other! 

Thank you for stopping by!
I wish you an awesome day!

X

Monday, August 19, 2019

Spellbinders Holiday 2019 Release blog hop


Hello crafty peeps,

I'm excited to join the Spellbinders Holiday 2019 release blog hop today! You should have arrived here from Marie's blog

I always love working on Christmas projects because I've collected quite some holiday scrapbook products over the years and I love mixing and matching them! There's some really cute products in this release! I won't be doing step by steps, but if there's something you'd like to know, by all means, leave a comment and I'll get back to you!

First up this cool little puppy! This set is called Merry Hugs. I love the retro feel of the design, so I paired it with a vintage scrapbook collection (as in the design is vintage, not the collection :D), Winterberry from My Mind's Eye.


Next up is another cutie, Christmas Bandit! Gosh, isn't this raccoon the cutest little thing?! And the trees with the snow?! Awww.


For this card I used a mixture of Pinkfresh Studio Christmas scrapbook collections from previous years, Holiday Vibes and December Days. 


Next up two stunning die sets - Deck the Halls and Joy. So many possibilities with these ones!


For these I chose another My Mind's Eye Christmas collection, Jingle All the Way, designed by my favorite Jen Allyson!


Then we have the Classic Christmas Cut and Emboss Folder which, as the name suggests, embosses and cuts the paper at the same time. This is actually a full background design, but I decided to fussy cut out the ornament.


For this one I used a mix of Fancy Pants Designs patterned papers.


Last but not least I have a trio for you. One of them uses the same Deck the Halls die set I already used above. Here I paired it with an embossed background and some additional snowflakes from the Yuletide Snowflakes set from last year. 


These gorgeous snowflakes are also part of the Yuletide Snowflakes die set by Becca Feeken. I love that this set has both traditional and non-traditional snowflake shapes. These ones on this card could easily be used to create flowers!


On this last card I used another older die, also by Becca Feeken, called Holly Jolly Christmas. This is a large die, so I cut it in half for my A2 size card. With this die set you have different options to die cut your design, you can choose to use only one rectangle, or more, depending on what style you want to achieve.


On these three I used scraps from several companies, My Mind's Eye, Doodlebug and Pink Paislee I believe.

Giveaway:
To celebrate this release, Spellpinders is giving away a $50 gift certificate to one lucky blog reader! The winner will be selected from the comments across all of the blogs in the hop. Giveaway closes on Sunday, August 25th 11:59pm EDT. The winner will be announced in the original blog hop post on the Spellbinders blog the following Monday. The winner is responsible for shipping cost, duties and taxes.

That's it for today! I hope you like my projects with the awesome new release! I apologize for the hasty post, I just can't seem to catch up after the holidays with my son starting a new school...

Your next stop is the wonderful Laurie Willison's blog!

Have a wonderful day!

X

Blog Hop list:
Spellbinders
Jennifer Mcguire
Debby Hughes
Yana Smakula
Nichol Spohr
Wanda Guess
Jean Manis
Keeway Tsao
Svitlana Shayevich
Mindy Eggen
Marie Heiderscheit
Zsoka Marko  ------ YOU ARE HERE!
Laurie Willison
Karin Ã…kesdotter
Nina-Marie Trapani
Mindy Baxter
Amy Rysavy
Betty Wright
Daniel West
Amanda Korotkova
Mayline Jung
Varada Sharma

Thursday, August 15, 2019

Pinkfresh Studio and Hero Arts blog hop - You Make a Difference


Hello there lovelies,

Welcome to the Pinkfresh Studio & Hero Arts collaboration blog hop! To celebrate 45 years of HA and this industry, Pinkfresh Studio created a gorgeous stamp set called YOU MAKE A DIFFERENCE, which we all are showcasing today. Since this is your last stop, I'm sure you've seen many wonderful samples by so many talented crafters in this hop! You can buy this stamp set from both Pinkfresh Studio and Hero Arts.


I've created two very different cards for this occasion. Both cards are mounted on A2 size top folding card bases. First up a card that I quickly colored with pencils. And I mean quickly, because I've used the wrong color ink to stamp with and as I started coloring I noticed that it was fading sooo fast I could not see the image anymore, oh dear....So I can't guarantee everything looks the way it should, but I had no heart to throw away this panel!


Once I was done coloring, I added some white details - well I wouldn't call the details, just lines and dots everywhere. I might have gotten carried away a bit, ha!


I've stamped and embossed my sentiment in white and splattered some white ink all over. To finish off the card I added some twine.


On my second card I went with my favorite thing and used patterned paper and scrapbook supplies! I chose a paper from the Just a Little Lovely 12x12 paper pack (there's also a 6x6 pad with smaller scale patterns) and cut a 4.25x5.5" piece out of it.


I then stamped and heat embossed the image in white using WOW Opaque Bright White embossing powder. I pulled out some embellishments from the Just a Little Lovely Embellishment bundle: a gold foiled acetate piece, a layered sticker, a die cut frame and some enamel dots. I also added two washi tape flowers I die cut from the Painted Washi tape using the coordinating Floral Elements dies


I ended up using a random little clothespin from my stash too, only because it was on my desk and I thought it fit. To finish off this card, I added some gold ink splatters and twine.


Since there is no celebration without prizes, here's what you can win if you leave comments along this blog hop!
You have until Sunday, August 18, 2019, to leave comments and the winners will be announced on the Hero Arts blog the week after.


I hope you've enjoyed hopping along with us today!
Thank you for stopping by and I wish you a wonderful day!

X

Blog Hop List: