Wednesday, September 30, 2020

Explore - DT Layout for Paige Evans

Hello there friends,

I hope you guys are doing well! Can you believe it's the last day of September already?! It's insane how months just fly by :(. 

I'm stopping by today to share a new layout with you that I've made for the Paige Evans Design Team. When I saw the new Go the Scenic Route collection, the paper that caught my eye first was the rainbow square paper! I right away thought I'd need to cut some shapes from it once I get my hands on it. So here we are! I went with one of my favorite shapes (after circles), hexagons. I have an old Fiskars hexa punch, it really doesn't cut great but for my purposes today, it was totally fine. If I had wanted to have nice clean edges, I would have used dies.


The size of this punch is perfect for this paper! I punched out all my hexagons, then spent some time on distressing the edges. I don't distress often; I prefer nice, clean edges in most cases, but I needed some dimension and texture here. I don't own a distressing tool, I used to use my nails back when I started scrapbooking haha! These days I use my Tim Holtz scissors (literally the best scissors out there) to do this, because one side is serrated so it does a great job with minimal effort.


I then played around with placement - but more often than not, I end up arranging my hexagons like this, kind of scattered around the page. I wanted to make sure they are grouped by colors too. I didn't have enough dark blue and since it's my favorite color, I just needed to add more - hence the blue spot paper (which by the way comes with a navy foiled look in the 6x8 pad, unfortunately I didn't have it back when I made this layout - that navy foil is absolutely gorgeous!) 

Once I was satisfied with the look, I started to glue things down onto my background paper. I chose a white ledger paper so the colors pop more. I had to turn it upside down because there was a blue text in the top left corner which I wanted to cover up - originally, I didn't have hexagons in that corner. In hindsight, I really didn't need to do this but hey, it's easy to be wise after the event ha! 

I alternated between liquid and foam adhesive, to create a bit of variation and dimension. I layered some tissue paper behind my photo, then glued it down. I tucked in some labels here and there and added a chipboard geo tag on top of my picture.


I kept my embellishing at a minimum - I mainly used chipboards and a few die cut pieces from the ephemera pack. I love adding lots of embellishments, but lately I'm having trouble doing so on my boys layouts - it's a whole new experience scrapping a tween! I used to make such sweet, colorful and fun layouts for my little boy but now that he is so big, I struggle, there's no doubt about it! Awww time, will you please stop?!


Finally, I added my date and wrote up my journaling. Done!

I hope you like this colorful layout, and I could inspire you in some small way! 

Thanks so much for stopping by today! I'll be back with another post soon (possibly with an extra surprise, but that depends on a bunch of things still hehe! Watch this space!).

Have a lovely day! Stay safe!

X

SUPPLY LIST:
Go the Scenic Route collection: Paper 19, Paper 21, Paper 12, Chipboard Stickers, Ephemera Die Cuts


Saturday, September 12, 2020

Ruby Ruby Ruby - DT layout for Paige Evans

Hey there crafters,

I'm here today to share a new layout I've created for the Paige Evans Design Team. 

Ruby Ruby Ruby! Am I giving you an ear worm?! (Kaiser Chiefs anyone?!) Anyway, my title ended up being a little shorter than intended because I didn't ave enough alpha stickers in the right colors, ha!

I am obsessed with ruby chocolate. I love that it tastes so fresh and fruity! So when my kiddo and I discovered that there's ruby chocolate covered Magnum ice cream, we had to try it of course :) This is what I documented on this layout.


Not sure why this orange paper caught my eye since I don't particularly like orange on its own, I think it was just bright and fun and reminded me of summer! I fussy cut out all the flowers from one of the floral papers, leaving a sliver of navy edge for contrast. Once done, I created some kind of arrangements in the bottom left and the top right corners. For some of the flowers I used foam adhesive to add variation and dimension.


I tucked my photos behind the flowers, then glued down my title. The only embellishment I used is the Document This die cut; I wanted the flowers to be the main focus (besides the photo obviously). I added my journaling and stamped the date. 


To finish off my page, I added some navy ink splatters. This spray has shimmer in it, which is why it is hard to see in the picture that it's blue! 


That's it! Super simple :) I hope you like it anyway!

Thank you so much for stopping by today!

Have a wonderful day!

X

SUPPLY LIST:
Go the Scenic Route collection: Paper 2, Paper 7, Foam Thickers, Ephemera Die Cuts


Thursday, September 3, 2020

In the spotlight: Spellbinders Sparkling Christmas collection

Hey there crafty peeps,

I have this guest post up on the Spellbinders blog, featuring some of their dies from the new Sparkling Christmas collection!

It's still so weird for me to share Christmas projects in summer, but hey, Christmas cards are my favorite so I could do them all year round ha!

Without further ado, here's the first card! The dies I've used on this card are my absolute favorites from this beautiful collection! I love plaid and flowers so of course I'm a fan of these! The Kaleidoscope Plaid set consists of 3 dies that you can either layer up or use on their own. I selected 3 different papers for the plaid: gray and gold card stock, plus pink polka dot patterned paper.


I created an A2 size top folding card base, then added a dark gray card stock panel to it. I die cut the rectangles 4 times to cover most of my card front. I adhered them onto white card stock first then attached this panel to my card front. 


I then die cut the flowers using the dies from the Glimmer Poinsettia set (this set consists of 5 glimmer plates and 5 dies). I love that the dies work on their own too, no need to add foiled details if you don't want to! I assembled the 3 flowers and arranged them on my card front. I placed some red enamel dots in the middles. For my sentiment I used one of the plates from the Holiday Sentiments Series 2 set with gold foil. It actually says FA LA LA LA LA which was too long so I trimmed it down. I used foam adhesive to attach my sentiment. To finish off this card I added some twine at the top.


On my next card I used the Kaleidoscope Plaid die set again. I created my background the same way as above, I just used different papers. 


For the car I used the Sunday Drive die set, which is actually not a Christmas product but now there is the Sunday Drive with Santa add-on with which you can create fun Christmas themed cars. There is another non-holiday themed add-on set available as well, called Hitched


Once I assembled the car, I added foam adhesive to its back and adhered it onto my card front. Since the licence plate is already a sentiment, I didn't need anything else.


On my next card I went with a Nordic Christmas vibe - red and white color combo. Now, red is one of my least favorite colors when it comes to paper crafting (well it depends on the color combo really, but on its own I do not love red), however I like using it on Christmas projects. And the Crimson Stars glimmer foil is absolutely stunning. I wish I could take better photographs that show off all the sparkle, but I hope you can still see just how beautiful this foil is!


This is also an A2 size top folding card - I layered red card stock, red grid patterned paper and a white embossed panel on top of each other. I foiled and die cut the poinsettias (Glimmer Poinsettia set). This time I didn't layer them, I just used the three different sizes to create an arrangement in opposite corners of the card. I added red enamel dots in the middles.


I foiled a holiday sentiment with the same red foil as before and adhered it to my card with foam adhesive.


Last but not least, I created 3 mini circle cards for which I used the 3.4" size circle die from the Nestabilities Hemstitch Circles Etched Dies Romancing the Swirl Becca Feeken set. I die cut two circles from heavy weight card stock for each of my card bases. I then created a score line about 3/4 inch from the top on one of the circles (the scored one becomes the back of the card) and added glue above the score line, then attached the other circle on top. I die cut 3 patterned paper circles too, for my card fronts.


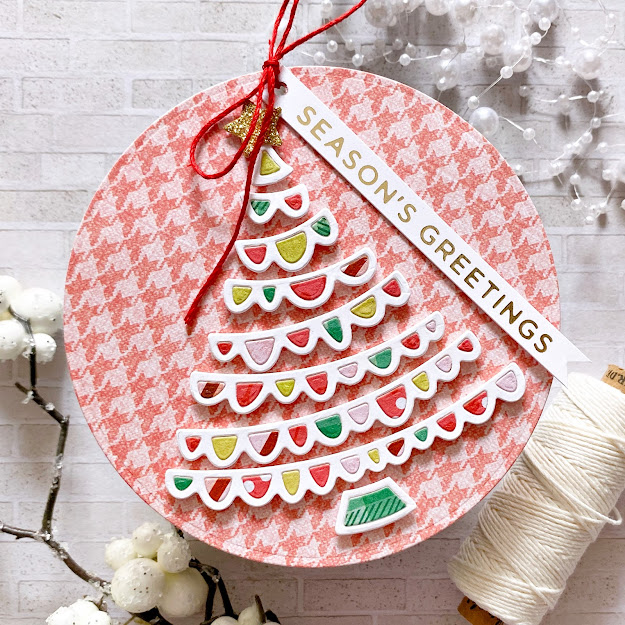
Using the Joyful Christmas Tree die set, I die cut several trees from white card stock and various patterned papers. On my first card I created a colorful tree with the inlay technique. I glued down all the scallops with foam adhesive. I punched a small hole in the card as well as in my foiled sentiment strip and attached it with a twine bow.


On my second card I used the outline pieces of the patterned paper die cuts and I backed them with white card stock. No inlaying. I added a red foiled sentiment this time.


To not waste all the patterned paper die cuts I had left, I created one more card, exactly the same way as above.


That's it! I hope I could inspire you in some small way with today's cards! Are you excited and ready for Christmas crafting?!

Thank you so much for stopping by! Have a wonderful day!

X

Spellbinders supplies:
Other supplies:
  • white heavy weight card stock
  • patterned papers
  • glitter card stock
  • satin finish gold card stock
  • liquid adhesive, foam adhesive, double sided adhesive
  • trimmer, scissors
  • twine
  • enamel dots

Tuesday, September 1, 2020

In the spotlight: Spellbinders Small and Large Die of the Month kits - September 2020

Hi there crafty peeps,

It's that time again! The Spellbinders September Club Kits are here! I can't believe summer is over, this whole year is flying by......Fall is my least favorite season, I think, we get a lot of rain and grey skies! It's not like fall you see in magazines and movies with beautiful colorful leaves and sunshine haha! So I don't particularly like it, it's depressing :( Anyway, my projects today are not fall themed, so all good! :D

As a reminder, Spellbinders have several monthly kits, which are really great! You can subscribe to:

You can find all necessary information about these kits here. 

This time I'll start with the Small Die Kit! You can create two different frames with the included dies, one is with simple leaves, the other is a bit more elaborate, you can add small, layered flowers to it. Moreover, you can create a couple of sentiments too, like you'll see here: Thank You and Hello (or a mixture of both obviously!)


The papers I've used here are from the My Mind's Eye Gingham Gardens line - it's a gorgeous collection, super feminine, soft and elegant!


For the die cut shapes I've used white card stock. The sentiments I've cut 4 times and then layered them up for a more dimensional look. I also used foam tape to attach the frame to my card base, to create more depth.


To decorate the simple frame on the second card, I added some flower stickers. I always glue these on a heavy weight card stock first, then fussy cut them, this way they are sturdier and I can layer them more easily.


To finish off this card, I added a few enamel dots in coordinating colors. 


The Large Die Kit this month includes everything for creating a fun slice of cake with various sentiments and little tidbits, like fruits, carrot, candle and more.


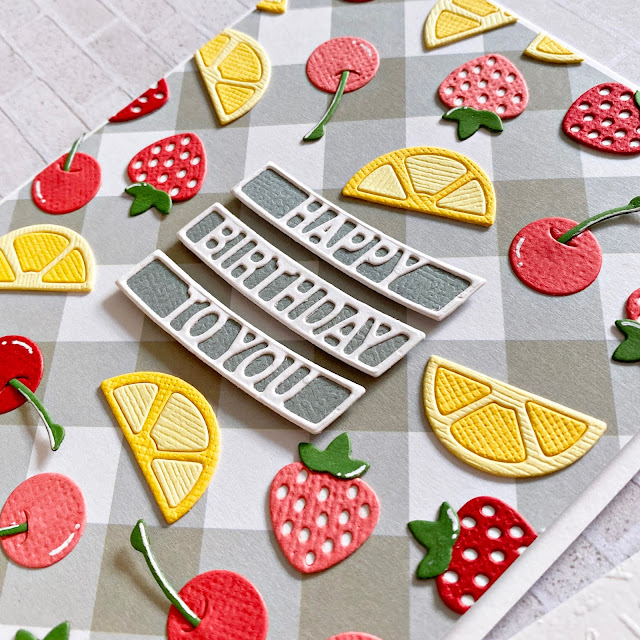
On my first card I decided to skip the cake altogether, because I love building patterns with the help of dies (or stamps) and I find these little fruits adorable! Love them on the gingham background, reminds me of summer picnics! Which, admittedly, I've never done in my life haha!


For my second card, I created a lemon cake with ombre cake layers. Now, I'm not up to date on cake trends; since I've started scrapbooking, I haven't baked any - but before that, ombre was a big trend! To me it still looks pretty, whether or not it's trendy :D.


Let's talk about the embossed background for a sec! The Sprinkles stamp set is an exclusive freebie this month if you are a VIP Value Club member. You get it if you are already a member or if you upgrade to the VIP Value Club in September. If this is confusing, check this link to read about the difference between Value Clubs and VIP Value Clubs.


I haven't used the sentiments, but they are sized to fit on the cake layers. I did a terrible job on the embossing, normally I would throw away a panel like this, but since it's white on white, the missing lines don't bother me. There's something about the card stock I've used, it's not great for stamping because it soaks up the ink right away. This would never have happened with Neenah Solar White, but I didn't want to use a bright white card stock with the gingham patterned paper. This stamp set is actually photopolymer, so it stamps great (unless you're me and use the wrong paper hehe).


I also made a carrot cake, just for fun! I love Starbucks carrot cake - thankfully we don't have Starbucks in  close vicinity to us, otherwise I'd eat it every day...Other than that, I'm not sure where it's available here!

I had this Alexandra Renke paper from her Easter collection, so I thought it'd be the perfect backdrop! I love that it's not traditional orange-green carrot colors, I don't like that combo at all. To be honest, I'm not a fan or orange either but hey, it's a fun change for once.


That's about it! What do you think? Fun products this month too, right? I also saw a sneak at some upcoming ones and I'll tell you, I can't wait to work with them!

Thank you for stopping by today!
Have a wonderful day!

X