Saturday, December 30, 2017

Berry & Bright - DT layout for Paige Evans + Silhouette

Hi there friends,

How was your Christmas? I hope you had a magical time with family and friends!

Is it still OK to share Christmas layouts?! :) Well technically this one is not a Christmas layout, but does look like one for sure!


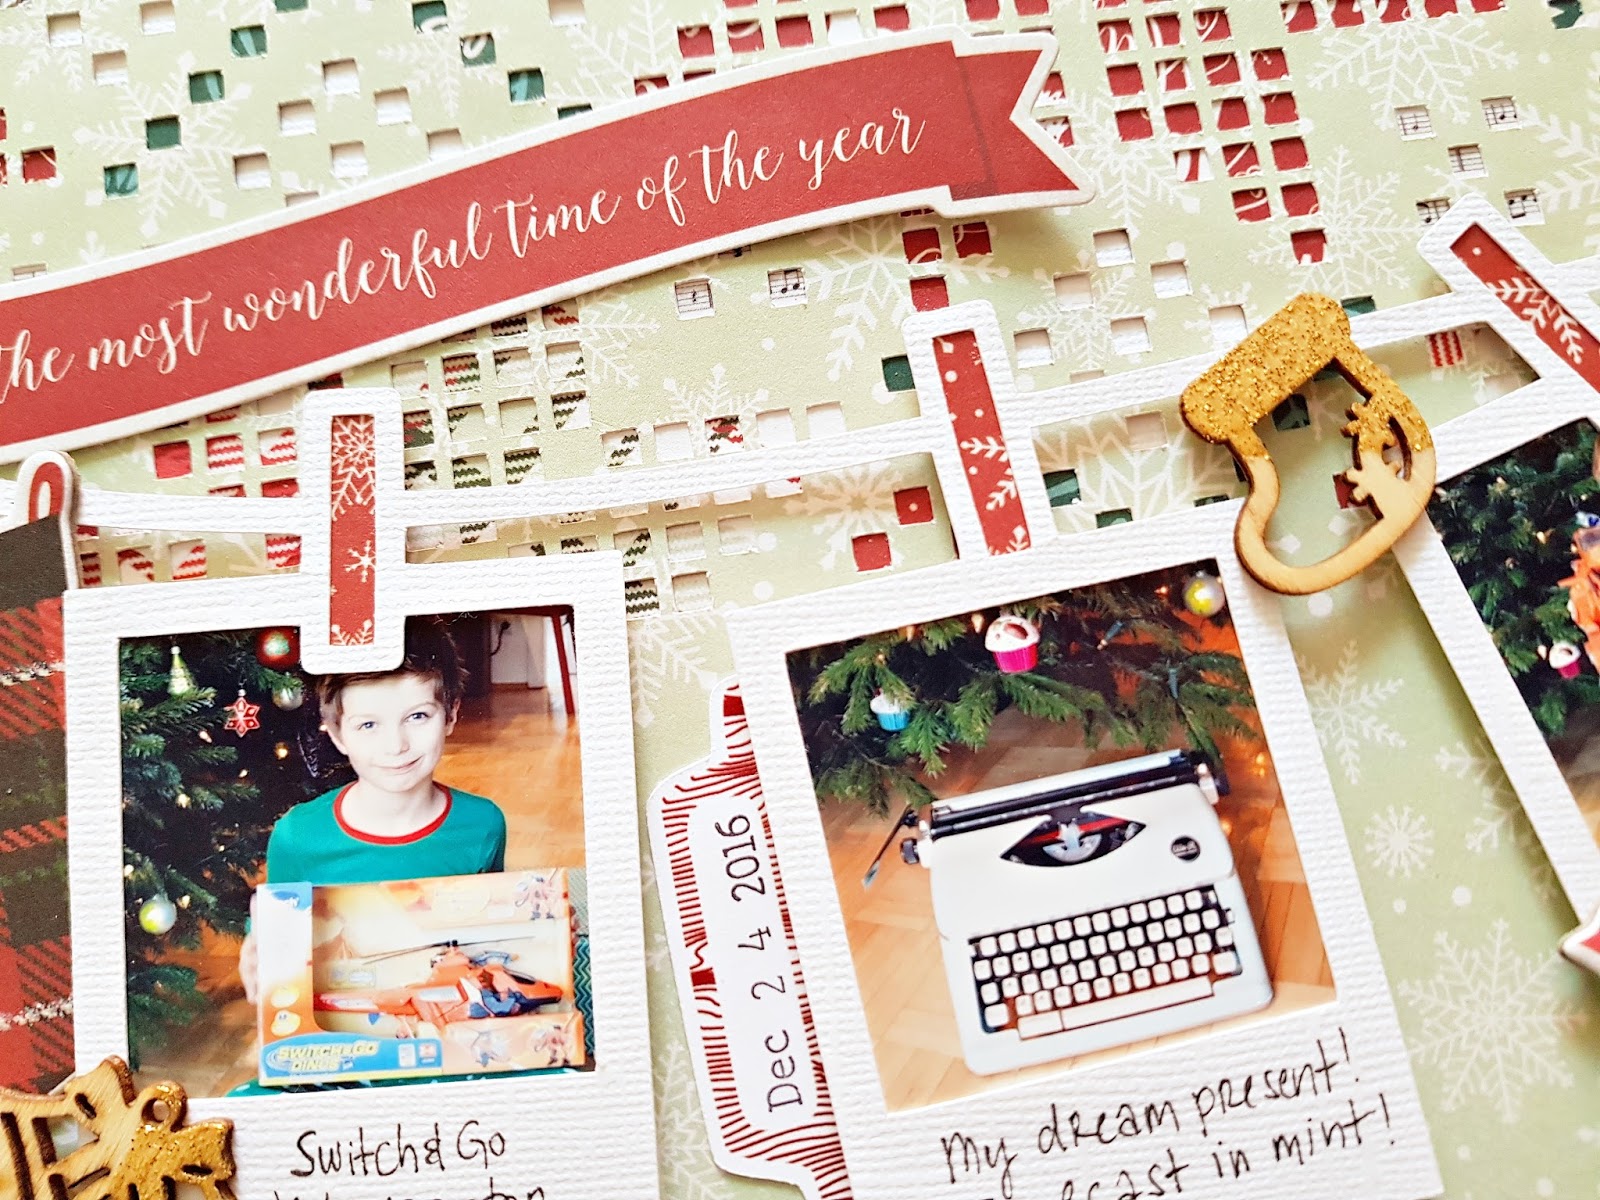
I've used the Geometric Stars Background cut file (Silhouette ID: #227004) paired with items from different collections, Paige's Turn the Page, My Mind's Eye Comfort and Joy, Pinkfresh Studio December Days and Christmas Wishes.

I kept it simple this time, I have not altered the cut file at all :). I went with white textured card stock and backed a few of the stars with two different red papers. I didn't want to back all the stars so the background paper is visible too. I thought it fits my kiddo's hat well!


I created one single cluster around my photo because I didn't want to cover up more of the background. I added a few layers of papers, chipboard frames and tags behind my picture and adhered some embellies here and there, on the photo, under the photo and next to it. 


The only embellishments that I spread out on the page are enamel dots. I only added a very short journaling, my title and date and I was done! 


I hope you like today's inspiration and maybe even feel like using red! It's my least favorite color and this Christmas season I almost only created layouts with lots of red on them! Who would have thought!

I wish you all lots of fun tomorrow and of course a happy and healthy New Year!

Until next time,

Zsoka

Saturday, December 23, 2017

Exploding Box mini album with pockets and lid - DT project for Paige Evans + Silhouette

Hi there friends,

I'm back today with a fun new mini that I created with Paige's new exploding box mini album cut file (Silhouette Store ID: #238987). I've wanted to make an exploding box for ages so I'm happy Paige created a cut file for it!

This summer my mom celebrated her 70th birthday with a surprise party and I realized I have not scrapped a single photo from the event! So I thought this would be the perfect present for her for Christmas. So dad if you are reading this, please do NOT tell mom about it, thank you :).

Here's the finished box!


If you remove the lid, this is what you see (please ignore the fact that in most photos the WONDERFUL chipboard piece is missing - I added this later and since then we haven't had proper daylight! Just grey skies...)


It's really very simple! You basically cut 3 of the same cut files in different sizes (all 3 included in Paige's cut file), glue them together and decorate! What I really like about this cut file is that it has these pockets where you can put photos, journaling, anything you want! I didn't adhere any photos, because I had 33, so I created some pockets for them and they are all stashed away. If you don't want the pocket option, you just need to cut off the flap!


I used 3 different patterned papers from the Pink Paislee/Paige Evans Turn the page collection for the base of my album. 


I used all kinds of embellies to decorate my pages: chipboard, clips, die cuts, twine, charms, ribbons...

Below is my most fave part of this mini! I added a shaker pocket and two adorable heart charms to this page. 


I adhered the pink ribbon to a few of my pockets, just to add something a little extra. I love how they look!

Check out all the detail shots below and if you have questions, just shoot!


I hope you give this album a try! It's really fun and comes together rather quickly! Perfect for your loved ones!

Thanks for stopping by today!

Till next time X


Friday, December 22, 2017

DT layout for Just Nick

Hi guys,

I'm back today with the last layout I'm sharing for Just Nick this year!

I've used the wonderful Leaf Cluster 3 cut file.


This photo must have been on my desk for 2 years, I just never got to it. Total coincidence that the collection I chose went with the colors in the photo! I'm always happy when I can use a color photo - I mostly don't bother because black and white photos go with any collection so don't require planning. I am really not big on planning out designs ahead!

I went with one of my all time favorite Christmas collections, Christmas on Market Street from My Mind's Eye. I'm so sad that I hardly have any left! I used up most this holiday season.

I cut the leaf cluster 4 times from white card stock, then I spent some time on backing these with a variety of papers. I made sure I have solid reds and greens (well, polka dots are solids right?!) as well as patterned papers.


There's a gorgeous gold foiled poinsettia paper in the collection - I fussy cut out a lot of the flowers and floral pieces to tuck them behind my cut files and scatter some smaller ones around my page.


I've arranged the 4 cut files into the four corners, and once I liked how they looked, I started to glue things down. I also added the photo and my title in the middle.


I then added those fussy cut pieces, some embellishments like flair, stickers, chipboards and a few cute buttons (which I believe are from Crate Paper). 


I love how this one turned out. It's funny how much I dislike red, the red and green combo in general, and yet, this holiday season this has been my most favorite combo to work with ha! There's just something so festive about these colors! I would never use them during the year though!

I hope you like the layout too and are inspired to create something!

I wish you and your loved ones a magical holiday season!

Thanks for stopping by today!

X


Wednesday, December 13, 2017

Holiday - DT layout for Fancy Pants Designs

Hi there,

I'm back today, sharing my newest layout for Fancy Pants Designs!

I've used the beautiful Holiday Hustle collection to create this Christmas layout. 


These photos weren't technically taken at Christmas but Sinterklaas (the Dutch version of St. Nick). The Dutch traditionally give presents at Sinterklaas not at Christmas. It's a pretty big thing in Holland and I love it! My kid is so lucky, he gets presents from Sinterklaas and the Hungarian Mikulas (also St. Nick but he only brings candy and small things like that), then Christmas too because in Hungary Christmas is the bigger holiday. Crazy I know! On top of this, in Germany (where we live) again another person brings the presents at Christmas haha. Poor kid must be confused! All the lies I have been telling him since he was little :).

Anywho, back to the layout! I picked a cut file with a bunch of presents from the Silhouette Design Store and cut it twice (I flipped the second cut file so they don't look all the same) from textured white card stock. Then as usual, I backed the openings with different patterned papers from the collection. 


To add some interest, I hand cut a few of the bows for the presents from patterned papers. I glued the cut file on the left onto my background and the one on the right I popped up using some foam adhesive. I tucked my photos behind the cut files. I also tucked some die cut Christmas trees behind the cut file on the right side. I thought they looked fun!


I added a few buttons here and there - I love them so much! I also scattered a couple of die cut pieces from the ephemera pack around my page. 


The title gave me a bit of a headache because I originally wanted to have something else. However none of the red alpha thickers I have in my stash fit for one reason or another. And these die cut alphas fit perfectly. So I just went with these in the end!


That's it for today!

Thank you for stopping by,

XOXO


Merry - DT layout for Paige Evans + Silhouette

Hey there friends,

I'm sharing a new layout today that I created for the Paige Evans + Silhouette Design Team.

I used two cut files on this page, the Poinsettia Nordic Background (ID: #228022) and the Polaroid Frame Border (ID: #228024).


I only cut the middle part of the cut file and backed it with different papers from My Mind's Eye Comfort&Joy and Crate Paper Falala. My background paper is from the MME Comfort & Joy collection.

Then I designed the rest of my layout in the Studio program to make sure my idea doesn't only work in my head! 


Now, I generally don't use more than 1-2 photos (and never bigger than 4x4) on my layouts because I love working on the background design as much as I love having my photos documented. I realised I have many photos from Christmas last year that I haven't scrapped yet and when I saw the Polaroid Frames cut file I thought it would be a great way to use several photos at once.


I wanted to create two banners to hold 8 pictures, I figured otherwise I'd never catch up on documenting everything ha! I however wanted my photos to be a bit bigger than what the cut file provided, so I sized them in a way my photos fit (I'm not sure about the size now, it's what you get when you print 4 square photos with border on your Canon Selphy, maybe about 1.5x1.5 inch?) and then cropped them (I have 4 frames instead of the original 5 in the cut file).


I backed the little clothespins with patterned paper then adhered my photos behind the frames. I put foam adhesive behind each frame to pop them off of the background. 


I added many little pieces of embellishments to the clothesline and the frames: chipboards from MME Comfort & Joy and Christmas on Market Street, wood veneers which I partly embossed with gold embossing powder. I also found this chipboard banner I've been hoarding, waiting for the perfect opportunity to use it. Well I guess this was it! 


I wrote a couple of words on each frame instead of a long journaling and added my date to finish off my layout.

I hope I could show you a different way to incorporate many photos into a page design! Give it a try, it's fun! 

Thanks for stopping by, have a great day!

X


Monday, December 11, 2017

Rudolph was here - DT layout for Just Nick

Hey there crafty friends,

Welcome to Day 11 of our 14 Days of Holidays cut file giveaways!  Each weekday from December 1-14, 2017 we will be giving away a FREE cut file for that day only!


Today's FREE cut file is the Ugly Sweater Background.


I always love these Nordic type backgrounds so I was happy to work with this one! I modified the cut file a little because I wanted the pattern to be smaller. I shrunk it and then multiplied it. I cut this from white textured card stock, then backed it with a red patterned paper from the Crate Paper Falala collection. 


It's become a tradition in my home to take these Rudolph photos every holiday season. These are from last year, I'm yet to take new ones! I just love them! Let's see how long the kiddo plays along :D.

Last year I made a layout with a big stag on it and I wanted to do something similar here. I found the Reindeer cut file in the shop and picked that one!


I blew this up and placed it slightly off to the left so I can put my long title at the bottom right. I wanted to kind of hang my photos on a clothesline between the antlers. For this I used some red  twine. I hung my photos on this with some teeny clothespins as well as some puffy stickers. 


I glued two wood veneer birds on the twine and tucked a few wood veneer presents behind the antler. I added 3 more wood pieces from Pinkfresh Studio in different spots on my page. 


For my journaling I used a die cut from the Pinkfresh Studio December Days collection and tucked it behind the cut file as well.


I mixed and matched my title, I used 3 different alpha thickers. The candy cane design ones were sort of lost in the background so I drew the outlines with a black pen.


Today's design, the Ugly Sweater Background, is yours for FREE today only! Just enter the code: UGLYFREE at checkout to get this design for free. This code is only valid until midnight CST on December 11, 2017. No purchase necessary.
Design will be available in the Just Nick store for purchase after the discount code expire.

That's it for today guys, I hope I could inspire you in any which way!

Thanks for stopping by today!

Till next time,

X


Friday, December 8, 2017

Gift boxes - DT project for Fancy Pants Designs

Hi there friends,

Today I am sharing a Christmas gift idea that you can create in little time if you have a die cutting machine. 

I wanted to create some gift boxes for friends and family that I can fill with little things. I found this cut file at the Silhouette Design Store and instantly fell in love with it!

I used the wonderful Holiday Hustle collection from Fancy Pants Designs - I mean have you seen the red foiling in this line?! So unbelievably gorgeous! You'd better believe me because red is my least favorite color and even I find this one amazing! Perfect for all your Christmas projects!


First I sized the cut file to the biggest size that fit on a 12x12 paper, then cut the tray from a black polka dot paper and all 3 boxes from different patterned papers. I also chose papers for the little plaques that read JOY. I did change the font to the Back this Font from Paige Evans, however I only used the outlines of it for my letters. 

The tray was very flimsy for my taste so I cut the same size again from white heavyweight card stock, cut apart the black one and adhered the pieces to all 4 sides but not the bottom.


I folded the boxes and started decorating. I went through the embellishments and picked out ones that matched my chosen colors. I ended up with several tags for each box because I just couldn't choose one! I used gold eyelets to attach all tags for each box, then added some twine. I also went through my ribbon stash which I never actually use, so this was the perfect moment to bust them out! Of course I would normally only do these last steps once I filled my boxes, but I am not sure yet what I will put in each. One will surely be filled with Lindor balls! 


I glued some die cut pieces to the front as well just to add a bit of interest. And of course the buttons! I just had to! They are my most favorite pieces in the last 3 collections! They are cute as a button - see what I just did there?! :)


And that's pretty much all I've done! Easy peasy but I find them so adorable!

I hope you like them and give these boxes a try!

Thank you so much for stopping by today!

Until next time X