Friday, December 27, 2019

Right Now - DT layout for Paige Evans

Hello there crafty people,

I'm sharing my last layout with you for this year! WOW how fast this year went by again...I can't even believe it!

This layout was inspired by my uber talented DT peer, Steffi Ried! I actually was going to flat out copy hers because I loved it so much, but when I was working on it, the layout just kept changing lol. 

This tree paper is one of my favorites in Paige's Truly Grateful collection, it's such a sweet and colorful design. For a long time I had no idea what photo I could use with it, but then we went biking in the forest one weekend and it just all made sense.


I fussy cut all the trees, then layered them up, glued them together along the middle so I could bend up the sides to create some dimension. In retrospect, I could have added some colorful hand stitching to the branches but I didn't think of it at the time.


I chose a polka dot paper for my background and I added a wide strip of green paper as a reference to the forest, if that makes sense? I added a few layers of tissue paper behind my photo, then tucked it all in behind some trees. I didn't add a whole lot of embellishments: a date label, an epoxy sticker bird and a die cut banner around my photo as well as puffy dots in between the trees!


For my title I chose one of the epoxy sticker phrases because I love the font so much! It would have been a shame not to use it! I wrote my journaling next to the title, kind of filling up the empty space there.


That's it! Thank you so much for stopping by today as well as your continuous support over the year! 

I'm wishing a merry Christmas and a healthy, happy new year to you and yours!

X

SUPPLIES:
Truly Grateful collection: Paper 3, Paper 7, Paper 17, Epoxy Stickers, Ephemera Die Cuts

Thursday, December 19, 2019

Last minute Christmas cards - DT project for Pinkfresh Studio

Hello Pinkfresh fans,

I'm back to share my last cards for Pinkfresh Studio. I think Christmas cards are my favorite, I could truly create them all year long. I doubt I'm going to have time for more this year though! Lack of time is also the reason why I ended up making such simple and quick cards for today's post. These are great for some last minute crafting!


I was focusing on my favorite (6x6) patterned paper from the Home for the Holidays collection and some of the new dies from the latest release.

For my first card I used the Essentials: Diagonal Stripes with Window die to create a frame from patterned paper. I also die cut the center from white card stock and stamped a sentiment from the gorgeous Share Cheer stamp set in navy blue, using the Stargazer ink pad. I added foam adhesive strips to the back side of my die cut and adhered it to my A2 size, top folding card base. I also glued down the middle piece.


I then went through the Home for the Holiday embellishments and picked out a few: a layered sticker, some die cuts, a wood button and a few enamel dots. I glued these down in two opposite corners. To finish off this card, I added some red twine at the top.


My next card is the simplest of the three! I created an A2 size, top folding card base from white, heavy weight card stock and added a patterned paper layer on top. Then using the Essentials: Fancy Diagonal Stripes die and white card stock, I created my top layer.


I glued down the Merry & Bright die cut first, then popped up the houses using foam adhesive. Some red enamel dots and red twine finish this card off. Oh oh! And a teeny tiny red tag from the ephemera pack! Isn't that too cute?!


For my last card I made another A2, top folding card base, then added red patterned paper to it. I adhered a white die cut on this which I cut with the Essentials: Diagonal Stripes with Window die. I glued some of the white fall-out pieces back in place, plus a few patterned paper strips as well.


I dug up a cute little stamp set from last year, Merry and Bright Toy Shop, cut apart the long Joy & Cheer stamp and re-arranged it in a way that it all fit on the paper in the middle. I then embossed this with red glitter embossing powder. I stamped the rocking horse image onto navy card stock, white embossed it and fussy cut it out. Using foam adhesive I attached it to the middle. Enamel dots and twine finish off this card.


That's it for today! I hope you've found some inspiration in this post!

Wishing you Happy Holidays, a wonderful and relaxing time with your loved ones!

X

Monday, December 9, 2019

Pinkfresh Studio Essentials 3 Release Blog Hop


Hello Pinkfresh friends,

Welcome to the Essentials 3 Release blog hop, full of amazing products and gorgeous inspiration! My most favorite card making supplies are standalone dies, so I'm pretty excited about this release! I wish I had had more time to try each one of them, but I'm sure you guys know how busy the end of the year gets!

I decided to create a mini Christmas banner with the smaller die from the Ornate Banner die set. I'm thinking, I should make a mini box for it and then it will be a cute present for a friend!


I die cut the banners from Home for the Holidays papers - here I used the little teardrop shaped die at the bottom too. I also die cut the banners from heavy weight white card stock that I layered behind each patterned paper banner so they are nice and sturdy. 


This striped background I had left from a previous project, I thought I might as well use it! I had enough for 2 banners!


I die cut each letter from the same patterned papers, using my favorite Kelly Alpha Upper Case dies. I glued them on heavy weight card stock, inlaid the little fall out pieces too, then fussy cut the letters out - again, nice and sturdy. I like my projects to stand the test of time! 


So that my letters stand out from the background, I added a white square to each banner. To create these, I used two new die sets: Diagonal Stitched Squares and Stitched Squares. These are really great basic shapes that I'm sure I'll use a lot!

I then added bits and pieces from the Home for the Holidays scrapbook collection to each banner, puffy stickers, stickers, wood buttons, layered stickers and enamel dots.


Last but not least, I added some gold eyelets to each banner and threaded pink ribbon through them. 


While I was at it, I made a second banner for my table decor piece! This time I die cut the banner from blush card stock. I did add a second layer of white heavy weight card stock behind it. I also die cut the tear drop shapes from white card stock and glued them in place.


For the letters I used citrine card stock and this time I left the patterns open, so the white backing could peak through. I adhered the letters in the middle of the banners.


To add something a little different, I used one of the dies from the Teardrop Tag with Fillable Elements die set to create a white ornate border at the top of my banner.


I then punched two holes in each banner and added some eyelets. I'm not sure what color these are, some kind of metallic brown or so. Works well with the color of the pine cones in the glass!


I used the same pink ribbon as before, and secured the banner on the glass with a bow.


This is what's inside! The brush trees have such a pretty color and shape and they are on concrete stands which I find super cool. 


There you have it! I rarely do home decor because we just have no space, but I loved working on something different for a change! Hope you like these projects too :).

Giveaways:

1. Pinkfresh Studio is giving away the full Essentials 3 release on the Pinkfresh blog and Instagram as well!

2. On each blog we are giving away a $25 gift certificate too!


As always, the winners will be selected from the comments left on all blog posts. Winners will be announced on Monday, December 16, 2019 on the Pinkfresh Studio Giveaway Page. You must claim your prize within 2 weeks so don't forget to go check the above page! Comment away! Good luck!

Pinkfresh Studio is also offering free shipping on orders $100+, within the United States. No code is needed.

That's it for today! Thank you for stopping by!

Have a fabulous day!

X


BLOG HOP LIST

You are invited to the Inlinkz link party!
Click here to enter

Friday, December 6, 2019

Shenanigans - DT layout for Paige Evans

Hello there crafty friends,

Can you guys believe it's December already?! I can't even. I don't have any Christmas layouts for you this year uh-oh. Things have been hectic around here, I'm sure most of you can relate! For the first time in almost 5 years I don't get to scrapbook every day. Oftentimes not even every week. If you know me, that is...just...not...acceptable!

I'm sharing this super simple big title page today that came together fairly quickly. Which is great this time of year when no one has time!


I blew up the Shenanigans cut file (Design ID: 297831) in the Studio software and placed it at a diagonal. Once I was satisfied with the size and placement, I die cut it from white textured card stock.


I then backed the letters with various blue and green patterned papers from the beautiful Truly Grateful collection. I adhered the cut file to my chosen background paper - placing the photo behind the letter G.


I didn't embellish much this time, but I felt like this page didn't need more. Maybe I'm just changing and use less stuff on my layouts? God I hope not, I have sooo.much.stuff :D. Anyhow, I went with wooden buttons, wood veneers and card stock stickers. I even added a few fussy cut sentiments I had left from one of the Whimsical papers. I love that paper, it has sentiments in all colors of the rainbow so if I need an embellishment in a certain color, I almost always find something on that paper that works with my project ha! 


Last but not least, I stamped the date and wrote my journaling. Done!

I hope I could inspire you to get scrapping, in one way or another!

Thank you so much for stopping by today! Have a fabulous day!

X

SUPPLY LIST:
Whimsical collection: Paper 8
Horizon collection: Stickers

Wednesday, December 4, 2019

In the spotlight: Spellbinders Small and Large Die of the Month kits - December

Hi there crafty peeps,

I'm quickly checking in, to share my projects with the awesome Spellbinders December Small and Large Die kits! I've combined the two on my card duo, because the Small Die kit is a bunch of great sentiments. I'll get to them in just a second!

But first, as a reminder, Spellbinders have several monthly kits, which are really great! You can subscribe to:
You can find all necessary information about these kits here.

This is what you get in the Large Die kit this month:


These layering border dies are very versatile, you can use each layer separately, you can create a standalone die cut or one that's part of the background...so many choices!

Then there's the Small Die kit, which like I mentioned above, contains a lot of sentiments this month:


So, my cards! I've used patterned papers from the Felicity Jane Rebekah kit. For both these cards I only used two of the possible layers of die cuts.


On the one on the left, for the bottom layer I used a die at the bottom of the paper but not at the top, so I have a wide strip left above it, if that makes sense! On the other card however, I completely die cut the shape. I also die cut the top of the border from the pink paper I used in the background, so I could inlay the floral border perfectly.


For my sentiments I've used some of the dies from the Small Die kit. I cute the words from patterned paper, then 3-4 times from white card stock too, and layered them up for a dimensional element. To finish off the cards, I added some enamel dots/sequins and twine.


That's it! I hope you like today's projects!

Thanks so much for stopping by and have a wonderful day!

X


Tuesday, December 3, 2019

In the spotlight: Spellbinders Card Kit of the Month - December

Hello there crafty friends,

Today I'm back with some new projects I've made with the fabulous Spellbinders December Card Kit of the Month! I wish I had had more time because there's so much awesomeness in this kit again, I didn't know what to grab first. My absolute favorite is the adorable fox die and the patterned papers!

As a reminder, Spellbinders have several monthly kits, which are really great! You can subscribe to:
These are all a great value, have a look! You can find all necessary information about these kits here.

Here's a look at what you get in this month's kit:


I started with the fox die, of course. Honestly, I love it so much, I could have just gone on creating loads of cards with it but there's so much other stuff in the kit too. I'll have to come back to this kit sometime for sure because I have so much left that I still want to use! For instance the sticker pack, it's crazy good! And that stamp is so cute too!


Pink and floral fox?! YES PLEASE! Love them :).


This cornflower blue is one of my favorite blues, so I was pretty happy to see it in the kit!


Such simple and quick cards, I pretty much only combined some patterned papers and added layers and layers of die cuts and stickers!


That's it for now! I hope I piqued your interest in this fabulous kit! Should you have any questions, please leave a comment below and I'll get back to you!

Thank you so much for stopping by today!

Have an awesome day!

X

Friday, November 29, 2019

Christmas for You - Weihnachten für Dich Blog Hop with Alexandra Renke

Hello everyone,

Welcome to the "Weihnachten für Dich" (Christmas for You) Blog Hop! You should have arrived here from Ulla's blog, but you'll find the whole blog hop list at the end of this post for your convenience.

Our goal with this project was, to pay it forward, to say thank you, to show our gratitude to a person that did a good deed for us, helped us, made our lives better in some way this year. Maybe a nurse, a postal clerk, what have you.  Basically a random act of kindness. When thinking about who that extra special person is that I'd like to create a gift for, who I am  especially grateful for this year, one name stood out. She came into my life at the right moment earlier this year. She says I came into hers at the right moment too. It might be destiny, I don't know. Our paths crossed because of "business", if you can call my health/well-being business, but I feel like we became so much more. She has been helping me deal with issues that block me from being my true self. She has her work cut out for her, that's for sure. But she hasn't given up on me even if I drive her crazy sometimes :D. Sooo I thought I'd surprise her with a little something. I tried to think of something that is not only pretty but serves some purpose too - which she will laugh about, because we just had a discussion about how I consider things useless that are just pretty but have no particular purpose. It's a long story :).

Anyway, I remembered how much I enjoyed creating calendars for friends last year, I thought she could maybe, just maybe, use one hehe! 

So without further ado, here's my project!


I had a color scheme on my mind for this project but ended up adding in some other colors too because Alexandra's papers are THAT gorgeous. I had to use them!


All pages are 4.25x5.5". I first cut white card stock to this size, then I glued the same size patterned paper on top, so that the pages are sturdy. Then I started working on the different designs.


I will include a supply list down below, in case you like any of the awesome products I've used!


For January I stamped a snowflake background onto a light pink woodgrain paper. This is a turnabout set from Concord & 9th, if you know these sets, they are super clever - you can use up to 4 colors of ink to stamp backgrounds. Here I used 3 inks and an embossing powder. 


For February I created a panel with paper weaving technique. I know there was logic to how I put down the paper strips (as in which arrangement) but once it was woven, there was no rhyme or reason anymore. I've done this many times and I could never figure it out. So, random pattern it is, ha!


For March I used the Botanical Beauty die to create a textured background. I embossed a piece of paper ages ago so I thought I'd finally use it since it was the right color. I die cut the month as well as one of the branches. This never happened to me before but some of the embossing just peeled off the letters, maybe it's to do with the fact that I embossed it a long time ago? I have no idea.  I didn't bother redoing them though, embracing imperfections and all.


For April I created a dimensional, floral number - this paper is just out of this world beautiful! I had a hard time cutting into it!


I decided to make a wreath for May - for this I used a part of the Eucalyptus wreath die set and die cut the branch several times from 2 different pink papers.


June - hexagons! Don't you just love hexagons? I only started paper crafting in 2015 but I remember one of my first scrapbook layouts had hexagons on it. I can't get tired of them! I love these dies especially because they also cut an outline shape.


Next up July! I cut a 4.25x5.5" size panel from this gorgeous floral paper, then die cut the letters from it. I die cute the letters from white card stock too, about 4-5 times, then layered them up, glued the patterned paper die cut on top (a bit offset so the white is a bit visible) and placed them back into place. Using some branches from the Just Because stamp set, I added some embossing here and there as well. Some fussy cut flowers on top, done.


For August I fussy cut some tiny bows from one of the patterned papers and glued them on this navy striped paper. I love this paper so much, I had to order it in all sorts of colors haha!


I went old school on the next two pages because I didn't have the right dies :). For September I fussy cut a bunch of simple leaf shapes, added some embossing, layered them up, stitched them down in the middle and bent up the sides for some dimension. 


I did pretty much the same with October, only with pumpkins. This was actually the last page I made because all I could think of in relation to October was pumpkins and I don't have a pumpkin die hehe.  Not sure why I didn't realise sooner that I can just draw some and cut them out...


I kept November simple because I wanted that pine cone paper to shine, it's so gorgeous! The 12x12 paper actually has "Baby it's cold outside" written on it and I would have loved to use it, but could not fit it on this background somehow.


Another thing I really had to use, one of the cardinals from one of the patterned papers. I love cardinals! I actually have never seen one in real life, only on TV and in photos - but their gorgeous red color always fascinated me. So beautiful!


SUPPLIES:

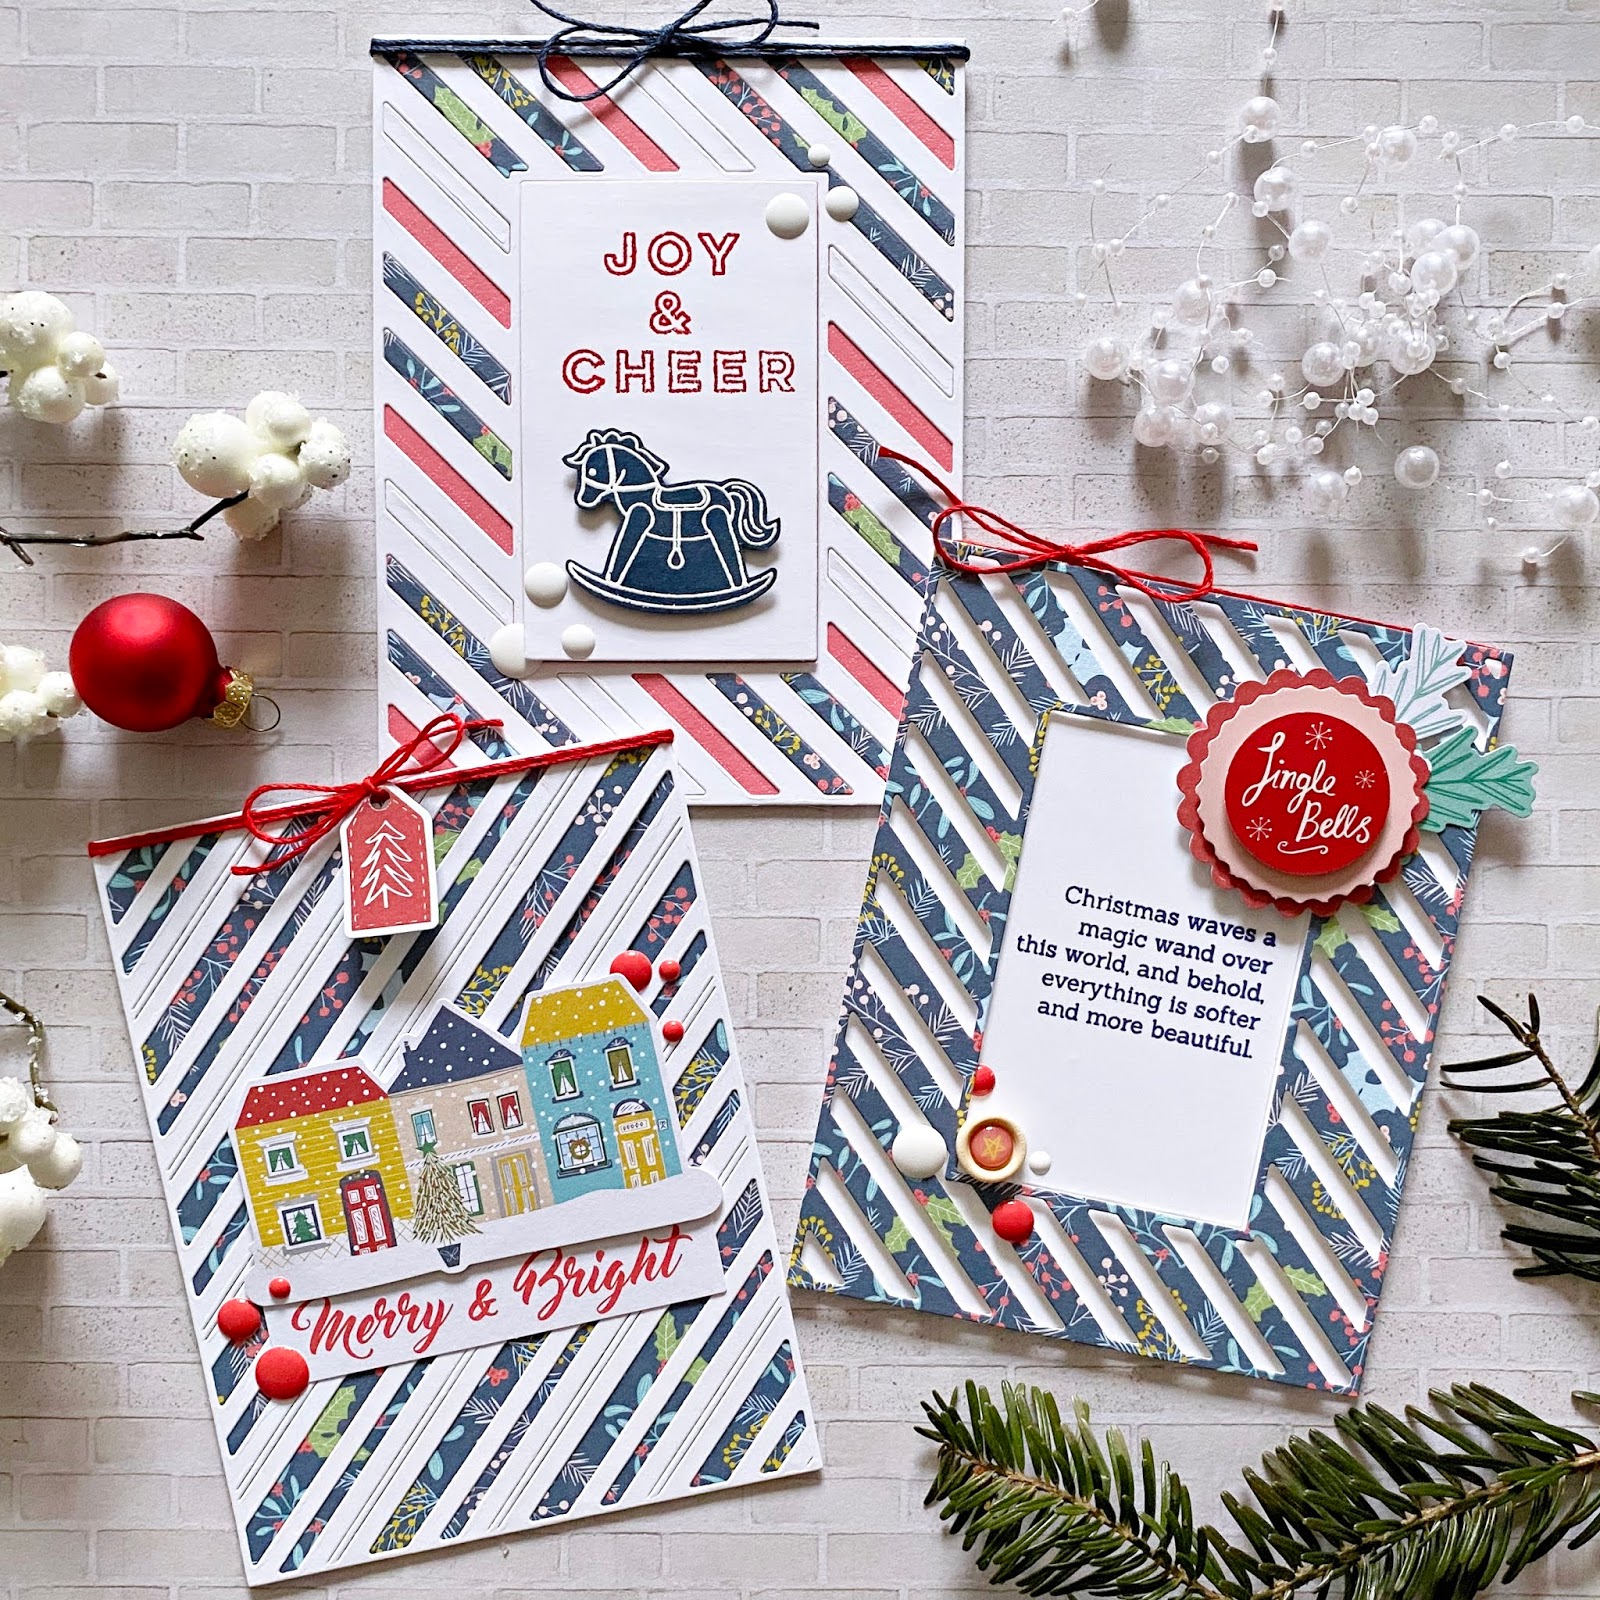
I also made a bonus project to thank Alexandra for her generosity and overall kindness! I made it simple, I used some of my favorite ideas/designs from the calendar project and turned them into cards. 


I also made a box for them, just so they are more suitable as a gift :)


This hexagon card was inspired by one of Lea Lawson's cards, that was so beautiful, I had to case it!


Same snowflake background as before, different colors. Same leaves as before, different arrangement :).


The dry embossing on the navy circle is a total fail BUT I actually loved the white bits peaking through, I thought it looked interesting, so I just left it as is.


SUPPLIES (as above, plus):
I hope I didn't forget anything - should you have any questions, leave me a comment and I'l get back to you!

That's it! I hope I could inspire you in some small way! Since I'm the last stop in the blog hop, you'll return to Alexandra's blog.

Thank you for stopping by today! Have a wonderful day!

X

BLOG HOP LIST: