Showing posts with label embossing powder. Show all posts

Thursday, December 19, 2019

Last minute Christmas cards - DT project for Pinkfresh Studio

Hello Pinkfresh fans,

I'm back to share my last cards for Pinkfresh Studio. I think Christmas cards are my favorite, I could truly create them all year long. I doubt I'm going to have time for more this year though! Lack of time is also the reason why I ended up making such simple and quick cards for today's post. These are great for some last minute crafting!
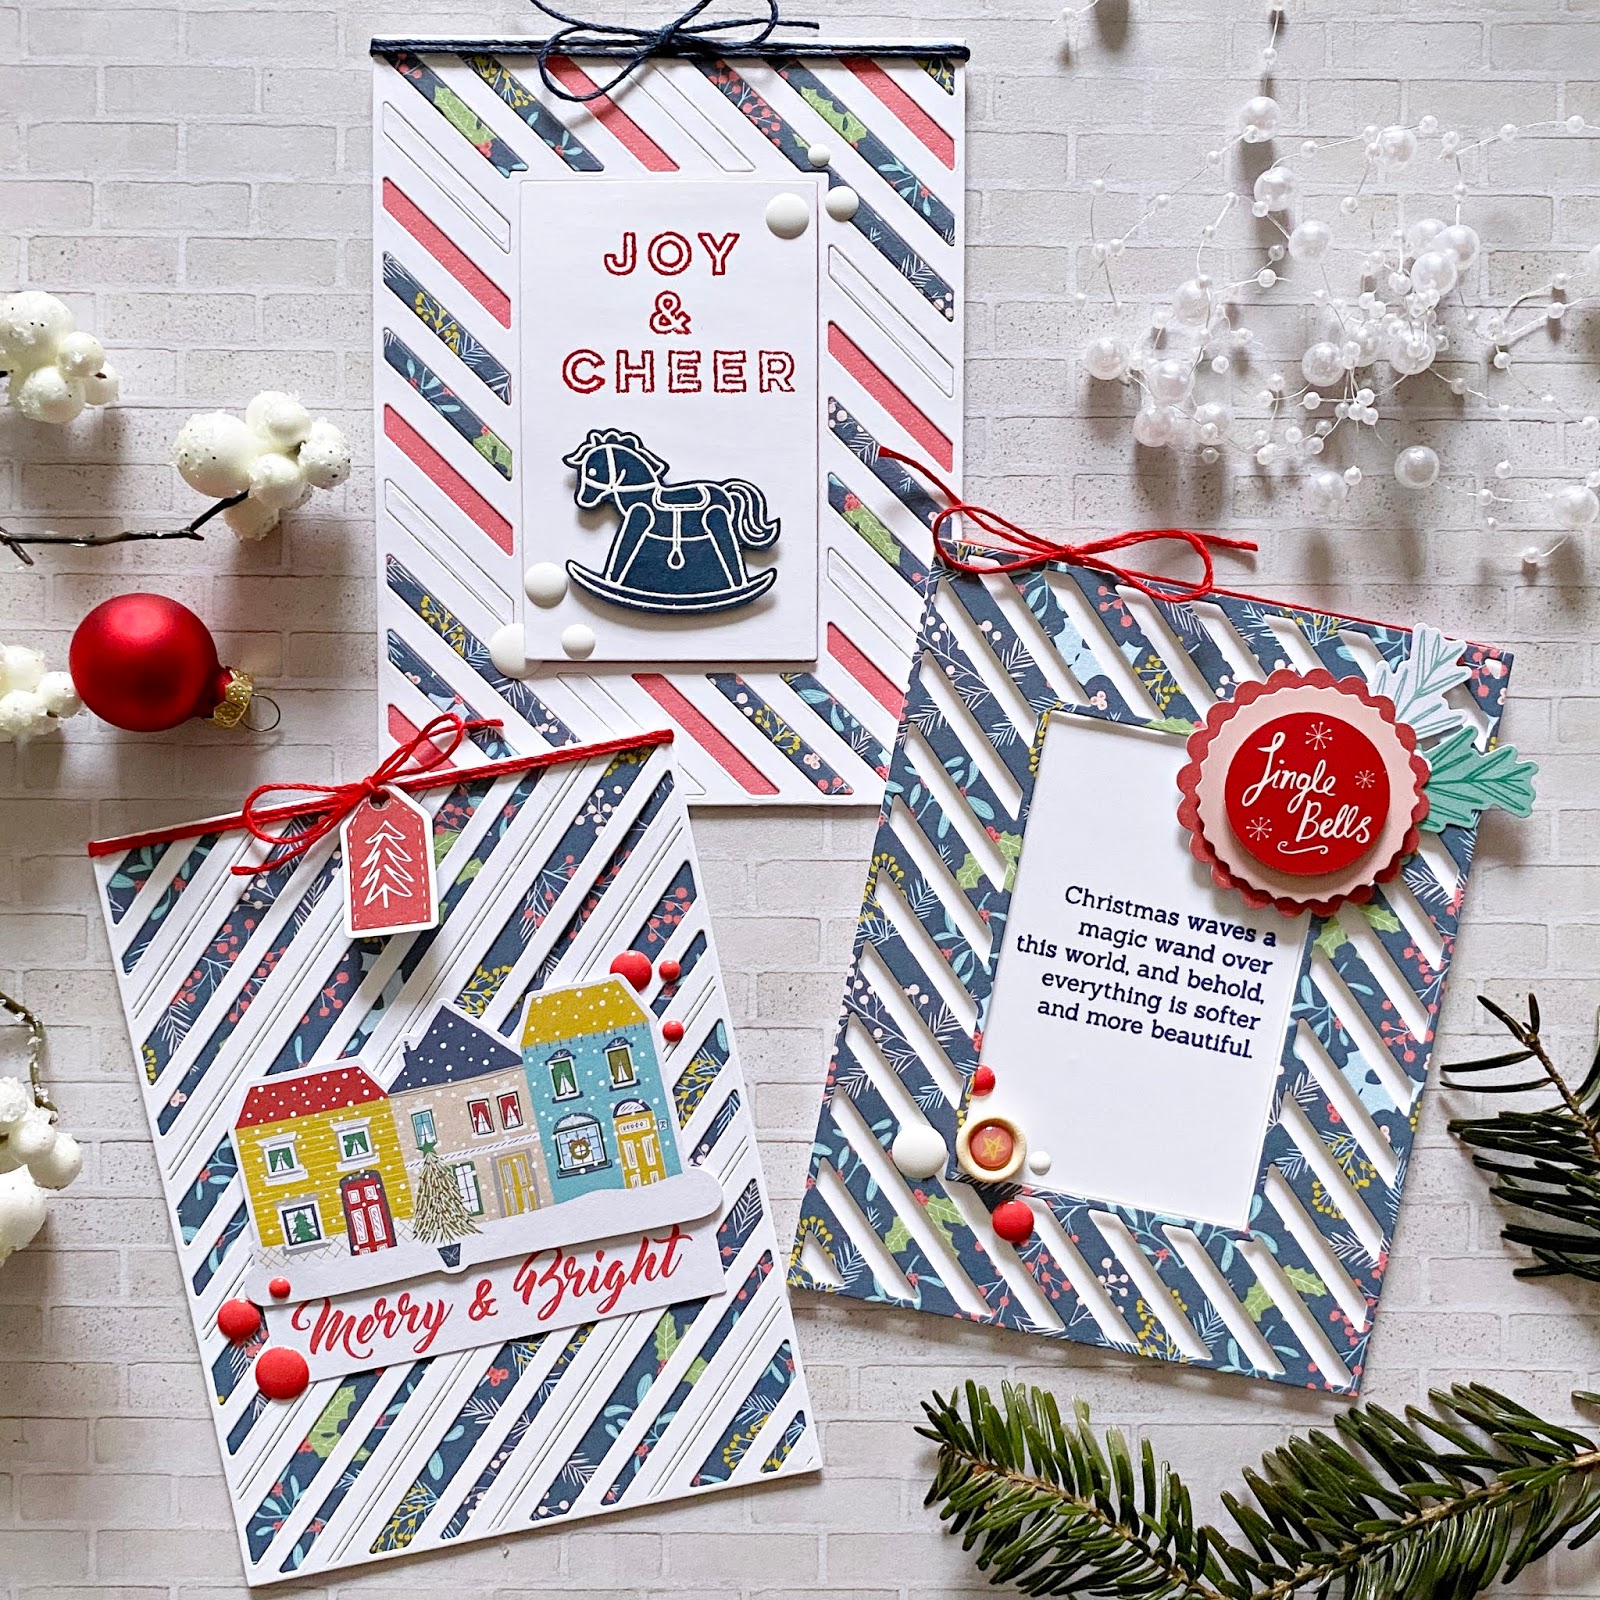

I was focusing on my favorite (6x6) patterned paper from the Home for the Holidays collection and some of the new dies from the latest release.

For my first card I used the Essentials: Diagonal Stripes with Window die to create a frame from patterned paper. I also die cut the center from white card stock and stamped a sentiment from the gorgeous Share Cheer stamp set in navy blue, using the Stargazer ink pad. I added foam adhesive strips to the back side of my die cut and adhered it to my A2 size, top folding card base. I also glued down the middle piece.


I then went through the Home for the Holiday embellishments and picked out a few: a layered sticker, some die cuts, a wood button and a few enamel dots. I glued these down in two opposite corners. To finish off this card, I added some red twine at the top.


My next card is the simplest of the three! I created an A2 size, top folding card base from white, heavy weight card stock and added a patterned paper layer on top. Then using the Essentials: Fancy Diagonal Stripes die and white card stock, I created my top layer.


I glued down the Merry & Bright die cut first, then popped up the houses using foam adhesive. Some red enamel dots and red twine finish this card off. Oh oh! And a teeny tiny red tag from the ephemera pack! Isn't that too cute?!


For my last card I made another A2, top folding card base, then added red patterned paper to it. I adhered a white die cut on this which I cut with the Essentials: Diagonal Stripes with Window die. I glued some of the white fall-out pieces back in place, plus a few patterned paper strips as well.


I dug up a cute little stamp set from last year, Merry and Bright Toy Shop, cut apart the long Joy & Cheer stamp and re-arranged it in a way that it all fit on the paper in the middle. I then embossed this with red glitter embossing powder. I stamped the rocking horse image onto navy card stock, white embossed it and fussy cut it out. Using foam adhesive I attached it to the middle. Enamel dots and twine finish off this card.


That's it for today! I hope you've found some inspiration in this post!

Wishing you Happy Holidays, a wonderful and relaxing time with your loved ones!

X

Saturday, June 22, 2019

Technique Tuesday and WOW! Embossing Powder Blog Hop


Hello dear friends,

Welcome to DAY 2 of the Techniques Tuesday and WOW! Embossing Powder Blog Hop! We are celebrating summer with fresh and summery stamps/dies, designs and colors!

You should have arrived here from the talented Verity's blog! I'm also including the full blog hop list at the end of this post, for your convenience.

One of the things my family loves in the summer is strawberries! We can buy them pretty much all year but they never are locally sourced and they never taste like strawberries in the summer! It's just a  few short weeks we can truly enjoy them so that we do! And not only their taste...I just love how sweet they look too! This is why I decided to work with two strawberry sets from Technique Tuesday, the Strawberries on the Border die set and the Sweet Summertime stamp set.


On my first card I stamped a background full of strawberries and added a very basic coloring using alcohol markers. Note that I rarely use realistic colors for things...I love color and I love playing with it! I dry embossed the panel to add a bit of texture and interest. 


I heat embossed a panel with my most favorite embossing glitter, Sorbet (yes, I am totally obsessed with it and I am not ashamed haha!) and I die cut a circle from it. I stamped my sentiment in black on a smaller circle. I glued down the citrus circle on my card front and wrapped some twine around it. I  then added the sentiment on foam tape. 


I had so many different ideas with the die...none of which worked out haha! So I just used it as it was intended (I think!), on the edge of my card front. I die cut the flowers, leaves, stems and the strawberries from patterned paper, color card stock and the embossed panel I used earlier. 


I then did a bit of paper piecing. I love love love paper piecing. It often takes ages but I always love the result so to me it's worth it. Can you imagine I was going to piece back the little dots on the strawberries...OMG. As I was trying to remove them from the die they flew EVERYWHERE. Plus they lost their shape as I tried to add them. I decided to remove them in the end. :(


I stamped my sentiment on a piece of patterned paper and adhered it to my card front. I also added a thin strip of embossed card stock, because those 2 strawberries were just not enough Sorbet hahaha. I dry embossed another A2 size panel and added it to my A2 size top folding card base. Using foam adhesive, I glued the strawberry panel on top. To finish off this card I tied some twine at the top. Done!

Now for the fun part! No blog hop is complete without a prize (or more)! 
  • WOW! Embossing Powder has 6 powders of your choosing along with a WOW carry case to store your powders safely in. 
  • Technique Tuesday is giving away 2x$20 gift certificate to their store
Winners will be chosen at random from the comments left on all the posts on both days. We encourage you to leave comments on both days, the more comments you leave, the more chances you have to win these fabulous prizes.

The hop is open internationally! Good Luck!

You might also be interested in the SUMMER SALE Technique Tuesday has going on now! The deets:
  • To receive your free stamp, use the coupon code: FreeWings.
  • The coupon code is valid June 22th through 24th, at midnight!

That's it for today guys! I hope you've found some inspiration along the hop! Your next stop is the lovely Jo's blog! Enjoy!

Have a wonderful day!

X
Verity Biddlecombe
Zsoka Marko ------ YOU ARE HERE!


Sunday, February 17, 2019

WOW! Embossing Powder and Ellen Hutson Collaboration Blog Hop


Hi there friends and welcome to the WOW! Embossing Powder and Ellen Hutson collaboration blog hop! You should have arrived here from the wonderful Ardyth's blog!

I've never had stamps from Ellen Hutson before so I was very excited to play along! I also haven't made a coffee themed card before if you can believe it! I only like espresso but I very rarely drink it because for some reason my body doesn't process it well. But I definitely wanted to use some of the coffee stamps from the February release because there so many cute images!

First up, I used the Breve Note stamp set - I love all the little mugs, pots and espresso machines! And the font of the sentiments is so awesome! So I first stamped the sentiment (left card) in WOW embossing ink on an A2 size watercolor paper panel, then embossed it with Metallic Gold Rich Pale embossing powder. 


I then stamped the images around the sentiment in black Versafine ink. I colored them in using water colors. I stamped some coffee beans all over the panel, to fill up the white space and colored them in with a metallic gold pen. I added the panel to a top folding A2 size card base and done.


The card on the right is the same thing, I just didn't fill up the whole background, and I went with a more linear placement of the images. I also used the Big Scripty Hello die set to create part of my sentiment. The skinny Hello die cut is embossed with the same gold powder 2 or 3 times.


On my second set of cards I've used the Mondo Gerbera Daisy stamp and die combo. On the card on the left I first stamped and embossed the flower with the Hot Gossip embossing glitter. I then stamped the same image on vellum and embossed it with Opaque Bright White embossing powder. I attached the vellum piece to the pink one, slightly offset, so I can see some of the color peeking through.


I die cut Thank You from a pink patterned paper, using the Big Scripty Thank You die set and stamped a sentiment below it, which you will find in the Mondo Gerbera Daisy stamp set. To finish off this card I splattered some navy ink around the panel and added some fussy cut butterflies.


On my second card I wanted to do paper piecing, so I stamped and embossed the necessary images on different patterned papers. I wanted to create a more dimensional flower, so I added a few petals in a darker shade of pink. To add interest to my white background, I used a bone folder and a scoring board to add embossed lines. Again some navy splatters, fussy cut butterflies and a friendly die cut sentiment finish off this card. The Hi Friend die is part of the Mondo Gerbera Daisy die set!


Now for the fun part! Of course there is no blog hop without a giveaway! One lucky crafter will win 6 WOW embossing powders of their choosing, a carrying case and $25 to the Ellen Hutson shop! To enter the giveaway, just comment at each stop on the hop (it's only a few stops!). A winner will be randomly drawn on February 25th and contacted by email. Good luck you guys! 

Your next stop is Adelina Starace!

Thanks so much for stopping by today! Have a wonderful day!

X

Full line-up:

Thursday, December 6, 2018

Altenew December 2018 Artist Markers Set E + Scrapbook Embellishments Release Blog Hop

Hello crafty friends,

I'm super excited to join the Altenew December 2018 Artist Markers Set E + Scrapbook Embellishments Release blog hop! You should have arrived here from the Altenew Scrapbook Blog!

When I saw the products in this release for the first time I wanted to do a happy dance, because you guys, ENAMEL DOTS!!! They are my all time favorite embellishments and I especially love the ones where you have one color in different shades in a pack! And that's exactly what Altenew did here. They are even matching their ink colors! I die.

So most of all, I wanted to create something colorful! I also wanted to use the new Artist Markers Primary Colors set because it's so fun and full of color and life!


I went with some of my favorite stamp sets: Leaf Canopy and Ditsy Prints. Both are perfect for some simple, flat coloring as they are small images. First I created two A2 size top folding card bases. I then started stamping onto an A2 size white card stock panel. I used black ink to stamp my main images and light gray ink to stamp some of the solid images in the background. I stamped my sentiment in black too. I then quickly colored in the leaves. I decided to add some pencil details to them too. To embellish my card I used a few enamel dots in different colors.


On my second card I did pretty much the same thing, but here I used a few shades of gray ink for the background pattern, since this is a layering stamp set. For my focal image I used black ink, the Artist Markers and some color pencils. This time I white embossed my sentiment on a wide strip of black card stock. Notice that I totally messed up the stamping at the bottom, but by then most of the card was already ready and I didn't want to waste it...This wide sentiment covers up some of it and distracts from my mistake. That's what I'm telling myself anyway hehe! A bunch of beautiful enamel dots finish off this card too.


On my third card I used another scrapbook embellishment, namely a wood veneer word. I embossed LOVE with the gorgeous Razzleberry crisp embossing powder; I added two layers for a better coverage. 


I cut a piece of patterned paper (from the Reflection kit), slightly smaller than my A2 size card base. Using the Leaf Canopy stamp set, I embossed this patterned paper with the same Razzleberry crisp embossing powder. I love the monochromatic look! I wrapped some mauve/gold twine around this panel and using foam sheets, I mounted it on my card base. I glued down the wood veneer and added some light pink enamel dots, done!


And now...Giveaways, yay! Read on to find out how you can win! Good Luck!

Prizes: 
1. To celebrate this release, Altenew is giving away a $50 gift certificate to 6 lucky winners! Please leave a comment on the Altenew Card blog and/or Altenew Scrapbook blog by 12/12/2018 for a chance to win. 6 winners will be announced on the Altenew blogs on Sunday, December 16th, 2018!

2. I will also draw a winner to receive a $30 gift certificate! I will announce the winner on 12/12/2018.  Comment away!!!

*********************************************************************************
GIVEAWAY NOW CLOSED!

Thank you all for your sweet comments! I apologize for not answering all, I'm only able to answer from my phone and it takes ages. For some reason answering from my PC hasn't worked for months and I can't figure out why :(. I'm really sorry!

My winner is Martha (comment on Dec 7)! Congratulations!!! Please contact me at mzs6666@googlemail.com so I can tell you how to pick up your prize! XXX

*********************************************************************************

Thanks so much for stopping by today! Your next stop is Virginia Lu's blog.

Enjoy!

X