
Hi there crafty peeps,
I can't believe yet another month has flown by! The Spellbinders June Club Kits are here!
As a reminder, Spellbinders have several monthly kits, which are really great! You can subscribe to:
I can't believe yet another month has flown by! The Spellbinders June Club Kits are here!
As a reminder, Spellbinders have several monthly kits, which are really great! You can subscribe to:
- Small Die of the Month
- Large Die of the Month
- Card Kit of the Month
- Stamp of the Month
- Amazing Paper Grace Die of the Month
- Glimmer Hot Foil Kit of the Month
You can find all necessary information about these kits here.
As always, I'm sharing projects with the Large and the Small Die Kits of the month. I'll start with the Small Die Kit which I originally thought was the Large Die Kit since there's so many dies in it, ha! As you can see, you can create a variety of flowers, they work great with or without stems or leaves. You also get 2 dies to create a hand with that holds a bouquet of flowers. Unfortunately I wasn't able to showcase the hand, because I haven't found any card stock in my stash that would have passed for any skin tone - I literally only have bright colors. Sorry for this!


As always, I'm sharing projects with the Large and the Small Die Kits of the month. I'll start with the Small Die Kit which I originally thought was the Large Die Kit since there's so many dies in it, ha! As you can see, you can create a variety of flowers, they work great with or without stems or leaves. You also get 2 dies to create a hand with that holds a bouquet of flowers. Unfortunately I wasn't able to showcase the hand, because I haven't found any card stock in my stash that would have passed for any skin tone - I literally only have bright colors. Sorry for this!

I started out by selecting my colors - aqua, coral, yellow and purple. I then spent a night on just die cutting LOL! I never know how many I'll need and tend to cut way more than I actually should. Case in point, I was planning to make two cards but ended up with four, because I know if I don't use my die cuts right away, I'll never use them. And I did not want to waste any of these beauties!

On my first card I've used the stems to create a big bouquet of flowers! I added some patterned paper to my A2 card base. By the way, the patterned papers I'm using on these cards are from Cocoa Vanilla Studio. To create more dimension, I added foam adhesive to some of the blooms.

I've finished off this card with a gold foiled sentiment from the Everyday Sentiments Glimmer Hot Foil Plate set. If you don't know the Glimmer Hot Foil System, look into it, because it's pretty awesome! There is also a Club Kit for it and this month there are some really fab sentiments in the kit. Oh and the foil I used is the Glimmer Hot Foil Roll in Gold. It's my most used colors, because it goes with everything!

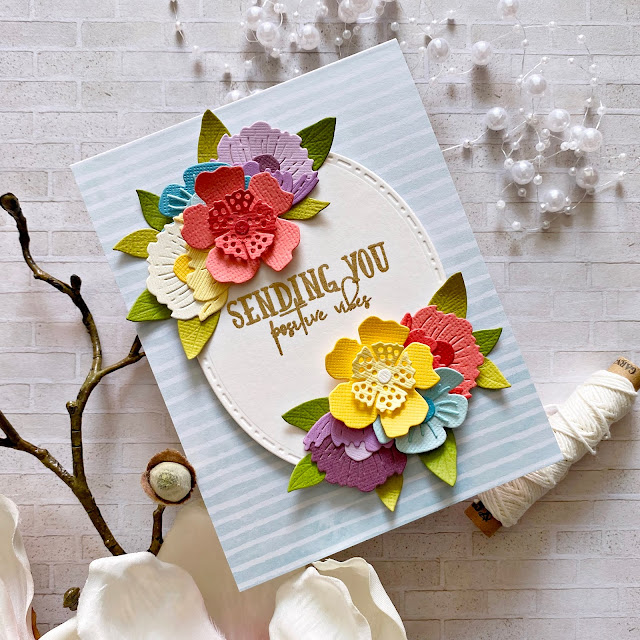
On my second card I first embossed the sentiment in the middle of my A2 size white card panel, then adhered it to my A2 card base. Finally I arranged the flowers and leaves around it, like a frame. I used foam adhesive to pop up a few flowers.


I've used my beloved Nestabilities Fancy Edged Ovals Etched Dies to die cut an oval shape for my sentiment. I embossed the sentiment in the middle with gold embossing powder (Gold Rich Pale from WOW Embossing Powders). Using a foam sheet, I mounted this shape onto my patterned paper background. I added a few flowers in opposite "corners" if you know what I mean.


Last but not least, I created an oval frame with the above mentioned die set. I die cut the frame a bunch of times and glued them together. I also added foam adhesive to its back to give it more dimension. Then I glued it onto my patterned paper background. I also used the white inner piece of the frame, but only one layer. I filled up the frame with all the remaining flowers I had! I added pop dots here and there. To finish it off, I added my gold foiled sentiment - I've used some foam adhesive to attach this.


Next up we have the Large Die Kit! This month you get 2 trendy frames and a bunch of little floral/foliage elements.

I had a few Maggie Holmes collections on my desk when I started these projects so I just went with papers from these collections. I chose a yellow-pink-blue color scheme.

For my first card I die cut the smaller frame from white card stock and glued it in the middle of my card front. I layered a bunch of leaves and flowers in the bottom right corner. I used a sticker from the above mentioned scrapbook collections for my sentiment. I also added a little bird sticker. To finish off this card, I added a twine bow as well as some enamel dots for flower centers.


For my next card I die cut the bigger frame from blue paper, twice. This way I could create this trendy gem shape. Actually I have no idea what these are called, but they have been everywhere for this past year.

I then added leaves and flowers in opposite corners and used a sticker for my sentiment in the middle.

That's it this month folks! I hope I could inspire you in some small way!
Thank you so much for stopping by!
Stay HEALTHY and crafty!
X