Tuesday, April 30, 2019

Peek-a-boo - DT layout for Paige Evans

Hello friends,

Today I'm sharing a new layout with you that I've created for the Paige Evans Design Team. I've just received the Horizon Project pad and I'm in love with the solid papers, such gorgeous colors! So I wanted to use them on my project, but couldn't decide on the color...So I used a bit of each haha!


My inspiration was a set of cards I made not so long ago (you can check here) and Paper 12, which is also in the Project pad. I cut it apart and used one of the shapes as a template to cut pieces out of the solid papers as well as Paper 3. I layered 3 of them together and stitched them down in the middle.


After much deliberation, I chose white for my background. I wanted to go with patterned paper but I simply loved how the rainbow of colors popped on white. It's what it is. Maybe I'm turning into a white background scrapper, who knows?! Ha! So that my background is not so boring, I made a cut file that is very similar in design to the arrangement of leaves I wanted to go for. I cut it from white card stock...you pretty much can't see it in these pictures :). I just wanted to add a bit of texture, nothing overwhelming.


I then adhered the leaves to the background, as well as my photo. I went through all embellishments in the collection, and pulled out whatever fit the colors or theme of my layout.


I glued down the embellies, tucked some tags behind my photo. Last but not least, I added my title, date and journaling. To finish off this layout I added copper paint splatters.


That's it! I hope I could inspire you in some small way!

Thank you for stopping by!

X
  

SUPPLY LIST: 
Horizon collection: Project Pad, Paper 3, Paper 12, Ephemera Die Cuts, Epoxy Stickers, Thickers, Stickers, Tags


Monday, April 29, 2019

Pinkfresh Studio April Release Blog Hop


Hello there crafters,

Welcome to the Pinkfresh Studio April release blog hop! It's a big month for Pinkfresh Studio, 5th birthday, several releases and blog hops...I hope you love all the inspirations coming your way! I sure love working with these products!

You should have arrived here from the amazing Yoonsun's blog, but I'll attach the full blog hop list at the end for your convenience, in case you're lost.

I've made a few projects for today, I wish I could have done more though - there's just not enough time in the day!

First up is the super cute Lovely Frames standalone die. I paired it with the gorgeous Lovely Day scrapbook collection and used various embellishments to fill the tiny frames.


Next up is another standalone die, Beautiful Blooms. I used the same paper collection again. The sentiments are from the Abstract Builder stamp set. The die cut LOVE sentiment is from the Essentials Classic Words die set. If you don't have this one yet, you NEED it hehe!


Next I've combined the Leafy Wreaths standalone die with the adorable bow from the Partial Cut Bouquet and a Bow die set. The beautiful sentiments you will find in the Through the Trees and the Folk Hummigbird stamp sets.  I've used the Everyday Musings scrapbook collection on these cards.


Next up, the Partial Cut Bouquet and a Bow  and the Jar Full of Hearts die sets as well as the You've Got This stamp set. The papers I've used on these are from the Joyful Day collection. Aren't these dies just the cutest?!


Last but not least an awesome stamp set, Through the Trees. What's unique about this one is that you can turn the stamp around and stamp the image a second time for a different look. Which is what I did here, in 2 shades of each color. 


That's it! I've kept the text short because this is a photo heavy post and I realize it's impossible to read every post in a hop! Should you have any questions on how I made something, just leave a comment below!

Now for the fun part! 

Giveaways:

1. Pinkfresh Studio is giving away the full April release on the Pinkfresh blog and Instagram as well!

2. On each blog we are giving away a $25 gift certificate too!


As always, the winners will be selected from the comments left on all blog posts. Winners will be announced on May 6, 2019 (my birthday yay!) on the Pinkfresh Studio Giveaway Page. You must claim your prize within 2 weeks so don't forget to go check the above page! Comment away! Good luck!

Shopping Promo:
There's two shopping promos during the release:

  • Get a free Rose die with ANY purchase! No code necessary, this die will automatically be added to your shopping cart.

  • Pinkfresh Studio is also offering free/discounted shipping from April 29 - May 5th on orders $50+. You just need to use code APRFREESHIPWITH50. Shipping in the US is free, and there's $5.50 off on international shipping.
That's it for today! I hope we could inspire you with our projects in this hop!

Since I'm the last one in this hop, you'll be returning to the Pinkfresh blog now!


BLOG HOP LIST
You are invited to the Inlinkz link party!
Click here to enter
<!-- end InLinkz code →

Thursday, April 25, 2019

Altenew April 2019 Washi Tape/Embossing Paste Release Blog Hop + Giveaway


Hello friends,

I'm so excited to join Altenew's washi tape / embossing paste release blog hop today! You should have arrived here from Kymona's blog but I'm adding the full blog hop list at the end of this post for your convenience.

Let's get to it, shall we?! There are five gorgeous washi tapes in this release as well as an embossing paste. You can buy the washi tapes as a bundle at a discounted price. I used each product from this release on today's projects.

First up is a card duo using two of the washi tapes: Botanical Rhapsody and Misty Meadows, and the embossing paste too. When I'm not in a crafty mood I often fussy cut, so that's what I did here...


I wanted to add some white on white texture to the backgrounds, so I took two stencils: Floral Drape and Tiny Bubbles and added some embossing paste.


I then created clusters of flowers and arranged them on the card base. Some white embossed sentiment strips and done!


Next up is another floral duo! I just love flowers, can't you tell? On these ones I decided to create a more colorful background, which is why I colored the embossing paste to match the teal flowers I cut out of the Teal Shadow washi tape


Once the embossed panels were dry (I've used the Floral Drape stencil by the way). I mounted them onto A2 card bases. 


I arranged the flowers the way I wanted and glued them down. I added a couple of slim gold strips using the lovely Golden Trim washi tape. Gold embossed sentiments finish off these cards.


Since I had an insane amount of fussy cut flowers, I decided to use them up on layouts (I didn't manage haha!).

On this first layout I used an Instax camera cut file from Handipaper, which I backed with various pink card stock. The big flower I backed with the Gold String washi tape


I also die cut a bunch of flowers with the Layered Floral Elements die set, which I just adore! For these I've used some patterned papers from the Reflection kit.  


I created 3 flower clusters with lots of washi tape and die cut flowers. I added a bit of tangled gold thread too, for interest. 


I chose some embellies from Altenews various scrapbook collections and placed them around my page. To finish off this layout I added my journaling, date, and a lot of gold ink splatter.


On my next layout I wanted to create a floral frame from all the washi flowers. I generally don't like such lineal designs but I wanted something different from the circle and wreath designs I often do. 


Some of the flowers I adhered to the background with liquid glue, for others I used foam tape, to have some dimension on my layout. 


I had some blue embossing paste left from my card project so I embossed a piece of white card stock with the same stencil I mentioned above and used it to make a mat for my photo and to create a focal point on my page. Then I die cut my title using the Calligraphy Alpha die set. I die cut the letters several times to create a faux chipboard title.


I adhered a few embellies to the photo, wrote my journaling on one of the label stickers, added my date and some teal ink splatter.


And now the fun part...Giveaways, yay! Read on to find out how you can win! Good Luck!

Prizes: 
1. To celebrate this release, Altenew is giving away a $30 gift certificate to 6 lucky winners! Please leave a comment on the Altenew Card blog and/or Altenew Scrapbook blog by 05/01/2019 for a chance to win. 

2. Altenew will also draw a winner to receive a $15 gift certificate from comments on each designer's blog in the blog hop list.

All winners will be announced on the Altenew blogs on 05/04/2019!

Your next stop is the Altenew Scrapbook Blog!

That's it! I hope you enjoyed my projects and I could inspire you in some small way.

Have a fabulous day y'all!

X

Blog Hop list:

Joyful Day layout inspirations - DT project for Pinkfresh Studio

Hi there crafty friends,

I'm back today with two new layouts I've created for Pinkfresh Studio with their beautiful Joyful Day collection.

I chose two cut files from Anett for today's layouts. On the first layout I've used one of the TN cut files, I just blew it up so it fit the width of my page. I then backed the flowers with various patterned papers. 


I also cut the same cut file from a color card stock but this time I removed some parts of it, so it didn't end up having a frame.


I added some tissue paper behind my photos, as well as some chipboard frames, then glued this cluster in place. 


I pulled out a few embellies from different packs, die cuts, stickers, a cute birdie clip, and arranged these on and around the photos. I placed a few enamel dots on the flowers. I glued my title in place and added my journaling.


On my next layout I really wanted to use this gorgeous black floral paper. I realize it is very busy as a background but it is so pretty, it deserves to shine in my opinion! I used another cut file from Anett on this, which I just love because it combines two of my favorite things: florals and geometric patterns. 


I die cut the cut file from textured white card stock and backed the flowers with pink patterned paper and two different pink card stocks. I also die cut some additional flowers so I could create some dimension. These flowers I backed with vellum so that they are light and airy.


I adhered all these to the background, then attached my photo cluster too. Here, just like on the first layout, I added some embellies on and around my photos. I also glued down my title above the pictures.


I cut a pink die cut into strips and wrote my journaling on them. Last but not least I stamped the date on a label and tucked it behind the photo on the right.


That's it guys! I hope I could inspire you in one way or another.

Thank you so much for stopping by!

Have a wonderful day!

X

Wednesday, April 17, 2019

Card Inspirations - DT project for Pinkfresh Studio

Hello there lovely peeps,

I'm stopping by to share my newest cards for Pinkfresh Studio.

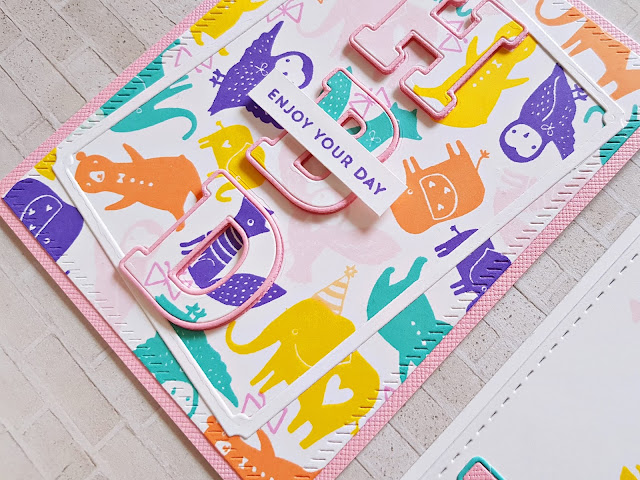
All these cards are top folding A2 size. For my first two sets of cards I chose one of my most favorite stamp sets from Pinkfresh Studio, Playful Animal Friends 1. Aren't these critters just adorable?! I also wanted to use some of the dies I haven't used yet from the Essentials collection (pretty much all the rectangles). On these first two cards I've used 3 sets of rectangles: Pretty Frames die set, Diagonal Stitched Rectangles die set and the Stitched Rectangles set. I also used the lovely Adore Alpha die set to create my titles.


As luck would have it, a few days after I made these cards, Jennifer McGuire posted a video of the same technique, using the same alpha dies. So instead of writing down how I created these, I'll link to Jennifer's video


On my next cards I used the same Playful Animal Friends 1 stamp set again, as well as the Pretty Frames die set. This time I went with a monochromatic color scheme. You could actually create these two cards from one stamped panel but I didn't think of this when I made the cards, so first I only stamped a smaller piece that was enough for the big label.


I die cut the label from the stamped paper as well as some white card stock so I could add a white outline. I dry embossed some blue card stock, and added a white frame to it (also part of the Pretty Frames die set.) I actually die cut this frame 3 times and layered them up to add more dimension to this simple card. I adhered this panel to my card base and using foam adhesive I attached the label in the middle, adding some teal metallic thread behind it. Last but not least, I tied some twine around the top.


For the other card I stamped a full background which I adhered to my card base. I die cut a label from blue and white card stocks, then glued them on a card stock and fussy cut around the outline. I dry embossed the label and using some foam tape I adhered it down on the card base. I embossed a piece of card stock with WOW! Embossing Powder in Mint Macaroon and die cut my sentiment from it. This word die comes from the Essentials Classic Words die set. I cut the sentiment from white card stock a bunch of times and glued them together. To finish off this card I added a twine bow.


My last card for today is using the Essentials Classic Tags with Fillable Elements die set and patterned papers from the beautiful Everyday Musings collection.


I die cut a a tag with one of the fillable elements from 3 different papers so I could add different colors to those tiny hearts and dots. I created my background: I layered 3 papers on the card base.


Once done, I adhered everything down. For the tag I used some foam adhesive so that it stands out better. I die cut a sentiment using the same Essentials Classic Words die set once again. To finish off this card, I added a bow on top.


That's it for today! I hope I could inspire you in a small way!

Have an awesome day! 

X