Showing posts with label Alexandra Renke. Show all posts

Tuesday, September 1, 2020

In the spotlight: Spellbinders Small and Large Die of the Month kits - September 2020

Hi there crafty peeps,

It's that time again! The Spellbinders September Club Kits are here! I can't believe summer is over, this whole year is flying by......Fall is my least favorite season, I think, we get a lot of rain and grey skies! It's not like fall you see in magazines and movies with beautiful colorful leaves and sunshine haha! So I don't particularly like it, it's depressing :( Anyway, my projects today are not fall themed, so all good! :D

As a reminder, Spellbinders have several monthly kits, which are really great! You can subscribe to:

You can find all necessary information about these kits here. 

This time I'll start with the Small Die Kit! You can create two different frames with the included dies, one is with simple leaves, the other is a bit more elaborate, you can add small, layered flowers to it. Moreover, you can create a couple of sentiments too, like you'll see here: Thank You and Hello (or a mixture of both obviously!)


The papers I've used here are from the My Mind's Eye Gingham Gardens line - it's a gorgeous collection, super feminine, soft and elegant!


For the die cut shapes I've used white card stock. The sentiments I've cut 4 times and then layered them up for a more dimensional look. I also used foam tape to attach the frame to my card base, to create more depth.


To decorate the simple frame on the second card, I added some flower stickers. I always glue these on a heavy weight card stock first, then fussy cut them, this way they are sturdier and I can layer them more easily.


To finish off this card, I added a few enamel dots in coordinating colors. 


The Large Die Kit this month includes everything for creating a fun slice of cake with various sentiments and little tidbits, like fruits, carrot, candle and more.


On my first card I decided to skip the cake altogether, because I love building patterns with the help of dies (or stamps) and I find these little fruits adorable! Love them on the gingham background, reminds me of summer picnics! Which, admittedly, I've never done in my life haha!


For my second card, I created a lemon cake with ombre cake layers. Now, I'm not up to date on cake trends; since I've started scrapbooking, I haven't baked any - but before that, ombre was a big trend! To me it still looks pretty, whether or not it's trendy :D.


Let's talk about the embossed background for a sec! The Sprinkles stamp set is an exclusive freebie this month if you are a VIP Value Club member. You get it if you are already a member or if you upgrade to the VIP Value Club in September. If this is confusing, check this link to read about the difference between Value Clubs and VIP Value Clubs.


I haven't used the sentiments, but they are sized to fit on the cake layers. I did a terrible job on the embossing, normally I would throw away a panel like this, but since it's white on white, the missing lines don't bother me. There's something about the card stock I've used, it's not great for stamping because it soaks up the ink right away. This would never have happened with Neenah Solar White, but I didn't want to use a bright white card stock with the gingham patterned paper. This stamp set is actually photopolymer, so it stamps great (unless you're me and use the wrong paper hehe).


I also made a carrot cake, just for fun! I love Starbucks carrot cake - thankfully we don't have Starbucks in  close vicinity to us, otherwise I'd eat it every day...Other than that, I'm not sure where it's available here!

I had this Alexandra Renke paper from her Easter collection, so I thought it'd be the perfect backdrop! I love that it's not traditional orange-green carrot colors, I don't like that combo at all. To be honest, I'm not a fan or orange either but hey, it's a fun change for once.


That's about it! What do you think? Fun products this month too, right? I also saw a sneak at some upcoming ones and I'll tell you, I can't wait to work with them!

Thank you for stopping by today!
Have a wonderful day!

X

Friday, March 13, 2020

#Birds - DT layout for Alexandra Renke

Hello there crafty friends,

I'm back today with a new layout for the Alexandra Renke Design Team!

Have you guys seen the brand new Bird papers in the AR shop?! Oh my goodness!!! They are all so beautiful and special! I can't wait to see what everyone makes with them!


For today's layout I chose one of my favorite papers from this collection, Designpapier Paradies große pinkige Spatzen, because well...colors! Am I right?! Such vibrant and happy colors, just like I like it!

So to start with, I fussy cut lots of birds (for future projects too) while I was watching some of my favorite series. Usually I do this when I'm not in a crafty mood! I just can't watch TV without doing something else though, so combining the two works great for me.

I then selected a bunch of papers that I thought matched the colors of the birds well:

Using the 3D feathers die (3D Federn), I die cut a bunch of feathers from the above papers.


For my background I chose the following paper:
Eventually I ended up cutting it up and combining it with white card stock to create my background. The white card stock I always use is this one:
I adhered the two pieces of papers to the background, then lined up all the feathers in an arch kind of shape. I glued them down in the middle, so that I could still bend up the edges.


I layered some tissue paper behind my photo and glued it all down on the left side of my paper.  I added my title, journaling, date.

Now the birds were ready to embellish my page! I used 3d foam adhesive to glue them down. Last but not least, I went through my enamel dots and pulled out some colors that went with my color scheme.


That's it! Easy peasy! What do you think?

Thanks so much for stopping by today!

See you soon!

X


Tuesday, March 3, 2020

5th grade - DT layout for Alexandra Renke

Hey crafty peeps,

I'm sharing a new layout today that I've created for the Alexandra Renke Design Team!

I wanted to use some of the cute new papers from the "Lieblingstierchen" collection, but eventually only ended up using one of them:


I pulled my color combo from the fish paper - thankfully Alexandra has all those colors on several solids and patterned papers! Here's what I chose:
They go well with Maxim's pullover hehe!

Sooo, I die cut several circles from various papers. I cut larger ones for matting my photos. One of the striped circles I stamped and embossed using the following products:


For these tiny letters it's better to take super fine embossing powder (like the one I linked in), I actually used the regular because that's all I had. But as you see the details are not so clearly visible. Anyway, it doesn't bother me much, I still like the way it looks!


I arranged my circles on the background paper and once I settled on this arrangement, I adhered them down. I used foam adhesive for a few of them to add dimension.

I then fussy cut out five numbers from the following paper:
I added foam tape to them and glued them down too. I used some white puffy alphas to create my title. I wrote my journaling along one of the photos.


I stamped a few sentiments using roller stamps from my stash and popped these onto some of the circles. Last but not least, I splattered some black ink around my page:
Oh! Almost forgot about the enamel dots! These are from various brands and packages but did you see that Alexandra now has a lot of new Hero Arts enamel dots (same color in one pack in different hues)?! I need to get all of them haha! I can't help it. I'm a sucker for enamel dots!


Alright, that's it for today! I hope I could inspire you in some small way!

Thanks for stopping by! Have a great day!

X

Thursday, February 27, 2020

Creative World - DT layout for Alexandra Renke

Hello there crafty friends,

Today I'm stopping by to share a new layout I've created for the Alexandra Renke Design Team!

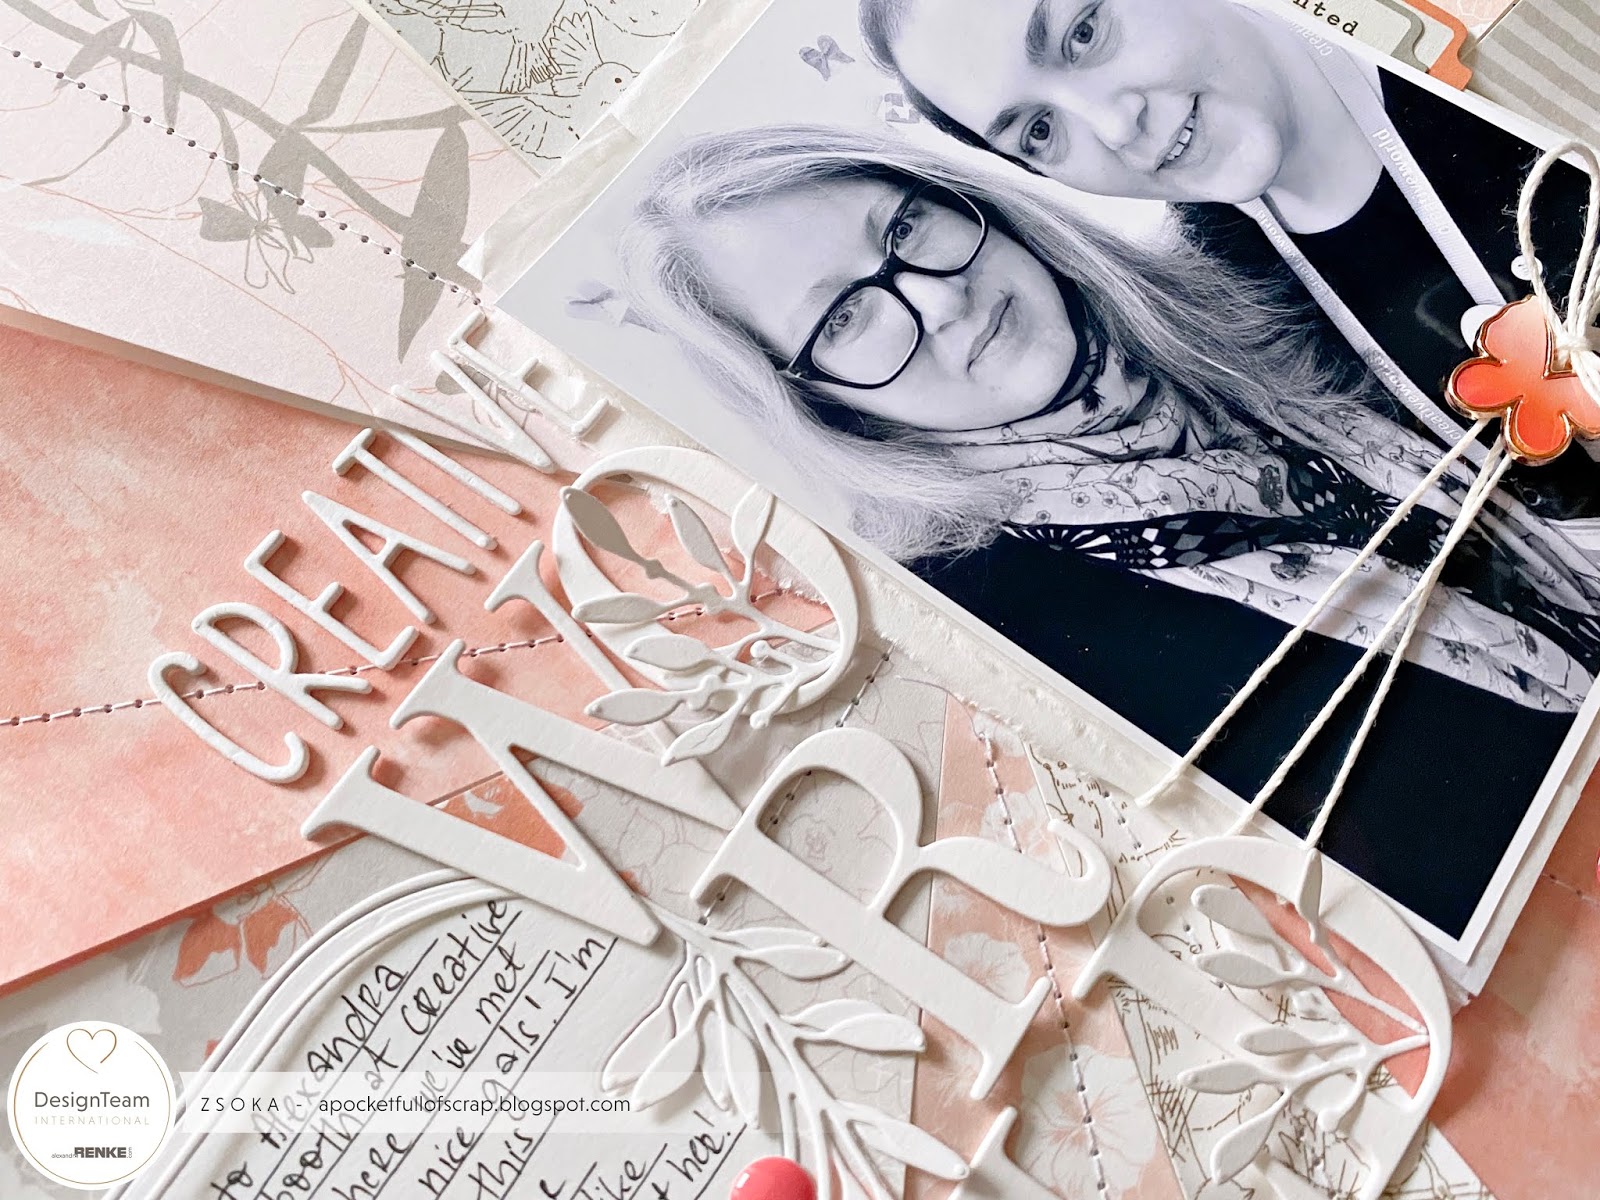
We had Creative World (for those of you who are not familiar with it, it's like Creativation just here in Europe. Apparently it's also much larger, it's really impossible to check everything even in 5 days if you ask me...) a month ago and since I had a few friends working the show, my boys and I came over to meet up with them! I also met a few people I haven't met before, Alexandra and a few of her DT girls, like Jana Maiwald-McCarthy! Since she took a couple of pictures, I decided to scrap one with some of Alexandra's beautiful papers!


I've made this type of layout a few times before, also cards (in fact I have one coming up in the next days), but I don't think I will ever get tired of it! I love the dimension and texture, and the fact that you can show off many different papers at the same time. 

I've used the following papers:
The white card stock I'm always using:


I first made a template from a 12x12 heavy weight card stock, cut it apart, then drew each piece on patterned papers. This way I knew exactly what shape to cut from which paper. Then I glued them on a 12x12 white card stock. I only added glue in the middle of each shape, so I could bend up the edges later. I also stitched them down in the middle.


I die cut my title using the following alphabet die sets:

I die cut each letter 4 times and layered them up. I also die cut this floral shape I used as a journaling spot twice:
I added some tissue paper behind my photo (when you get a package from Alexandra, everything is packed into white tissue paper, which I always keep and use for matting my photos!), I tucked in a couple of tabs and wrapped some twine around it too. I hung two tassels that I made from the same papers as well as a butterfly charm (from a Paige Evans collection) from the twine, then I adhered all this to my background.


I wrote my journaling on the oval die cut shape, arranged this and the title on my background and once I was happy with the way they looked, I glued them down.

A few enamel dots finish off this layout. And on that note, have you seen all the new enamel dots Alexandra has in her shop?! Check them out, you need them all hehe!

That's it for today! I hope I could inspire you in one way or another!
Happy crafting!

X

Tuesday, February 25, 2020

Braunfels day trip - Mini album with the gorgeous new Paige Evans Bloom Street collection

Hey crafty friends,

I don't remember when I made a mini album last time! Oh wait, I think I do, it must have been the exploding box mini I made years ago. I also used Paige's collection for that one ha! Holy moly, that was end of 2017, I just checked. OMG, where does time go?! Here's a link to that post, if you're interested!

I love looking at minis, but making them is a whole different story! I'm not big on planning and I feel like minis require quite a lot of planning, if I want to add nice or clever details. Anyway, when I saw the tassels in Paige's new, Bloom Street collection, all I could think of: I NEED to make a mini haha! As luck would have it, we went on a day trip last Saturday, to a nearby castle we've never been to, so I had a million photos for a mini, yay!


I was planning to make all kinds of different shapes for the pages, but somewhere along the way I got lazy so I just kept a simple (mostly) tag format. But hey, at least I made a mini AND that also means I scrapped a lot of photos yay!


For the tag base I've used the Jumbo Tag die from The Stamp Market. It's the perfect size and it comes with the hole reinforcer die too, so you really get a nice, clean finish! You can see that in the detail shots down below. So, what I always do when I make this type of mini album: I use patterned papers on both side AND I also cut the same shape from a heavy weight card stock, which I then layer between the two patterned papers. This way my pages, in this case tags, are sturdy and I don't have to worry they get damaged from flipping through them. I also stitched them together so I can be sure everything stays in place :D.


For the butterflies on the front I've used the Schmetterling ohne Fühler dies from Alexandra Renke. I love that they cut an outline too, so many possibilities!


As you see, I kept most pages really simple, photo plus a couple of stickers or other embellies. Mostly I was worried I'd run out of embellishments on my very first Bloom Street project haha!


The tiny puffy alpha stickers are from Freckled Fawn, from several years ago. I have a love/hate relationship with them! I absolutely love the mixed handwritten font, the color, the texture, so basically everything about the way it looks. However...they don't stick...and there's no glue that would keep puffy stickers in place either (not that I've found and god knows I've tried many). Also, they are way too skinny to apply any glue and achieve a clean finish. So my only option is to stitch them down and hope they won't fall apart! You can see how they curl up, they just don't stick. It's a pity because they look absolutely amazing!


I used some tags and die cuts for my journaling throughout the album.


I've created several pockets for loose photos, because I printed something like 60 and I wasn't going to create 30+ pages...haha! One is a see through pocket I've made from the acetate sheet and patterned paper (I just stitched together two rectangles, leaving an opening on the side, big enough for the photos to go in but small enough so they don't fall out). Do you see the iridescent foil polka dots? So fun! 

Then there is this patterned paper tag with literally a pocket on it, that I stitched down on the sides and bottom for reinforcement.


Here's the back of the above pages:


The stitching is clearly not as nice as on the right side but I really don't mind.


A few more pages and pockets:


This wreath I had left from an upcoming project and didn't have the heart to throw it away! I actually had two, so I added some heavy weight card stock in between the two and stitched them together. The Sakura Blossoms die is from Spellbinders and will soon be available! I had the honor of creating cards for the packaging of the Destination Japan collection last summer, which is why I already have the dies :). This is my most favorite Spellbinders collection to date, be sure to check it out! I'll post my cards with these dies in a few weeks, watch this space!


The little heart die is part of the Büttenrand Herzen die set from Alexandra Renke.


Another pocket I've made, this one is made of 4 layers of paper: 2 heavy weight card stock tags on the inside, 1 patterned paper tag on the front and for the pack I engineered a longer tag from patterned paper, so I could fold it back on the front. So what I did was, using the tag die and a longer strip of paper, I partially die cut the sides and the top - you need to leave the bottom part of the die off your cutting plates. Then I used a circle die to partially die cut the other end of this strip. I hope that makes sense? 


I then just glued and stitched everything together, and added two brads and thread so I can close the pocket.


The back side of these pages:


Lots of iridescent foil details! Really hard to photograph :)


Once done with all my tags, I put them on a pink ring and added the tassel that is solely responsible for me making this whole album haha! Oh and a cute flower charm! Super love that new embellishment in this collection!

That's it guys! I hope you'll be inspired to get crafty now!

Thanks for stopping by! Should you have questions, just comment below and I'll get back to you!
Have a wonderful day!

X

Thursday, February 20, 2020

Heights - DT layout for Alexandra Renke

Hi there friends,

Today I'm sharing my first official layout for the Alexandra Renke International Design Team! I'm so excited to be joining this amazing group of ladies!


On today's layout I decided to use the following two die sets (they happen to be my favorites hehe):
All these dies are relatively small in size so they were perfect to use with the 12x12" paper that has all these small sections with different designs. Unfortunately it seems this particular paper is not available right now, but here is the 6x6 pad with the same colors and designs!
These 6x6 papers are also available in the US, at Simon Stays Stamp! Great news, right?!


For my background I chose the subtle yellow striped paper from the Mimi's Stripes collection (it's more like a beige color actually):

You might have seen me use this paper in various colors, because I love it so much, it's so versatile!


I die cut loads of hexagons in both sizes - for this project I didn't use the outline part, but I did save those cuts for future projects. No wasting paper lol! I also die cut several flowers and shaped them a bit with my hands to create a more organic look.

I arranged my hexagons the way I liked them, then glued them down. I added foam tape to some of them for a bit of dimension. I also adhered the flowers, in a tone-on-tone look. 


I stamped a few sentiments in black, to add contrast. These sentiments come from the following stamp set:
Finally I glued down my photo, which I also printed in a hexagon shape, using foam tape. For my title I used the below alpha dies:
I've used these dies so many times before, because they are small and skinny and perfect for titles and sentiments alike!

I added my journaling and stamped the date and done! Oh, I also splattered some ink around my page in a plum color. That's it!


What do you think? I hope I could inspire you in some small way!

Thanks so much for stopping by!
Have an awesome day!

X