Showing posts with label guest designer. Show all posts

Tuesday, September 17, 2019

Guesting on the Altenew card blog

Hey lovelies,

I'm so excited and honored to be guesting on the Altenew card blog today!

Since it's September, I thought I'd create a few Fall/Thanksgiving themed cards for today's post!

My first duo features watercoloring which I hardly ever do, but the Weekend Doodles stamp and coordinating die set is one of my absolute favorite Altenew sets of late.


I stamped the images on watercolor paper and heat embossed them with gold embossing powder. I then colored them in loosely. For my first card I added some kraft card stock to my A2 size, top folding card base. I embossed my sentiment in white, then splattered white ink all over. I glued two flower die cuts in opposite corners, added some twine and done! Super easy!


I stamped some kraft card stock with the Rustic Linen background stamp and embossed it with white embossing powder. I trimmed it down and attached it to the white card base. I stamped the sentiment in brown. Next, I die cut a T from white card stock, using the Mega Alphabet T die. I kind of wrapped the flower around the T, glued them together, added some foam adhesive to the back and attached it to my card. Some twine finishes off this card too.


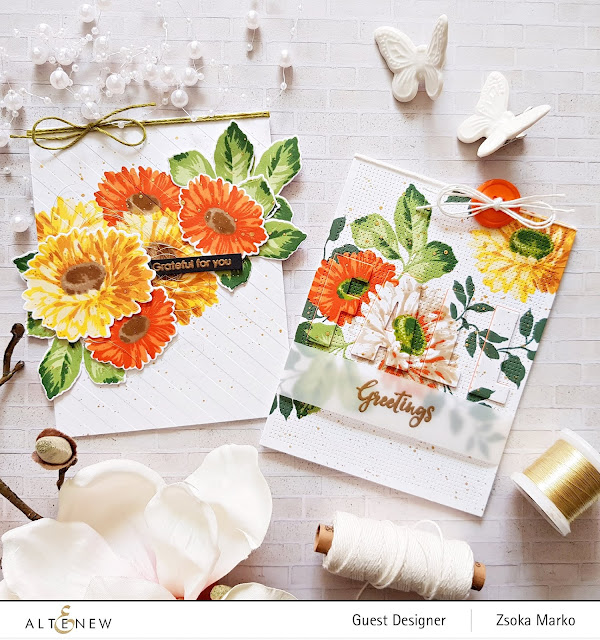
Next up a duo with the amazing Sunflower Daisy stamp and coordinating die set. I mean, just how realistic do those flowers look?! So much depth and dimension!


I started by stamping some flowers on white card stock. I had to create masks so they could be stamped behind each other. I then decided to stamp and die cut single flowers too so I could add some dimension to my card. But first, I dry embossed the stamped panel for additional interest. I glued down the die cut leaves, then started adding the flowers with foam adhesive. I also tuck some gold thread behind one of them. Once done, I splattered gold ink all over the card front. I added a gold embossed sentiment and some twine to finish it off.


I'm not a technique oriented card maker but I do love the following technique, I think someone told me it was called Eclipse? Anyway, I stamped my design on white card stock, then die cut FALL out of the panel, using the Caps Bold Alphabet die set. I also die cute FALL from orange card stock 5 times. I glued the layers together with the stamped image on top. In the meantime, I ran the background panel through my die cutting machine with the Cross Stitch Canvas die on top. This is one of my favorite Altenew dies, it instantly gives so much texture and interest to a card, it's absolutely stunning over stamped images! I adhered this panel to my card base, then glued down the letters too. I added gold splatters. Then using a sentiment from the Bountiful Branch stamp set (I actually cut apart Season's Greetings for this one) I gold heat embossed Greetings on a vellum strip, which I wrapped around my card. To finish off this card, I added twine an orange button at the top.


And so we've arrived to my last duo for today! For the card on the left, I stamped a background with the A Walk in the Woods stamp set - I stamped it twice, in 2 different inks, turning the stamp 180 degrees between the two layers. I then die cut a circle out of the middle with the circle die from the Welcome Home die set. The fall-out piece I used on my second card. I gold heat embossed a sentiment (from the Bold Bunch stamp set) on white card stock, I adhered it to my card base, then glued the stamped piece on top.


I used the Frilly Frame die to die cut a frame for the white circle. I stamped lots of sweet little flowers with the Painted Flowers stamp set and fussy cut all of them (I didn't realize there's a coordinating die set so I don't have it - this would come in handy if you have so many flowers!). I layered them over the die cut frame at the bottom and glued them down using liquid glue as well as foam tape, to add dimension. As a finishing touch I added gold ink splatter, some shabby ribbon and a button.


For my last card, I die cut a panel from kraft card stock using the Cozy Flannel cover die and glued it on my white card base. I die cut another frame with the Frilly Frame die and attached it to the fall-out piece I had left from my previous card. I stamped the sentiment in black ink (from the Sunflower Daisy stamp set). I added foam tape to the back and adhered it down on the card base. As before, I layered some flowers around the frame, added gold splatters and some twine.


That's it! It was so fun mixing and matching new and old products on these cards! I hope I could inspire you to dig into your stash and start creating! 

Thank you so much for stopping by today! And thank you Altenew for having me!

Happy crafting!

X

Monday, February 25, 2019

Guesting at Doodlebug Designs!

Hey there crafty friends,

I'm so honored to have been invited by Doodlebug Designs to guest on their blog! And that with the cutest collection ever! Have you guys seen the French Kiss collection?! I love love love that the colors are not your typical Valentine's colors - the addition of that gorgeous blue is just fabulous!

I actually had a hard time putting down the collection, I only did because I had other deadline work to do. I've created 3 layouts and 4 cards for today's post. I hope you enjoy!

For my first layout I chose my most favorite paper from the collection. Isn't this blue just gorgeous?! 


I cut the Floral Square Frame cut file from Handipaper from white textured card stock and backed some of it with various patterned papers. I added some foam adhesive to the back and adhered the cut file to the background. 


I layered some tissue paper and patterned paper behind my photo and tucked all this behind the wreath. I added a some embellishments around the photo, an adorable bow clip and some sentiment die cuts. I also used one of the die cuts for my title.


As a finishing touch, I scattered some enamel dots around the wreath.


On my next layout I used the Rainbow cut file from Handipaper - I figured it would go perfectly with the cloud patterned paper! 


I desperately love dimension and 3d flowers! I die cut 3 layered flowers (cut file is from Paige Evans) using many different patterned papers to showcase more of this lovely collection! I added enamel dots for the flower centers. 


I backed the rainbow with patterned papers as well and glued it down on my background paper. I also ran my sewing machine over the rays because the white cut file didn't stand out so well. I added some tissue paper behind my photo and glued it down.


To finish off the layout, I placed several die cuts, stickers and a clip, here and there.


On my last layout I went with a partially white background which I don't do often! But I love that crisp white against the blues and pinks/reds, so I couldn't help myself.


I cut the Floral Frame cut file from Handipaper in various sizes. First I backed the flowers and leaves   with patterned paper, then I added a photo to the biggest and more patterned papers to the other two.


I added some machine stitching to the frames so that they stand out from the background. I placed the frames on foam adhesive and glued them in place.


I decorated my page with lots of die cuts and some enamel hearts. 


As for the cards. As soon as I saw the teeny tiny envelope pack, I knew I had to make some cards! Aren't they the most adorable thing you've seen?! The bigger envelope on the left is a layered sticker, that comes in a different pack. The tiny ones come flat on sheets, you have to assemble them, but that takes like 10 seconds!


I die cut a scallop rectangle from patterned paper for my background. I also attached a piece of red scallop sticker at the bottom. I then arranged the envelopes the way I liked them and glued them down. I filled some with a note, some with hearts (also included in the mini envelope pack). 


I added a few strips of patterned papers and stickers to the white card base, then die cut a big heart from blue patterned paper (I used the 6x6 paper pad for my cards). I glued a mini envelope on top and scattered some die cut and enamel sticker hearts all around. For the sentiment I used a die cut tag which I added to the card on pop dots.


I just had to use the adorable kids flying airplanes on my last two cards! I created two A2 size top folding card bases (landscape), attached some patterned paper on top, then added a slightly smaller piece of white card stock too. 


I pulled out all clouds I could find - die cuts and stickers. I used two big ones on the girl card, as well as some heart balloons. I added foam adhesive to the balloons and the plane/banner for a more dimensional look. A cute enamel birdie and bow finish off this card.


For my boy card I used a lot more clouds - some of which I placed on pop dots. The plane and the banner are also attached with foam adhesive. I scattered some enamel hearts in between the clouds. Oh and the boy is also accompanied by a little enamel bird! Last but not least I added some border stickers at the bottom of both cards.


That's it! I hope you enjoyed my projects as much as I enjoyed creating them!

A big thank you to Doodlebug for having me!

And thank you all for stopping by today! Have an amazing day!

X

Tuesday, December 25, 2018

Guesting on the Altenew scrapbook blog + Giveaway!

Hey lovelies,

First of all, Merry Christmas guys! I hope you are having a wonderful holiday season with your loved ones!

I'm so excited and honored to be guesting on the Altenew scrapbook blog! Thank you Altenew for the awesome opportunity!

In case you're new here, here's a short bio about myself:
I am a Hungarian living in Germany with my Dutch boyfriend and our 10-year-old son. I've been crafting ever since I remember...I tried every craft under the sun, from glass/porcelain/silk painting, bead weaving, mosaic in all form, to cake/cookie decorating and lots more. I need to craft to keep sane! Scrapbooking has been my main focus since early 2015 and this year I've added card making to the mix as well. I love love love patterned papers and all colors of the rainbow, so you won't be seeing me use a lot of white and solids except maybe on cards!

For today's blog post I've made 2 layouts and a bunch of cards that are similar in design yet all a bit different. I've worked with the Reflection scrapbook kit which is my favorite from Altenew. So much so that I am on my second kit now! 

For my first layout I've embossed a lot of flowers from the gorgeous Frosted Garden stamp set. I used Altenew Pure White Crisp embossing powder on 2 different patterned papers from the kit, then using the Frosted Garden die set I die cut them all. 


I then created my background. This is one of my go to designs - 2 partial wreaths/circles on opposite sides of the layout. I chose a black and white striped paper and added some white card stock at the top and one of the patterned papers from the Reflection kit at the bottom. I covered up the edges with flowers.


I placed my photo inside the bigger wreath and decorated this area with a few wooden buttons, stickers, tags and chipboard pieces. I also added my title and journaling here. 


I was actually planning to add my journaling in the bottom wreath but then I found this chipboard about traveling which was the perfect fit for my page, so I glued that down there instead. I also stamped my date here. Done!


I wanted to go green with my second layout because I haven't made a green layout with this kit before. I started out by covering a heavy weight white card stock with the Dotted washi tape. I've never been a huge washi tape fan, as in, I haven't used them often on my pages, but ever since Altenew came out with these wide washi tapes, I'm hooked. They are so versatile! I believe this is my first time using one on a layout though. 


I then cut green stripes from one of the patterned papers and covered the bottom of my page with them. I distressed the edges a bit to give them some dimension. I don't like flat layouts, I'm all about dimension and texture. I fussy cut out lots and lots of roses from two patterned papers and layered them on top of the green stripes. I used different adhesives to do this, liquid and foam, again, to create a more dimensional look. 


I tucked my photo behind the roses. It seems I forgot to add the date even though I specifically asked my aunt when this photo of me and my cousin was taken ha! We were 4 and a half years old! One of my favorite childhood memories, harvests at my grandparents' vineyard. Since I've been living in Germany, I've only been able to go once...Anyway. Back to the layout! To finish off my page, I added my title and a few chipboard and wood veneer pieces as well as some wooden buttons.


As for my cards. I love love love the Mega Alphabet dies so I thought I'd make some cards with one of them. Namely, the B. I thought I'd make some birthday cards because for some reason I never find any when I need one! But of course, I don't have a single Happy Birthday sentiment from Altenew haha! So, I went through all my stamp sets to find sentiments that make sense with the letter B :). Here's what I've come up with:

All 6 cards are A2 size and top fold. On my first two I used the Watercolor Stripes and the Cross Stitch Canvas cover dies. The stripes I backed with a purple patterned paper and glued it on my card base. The other one I left white. I then covered some white card stock with the stunning Gilded Ombre and Glitter Flurries washi tapes. I fussy cut out lots of flowers and die cut two letter B's.


I added some foam tape to one of my B's and before gluing it down, I tucked some washi flowers under it. I white embossed a tiny sentiment which I then placed on my B, using foam adhesive. On my other card I used liquid adhesive to glue down my B and layered some flowers over it, at the bottom. I embossed my sentiment on patterned paper and added it on top of the flowers.


For my next duo I used the Peach Gold washi tape, a black and white floral patterned paper from the Reflection kit, the Cozy Flannel and the Cross Stitch Canvas cover dies, and last but not least my favorite Layered Floral Elements die set. These are products I use a lot, because they are so versatile. 


As you see, I pretty much did the same thing as before, just decorated my letters with different supplies. 


On my last duo I used my favorite patterned paper from the Reflection kit to create the card fronts. I had plenty of fussy cut roses left from my layout so I used those here. And I used the Dotted washi tape to cover my letters. 


For a little something something I added some gold metallic tangled thread behind the letters.


That's it guys! I hope I could inspire you in some small way! Should you have any questions, don't hesitate to ask, I'm always happy to help!

*********************************************************************************
Altenew is kind enough to sponsor a giveaway here on my blog! You can win a $20 gift certificate if you leave a comment below! Comment away :). I will try to announce the winner on January 1, 2019 - but it could be a bit later because we will be travelling to Iceland that day.
*********************************************************************************

Thank you for stopping by today! Have a wonderful day!

X

Thursday, June 7, 2018

Spellbinders Exclusive Indie Collection - Part 3

Hi there crafty friends,

I'm stopping by today with the third and last blog post in my Exclusive Indie collection inspiration series. If you missed my previous two posts, you can check them here and here.

If you read my other posts you know that I love the layering dies in this collection :). Surprise surprise, I picked layering dies for today's projects as well! I can't help myself!

Here are the two cards I made for this post:


The patterned papers I used are from the Maggie Holmes Chasing Dreams collection. This is still one of my favorites from her to date. I just love the colors!

For my first card I picked the gorgeous Shapeabilities Layered Rose Etched Dies. I die cut two roses, one from pink patterned papers, the other from yellows. For the yellow I also used some textured card stock because I didn't have different patterned papers for 3 layers. I die cut 3 pairs of leaves as well.


I layered them up and glued them together. Note that I only glued each layer down in the middle, never on the sides. I do this because this way I get some dimension. I am not going for a realistic look on my projects to be honest. I love dimension and texture, and this is one way to achieve the look I like. I added some patterned papers to my A2 size top folding card base and started adhering my design elements on the panel. I used foam adhesive for the flowers and tucked the leaves behind them. I placed some yellow enamel dots here and there. I cut apart the "you a happy birthday" sentiment stamp from the Wishing Expressions Stamp and Die Set so that I only had "happy birthday" left because I only wanted to add a thin paper strip to my card. I heat embossed the sentiment on yellow card stock and glued it on the card front. Done!


On my second card I used the lovely Shapeabilities Layered Foliage Etched Dies . I die cut 3 of them from various patterned papers and assembled the layers. I created another A2 size top folding card base (which is what I go for in 98% of the cases) and added some patterned paper strips.


I die cut "Wishing" from the Wishing Expressions Stamp and Die Set 4 times as before, once from patterned paper, 3 times from white card stock. I glued them together to create a nice, dimensional word. Before adhering this to the card front, I stamped the rest of the sentiment directly on the patterned paper using black ink. I then figured out where to place the die cut word and before gluing it down, I adhered the leaves to the card. I only attached the die cut word in the middle, so that the leaves can hide behind it. Surely, one could glue it all down, I just prefer a more dimensional look. I added some black enamel dots and done! Don't enamel dots just look good on pretty much anything?!


I hope you liked this series as much as I loved creating these cards! I also hope you found some inspiration in there somewhere!

Thanks so much for joining me - I may or may not be back soon with another series! Check this space!

Have a wonderful day!

X

Spellbinders supplies:
  • SDS-157 Wishing Expressions Stamp and Die Set - Exclusive
  • S4-921 Shapeabilities Layered Rose Etched Dies
  • S5-361 Shapeabilities Layered Foliage Etched Dies - Exclusive
Other supplies:

  • patterned paper and embellishments - Maggie Holmes
  • enamel dots
  • white heavy weight card stock for card base
  • color card stock - American Crafts
  • diecutting machine
  • trimmer
  • liquid adhesive, double sided adhesive, foam adhesive

Tuesday, June 5, 2018

Spellbinders Exclusive Indie Collection - Part 1

Hi there crafty friends,


I'm checking in today with the first instalment of my 3-blog-post-series showcasing the gorgeous Spellbinders Exclusive Indie collection. There are so many different products in this collection, there's something for everyone! I was especially drawn to the new layered dies, they are fabulous!

Today I'm sharing three simple cards with you. Here they are:


I'm obsessed with patterned paper, on my scrapbook pages I can't handle white space either. On cards I like it more but if I can, I will always go with patterned paper. So I picked a collection I haven't had a chance to work with yet (Pink Paislee - Auburn Lane) and chose a few papers I thought would work together.

I really wanted to try the layered dies first so I went with the Shapeabilities Layered Butterfly Etched Dies. I die cut 3 of them from different patterned papers because originally I wanted to put 3 on one card but they are quite big so I decided against that idea. I cut a few different strips of patterned paper and adhered them onto an A2 size top folding card base. Next I glued down two butterflies. When I put together those layers, I only glued them together in the middle so I could fold up their wings and create a more dimensional look.


I then die cut my sentiment using the Hugs Expressions Stamp and Die Set. Once from patterned paper and 3 more times from white card stock. I stacked them up and glued them together to create a 3d sentiment, then I adhered it on the card front. To finish off the card I added a few enamel dots.


Up next is a similar card. Here I just arranged the papers differently and only added one butterfly.


On my final card I arranged my papers vertically and I used a lighter, less busy paper on the right side. I then used the same Hugs die as before, again stacked up 4 layers of die cuts but this time I also die cut the outline of the sentiment to give it a bit of a different look.


I added the rest of the sentiment using stamps from the same set. Again, as finishing touch I added a few enamel dots.


That's it! These cards come together pretty quickly, so they are perfect for those times when you are in a rush but would still like to gift something handmade!

I hope I could inspire you in one way or another!
Thank you so much for stopping by today and I hope you'll come back for more in the next days!

I wish you a fabulous day!

X

Spellbinders supplies:
  • SDS-154 Hugs Expressions Stamp and Die Set - Exclusive
  • S5-360 Shapeabilities Layered Butterfly Etched Dies - Exclusive
Other supplies:
  • patterned paper - Pink Paislee Auburn Lane
  • enamel dots
  • white heavy weight card stock for card base
  • diecutting machine
  • trimmer
  • liquid adhesive, double sided adhesive