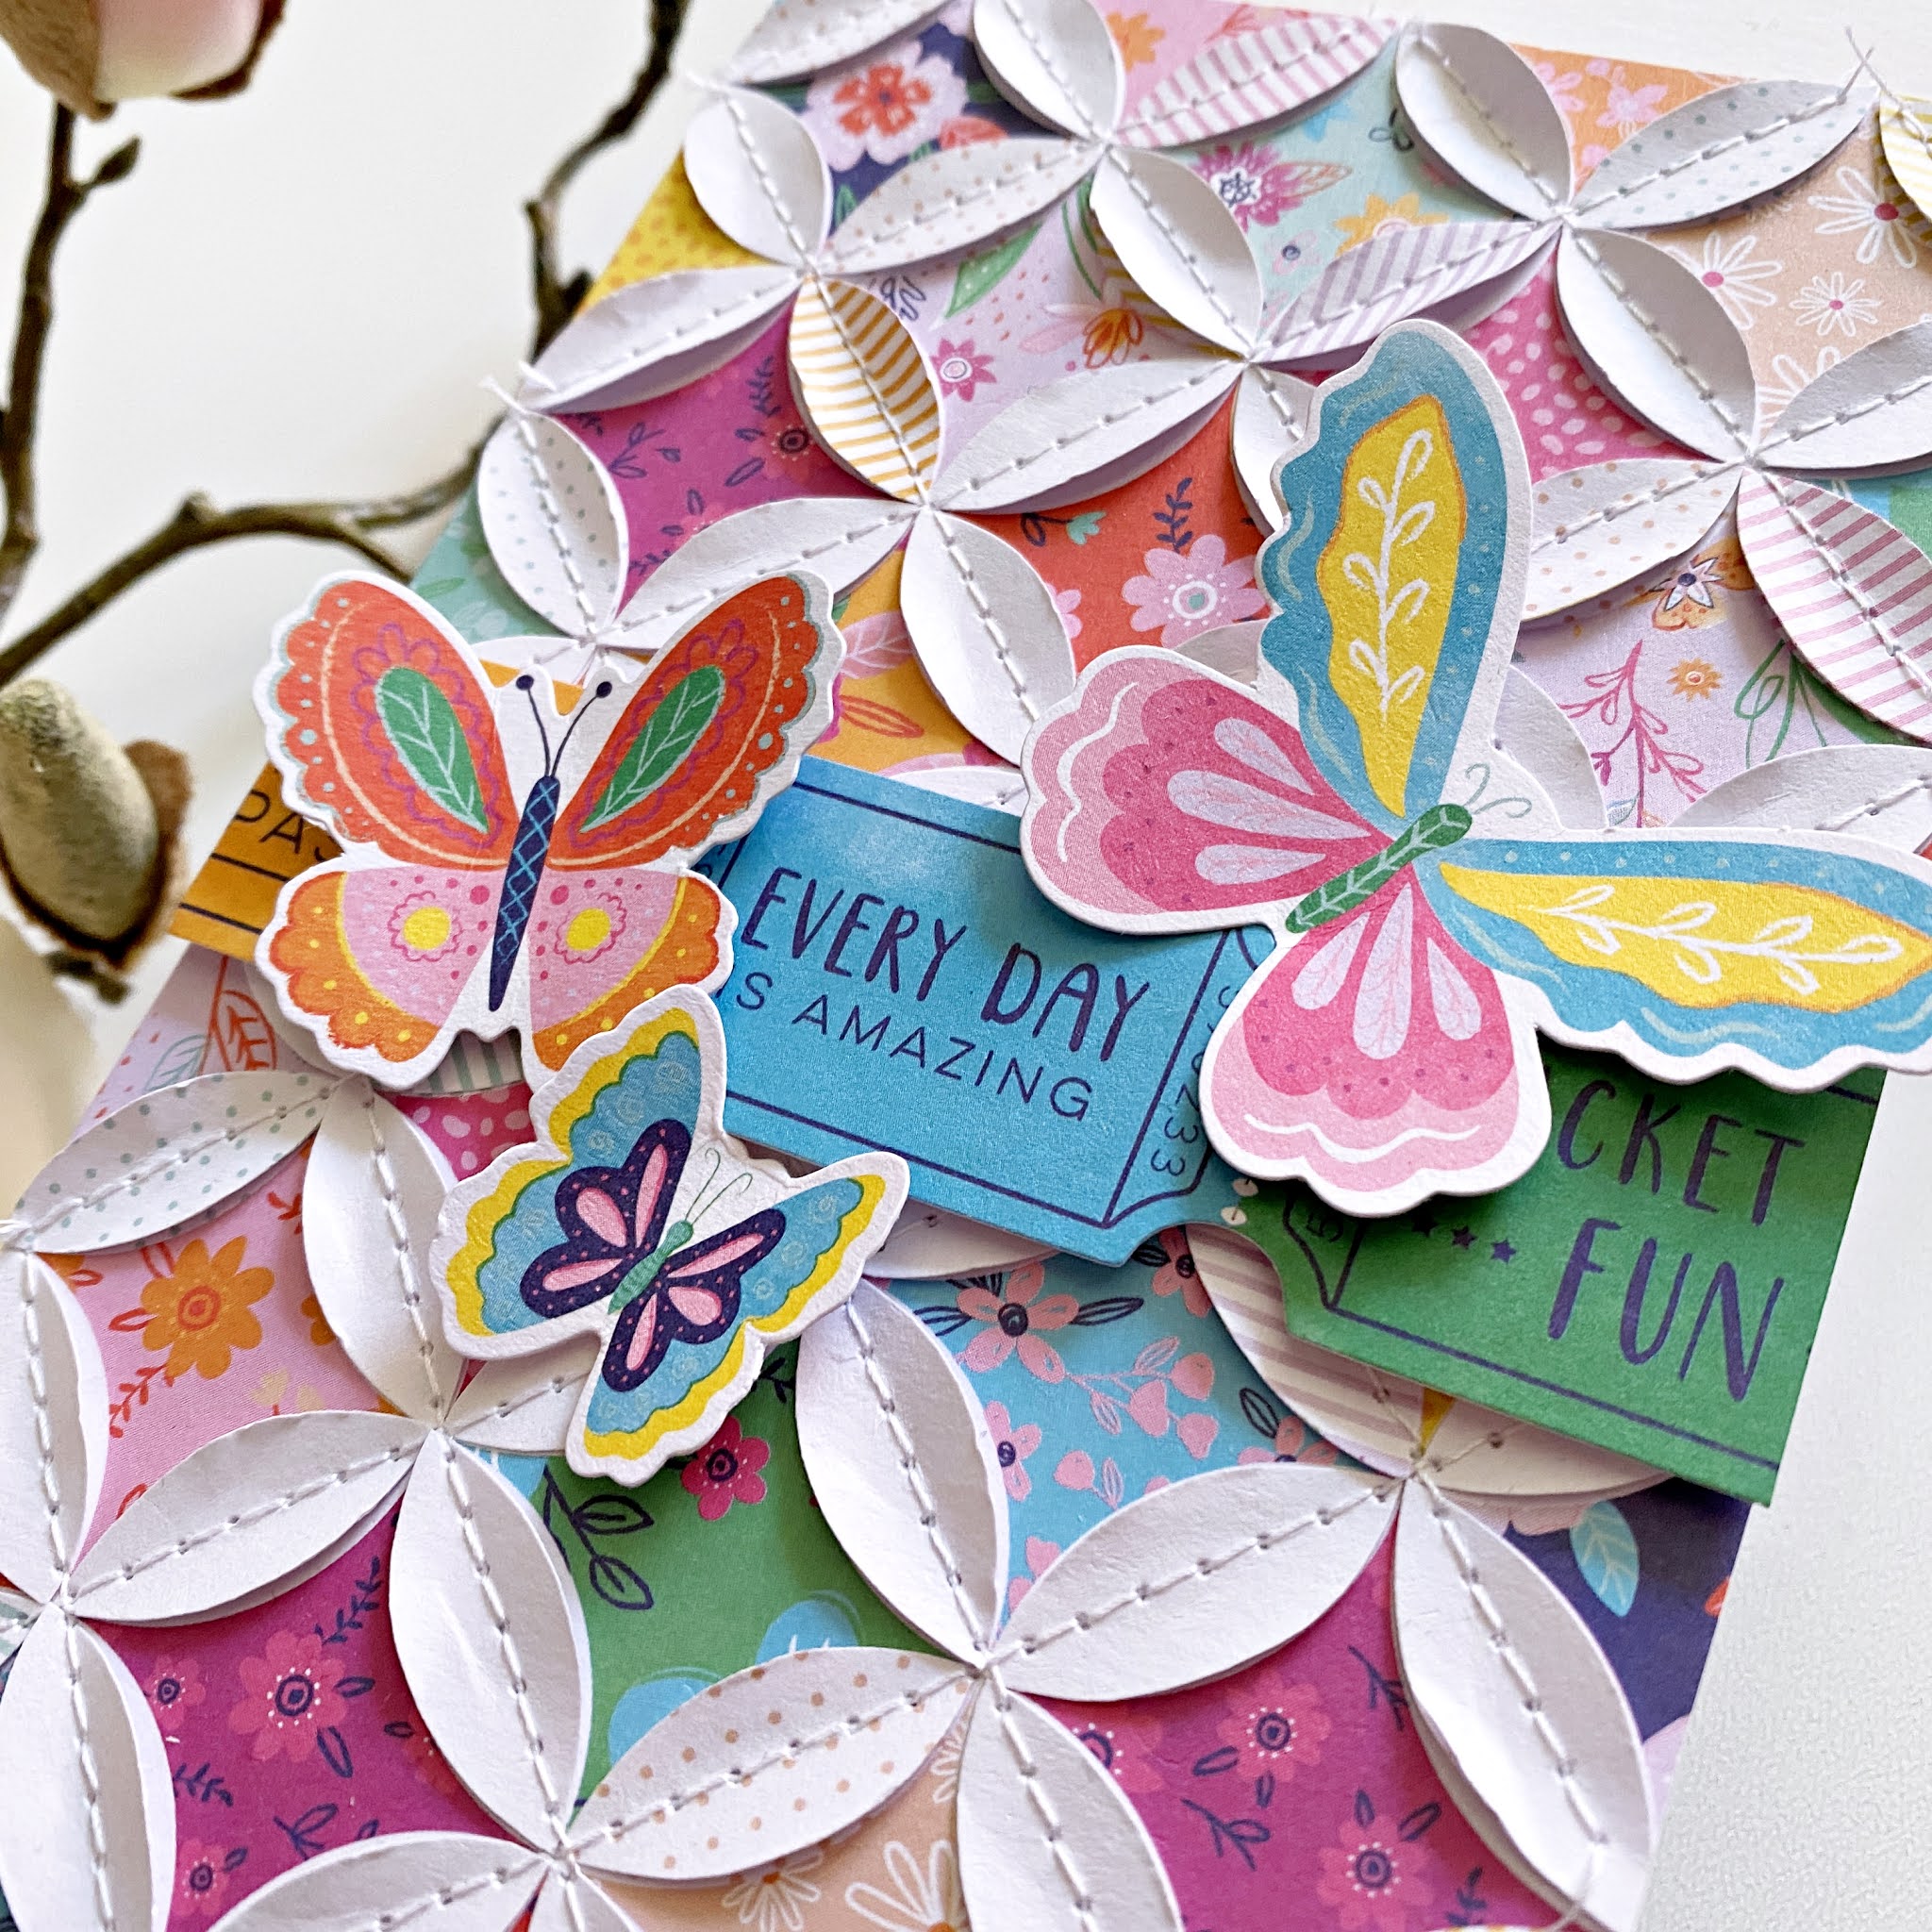
I'm stopping by to share my newest layout with you that I've created for the Paige Evans Design Team. Most important news, Wonders is in the house yay!!! I'm so excited! I couldn't wait to create with this gorgeous new collection!
I don't know about you, but I like to sit with a new collection for a few days. Like literally, I put it next to me on the couch and go through it many times over the course of a few days. I like to soak it all in and see what speaks to me. While I wait, I usually take the papers that are good for fussy cutting, start Netflix and just start cutting away! One of those papers was the butterfly paper. I was planning to use something else first, but then these beauties were calling my name!
Once you fussy cut all butterflies (I've used them all on this page), the layout comes together super quick. I arranged them into a spiral around my photo (which I die cut using a basic stitched circle die then added a cardstock circle behind it and some foam tape for dimension). Some of them have two layers, because I had more than I needed but I didn't want to save them for another project.
I then glued them all in place - adding just a little bit of liquid glue in the middle. Next, I stitched them down, then I bent up their wings.
I went through all the embellishments and picked out a few that went with my photo and also the colors of the butterflies. I added foam tape to all, then adhered them to the background. For my title I chose one of the chipboards. I looove chipboards!
Last but not least, I added my journaling and some white paint splatters. If you look closely, you'll see that the paint wasn't even dry when I took these photos hahaha!
You can watch the process video on my YouTube channel if you're interested:
That's it! I hope I could inspire you in some small way!
Thanks so much for stopping by! Have a beautiful day!
I'm stopping by today to share my latest projects I've created for the Paige Evans Design Team. This time I have cards for you with the Go the Scenic Route collection.
This year it's been even more important than before to tell our friends and family that they are loved, life is beautiful, and everything is going to be alright. What simpler way is there, than to create some handmade cards and mail it to them?
I decided to make some slimline cards that are all the rage now. Now, generally my slimline cards are about 3.5x8.5" but these three cards ended up being slightly wider, 4", because of the quilt patterned papers. I wanted to leave the circles complete, and luckily I got a full pattern with the 4" width. Does that make sense?!
For my first card, I chose a quilt patterned paper from the 6x8" paper pad. I cut it down to 4" wide, I'm not sure about the length, I just made sure that I have full circles - probably it's about 6.5"? There's two of this paper in the pad, and I fussy cut out the white shapes from the second paper. I then adhered these down, on top of the other paper, using only a tiny amount of glue in the middle of each shape, because I wanted to stitch them down and bend them up later. This creates such a wonderful texture and dimension!
I glued the patterned paper piece onto a white card stock, and then adhered these both to my card base. To finish off the card, I added a sentiment, for which I used some tickets from the ephemera pack, and I also placed some butterflies around it.
For my second card, I fussy cut a bunch of simple leaf shapes from a variety of patterned papers. I went with a blue-red-pink-orange color combo. To do this, I just drew a simple leaf shape onto a piece of heavy weight card stock and fussy cut it out. This served as a template for all the other leaves. Easy and quick, and one doesn't need any fancy tools!
I cut two layers for each leaf - sometimes when I do this design, I go with more layers, but 2 is perfectly enough. So I glued the two layers together, but only in the middle, because I wanted to stitch these down and bend up the sides as well.
Once I was done with all the stitching, I adhered the leaves to my card base. I added some gold splatter for interest. I trimmed down a die cut from the ephemera pack for sentiment and using foam tape, I added this to my card too.
The third card is very similar to the first one, the paper has the same pattern, only a different scale. But I did the same thing with it: that is, added a second layer of shapes, stitched them down in the middle, and bent up the sides.
I added three strands of twine above the patterned panel, as well as a bow. For my sentiment I used the lovely colorful alphas from this collection!
That wraps up today's post, I hope I could inspire you in some way!
I also have a process video, that you can watch here:
Thank you so much for stopping by! Have a wonderful day!
I'm stopping by today to share my newest layout I've created for the Paige Evans Design Team. I've worked with the awesome Go the Scenic Route collection!
There were two things I wanted to use on this layout, the patterned paper with all the super cool travel related icons and the foam alpha stickers. My idea was to have a longer title so I could use lots and lots of colorful alphas, but it didn't quite turn out the way I imagined it.
I started out by fussy cutting lots of icons - obviously you could do this with a PixScan mat, but I have no idea where mine is, so I thought instead of spending time on finding it, I'd just watch a movie and fussy cut them :). This was actually the most time-consuming part of the whole layout; the rest is super quick and simple. Well, except the adhering of these pieces, of course, that takes some time too.
What I wanted to do originally, is having the icons just like they are now, with a white circle in the middle, in which I was going to add my title. But I couldn't figure out a good place for my photos, so I scratched that. Also, my title didn't fit inside the circle. Oh dear. On to the next idea! This time I put my photos inside the circle, and I lined up my title with the circle - but the last word just wouldn't fit. Sheesh. I'm really stubborn though and I was not going to give up on that title! So eventually, instead of using the alphas for the last word, I just typed it up and added it between the first and last words of the title - I was thinking, this way one can actually tell where the title starts? I don't know, maybe it all makes no sense at all :D Before I glued down the typed-up word though, I stitched down the alphas using my sewing machine.
Then I arranged all my fussy cut icons and adhered them down with foam tape for dimension, texture, and interest. I splattered some white acrylic paint on the background. I then added my photos, which has some tissue paper layered behind them, as always. Since my page is already super busy, I didn't add many embellishments, just a few die cuts for a bit of color, a puffy sticker, and a paper clip. Once everything was in place, I wrote my journaling - which is super short, but I didn't need to say more.
That's it! Very simple, but I love the colorful result.
I have a process video for this layout as well if you're interested!
Thank you so much for stopping by today! I hope I could inspire you in one way or another. Have a wonderful day and see you next time!
I'm so excited and honored to be guesting on the Altenew card blog today!
Since it's September, I thought I'd create a few Fall/Thanksgiving themed cards for today's post!
My first duo features watercoloring which I hardly ever do, but the Weekend Doodles stamp and coordinating die set is one of my absolute favorite Altenew sets of late.
I stamped the images on watercolor paper and heat embossed them with gold embossing powder. I then colored them in loosely. For my first card I added some kraft card stock to my A2 size, top folding card base. I embossed my sentiment in white, then splattered white ink all over. I glued two flower die cuts in opposite corners, added some twine and done! Super easy!
I stamped some kraft card stock with the Rustic Linen background stamp and embossed it with white embossing powder. I trimmed it down and attached it to the white card base. I stamped the sentiment in brown. Next, I die cut a T from white card stock, using the Mega Alphabet T die. I kind of wrapped the flower around the T, glued them together, added some foam adhesive to the back and attached it to my card. Some twine finishes off this card too.
I started by stamping some flowers on white card stock. I had to create masks so they could be stamped behind each other. I then decided to stamp and die cut single flowers too so I could add some dimension to my card. But first, I dry embossed the stamped panel for additional interest. I glued down the die cut leaves, then started adding the flowers with foam adhesive. I also tuck some gold thread behind one of them. Once done, I splattered gold ink all over the card front. I added a gold embossed sentiment and some twine to finish it off.
I'm not a technique oriented card maker but I do love the following technique, I think someone told me it was called Eclipse? Anyway, I stamped my design on white card stock, then die cut FALL out of the panel, using the Caps Bold Alphabet die set. I also die cute FALL from orange card stock 5 times. I glued the layers together with the stamped image on top. In the meantime, I ran the background panel through my die cutting machine with the Cross Stitch Canvas die on top. This is one of my favorite Altenew dies, it instantly gives so much texture and interest to a card, it's absolutely stunning over stamped images! I adhered this panel to my card base, then glued down the letters too. I added gold splatters. Then using a sentiment from the Bountiful Branch stamp set (I actually cut apart Season's Greetings for this one) I gold heat embossed Greetings on a vellum strip, which I wrapped around my card. To finish off this card, I added twine an orange button at the top.
And so we've arrived to my last duo for today! For the card on the left, I stamped a background with the A Walk in the Woods stamp set - I stamped it twice, in 2 different inks, turning the stamp 180 degrees between the two layers. I then die cut a circle out of the middle with the circle die from the Welcome Home die set. The fall-out piece I used on my second card. I gold heat embossed a sentiment (from the Bold Bunch stamp set) on white card stock, I adhered it to my card base, then glued the stamped piece on top.
I used the Frilly Frame die to die cut a frame for the white circle. I stamped lots of sweet little flowers with the Painted Flowers stamp set and fussy cut all of them (I didn't realize there's a coordinating die set so I don't have it - this would come in handy if you have so many flowers!). I layered them over the die cut frame at the bottom and glued them down using liquid glue as well as foam tape, to add dimension. As a finishing touch I added gold ink splatter, some shabby ribbon and a button.
For my last card, I die cut a panel from kraft card stock using the Cozy Flannel cover die and glued it on my white card base. I die cut another frame with the Frilly Frame die and attached it to the fall-out piece I had left from my previous card. I stamped the sentiment in black ink (from the Sunflower Daisy stamp set). I added foam tape to the back and adhered it down on the card base. As before, I layered some flowers around the frame, added gold splatters and some twine.
That's it! It was so fun mixing and matching new and old products on these cards! I hope I could inspire you to dig into your stash and start creating!
Thank you so much for stopping by today! And thank you Altenew for having me!
I'm back today with a new layout for the Paige Evans Design Team! I've used Paige's latest collection, Horizon on this one. I wanted to use some paper that I haven't seen used all that much before (so obviously rainbow paper OUT haha!) and when I went through the collection, Paper 17 caught my eyes, with all those super cute suitcases! We travel often, not as much as before Maxim was born, but still quite often. So finding a picture wouldn't have been hard. BUT. The picture that I instantly thought of was one of Maxim in his car seat on top of some suitcases on the airport trolley...It was his first flight, alone with me... In retrospect this is a super funny story. That day I obviously did NOT think so. Bear with me here...
I fussy cut out all suitcases (I didn't actually need all of them for this layout) and because I like my projects to be sturdy, I also glued all suitcases onto heavy weight card stock and then cut them out again. Mind you, not the handles. Those are so small, I would never be able to do that LOL! I played with the arrangement - I originally only wanted 2 rows but the layout felt so empty, so I went with 3. I added foam adhesive behind each suitcase as well as my photo and adhered them to the background. I wrote my super long journaling on a tag, and because both sides are full, I have to be able to turn this around. However I wanted the tag to stay in place, so after threading some twine through the handles and holes (if that makes sense?!), I glued down the twine behind the tag, plus I added a paper clip in the front so it stays put!
OK, back to the story! Earlier that day my mom called me and listed all the things I shouldn't forget. I mean back then I seriously wrote lists of things I needed to pack, organised by rooms (as in what I need from each room). And she kept saying, "Just don't lock yourself out, always have the keys in your hands". I'll tell you what, I have never ever ever locked myself out in 31 years so honestly I was perfectly relaxed. Then the taxi came. Me, holding Maxim on one arm, started to put the suitcases outside, keeping the door open with one of my legs. One of them fell...What's my automatic reaction?! Trying to stop it from falling, so I stepped outside. OMG. Door shut closed behind me. Full on panic. I had my phone in my pocket so I called Martin, cos he is generally super calm. What do I do, what do I do?! The taxi is here, half my stuff is inside (like flight tickets, passports, wallet and all those unnecessary things haha! This was before I owned a smart phone, too.). The balcony door was open! Lucky for me we used to live on the first floor (or second if you are in the US). Martin told me to go around in our street and check if anyone has a ladder. There was a company across the street that had a ladder but it didn't go half way up the balcony...Eventually someone found a ladder that reached the bottom of our balcony, so I gave my baby to this person, climbed up and then somehow managed to pull myself up. I still remember what I was wearing. Crazy! Also, thank god I was young and thin and relatively fit back then, I could never do this now! By the time we checked in at the airport I was calm but I didn't tell any of this to my parents before landing in Vienna. All this trouble for a one hour flight seriously :D. AAAAAND what does my mom say?! I TOLD YOU SO! O.Em.Gee.
Back to the layout! I pulled out some stickers, puffy stickers, charms, die cuts and embellished my page. Last but not least I added my title and some white paint splatters. Done!
I hope I could inspire you to go get crafty and maybe put a smile on your face with my story. It's one I wouldn't ever forget even if I didn't have this page, but I felt like it needed to be documented.
I'm stopping by today to share a new layout I've created for the Paige Evans Design Team!
A couple of months ago I fussy cut all papers from the Whimsical collection that could be fussy cut, and Paper 13 with all these cute frames was one of them. I generally don't like linear layouts but I do make a couple of grid layouts every year anyway.
I wanted to create a boy(ish) page for today's post, so I didn't use the pink frames, only the greens, yellows, blues and purples.
I glued down all my chosen squares at a different angle, so they don't look so uniform. I printed 4 tiny photos of my kiddo clowning around in Disneyland. To some of them I added another frame, I found one in the chipboard pack, one in the sticker pack, and the third one I fussy cut from one of the patterned paper frames I had left. I also fussy cut the frame for the square I used for my title and popped it up for some dimension.
Then I went through all the embellishments in the Whimsical collection and picked out the ones that I thought could work. I made it my mission not to use flowers on this layout haha! It's difficult when there are so many gorgeous flowers in the collection! Obviously some of the squares do have floral images but that's OK. I just didn't want to add any other floral embellishments.
I tried to find something to decorate most frames with, let it be chipboard stickers, card stock stickers, enamel shapes or puffy stickers. I love the mix of textures all these embellishments add to my page.
I cut a piece of white card stock for my journaling and glued it on top of one of the squares. I stamped my date and added some rose gold ink splatters and done!
That's it for today! Hope you like this layout even though it's not pink, nor does it have lots of flowers hehe!
You might remember my last post for Paige's DT called 1 paper 2 ways! Today I'm sharing the second part with a new layout idea using Paper 23 of the gorgeous Whimsical collection.
I fussy cut out all the scallops from this paper. They are not all the same size but I didn't really mind. I don't like uniformity much anyway.
I then started layering the scallops, going from the bottom towards the top. Once done, I glued a piece of purple ribbon with a bow on top, then added my photo. I have some tissue paper and a die cut frame behind my photo.
For my title I chose a die cut word from the ephemera pack. I used pop dots to add it on top of my picture. I decorated the opposite corner with some die cut flowers.
I went through the rub-on pack next, and I picked out a bunch of them to add to my background. I also created a few heart clusters for which I used rub-ons, chipboard- and card stock stickers. Last but not least I added my journaling and splattered some rose gold ink all over the page.
That's it guys! I hope I could inspire you in some small way today!
First of all, Merry Christmas guys! I hope you are having a wonderful holiday season with your loved ones!
I'm so excited and honored to be guesting on the Altenew scrapbook blog! Thank you Altenew for the awesome opportunity!
In case you're new here, here's a short bio about myself:
I am a Hungarian living in Germany with my Dutch boyfriend and our 10-year-old son. I've been crafting ever since I remember...I tried every craft under the sun, from glass/porcelain/silk painting, bead weaving, mosaic in all form, to cake/cookie decorating and lots more. I need to craft to keep sane! Scrapbooking has been my main focus since early 2015 and this year I've added card making to the mix as well. I love love love patterned papers and all colors of the rainbow, so you won't be seeing me use a lot of white and solids except maybe on cards!
For today's blog post I've made 2 layouts and a bunch of cards that are similar in design yet all a bit different. I've worked with the Reflection scrapbook kit which is my favorite from Altenew. So much so that I am on my second kit now!
I then created my background. This is one of my go to designs - 2 partial wreaths/circles on opposite sides of the layout. I chose a black and white striped paper and added some white card stock at the top and one of the patterned papers from the Reflection kit at the bottom. I covered up the edges with flowers.
I placed my photo inside the bigger wreath and decorated this area with a few wooden buttons, stickers, tags and chipboard pieces. I also added my title and journaling here.
I was actually planning to add my journaling in the bottom wreath but then I found this chipboard about traveling which was the perfect fit for my page, so I glued that down there instead. I also stamped my date here. Done!
I wanted to go green with my second layout because I haven't made a green layout with this kit before. I started out by covering a heavy weight white card stock with the Dotted washi tape. I've never been a huge washi tape fan, as in, I haven't used them often on my pages, but ever since Altenew came out with these wide washi tapes, I'm hooked. They are so versatile! I believe this is my first time using one on a layout though.
I then cut green stripes from one of the patterned papers and covered the bottom of my page with them. I distressed the edges a bit to give them some dimension. I don't like flat layouts, I'm all about dimension and texture. I fussy cut out lots and lots of roses from two patterned papers and layered them on top of the green stripes. I used different adhesives to do this, liquid and foam, again, to create a more dimensional look.
I tucked my photo behind the roses. It seems I forgot to add the date even though I specifically asked my aunt when this photo of me and my cousin was taken ha! We were 4 and a half years old! One of my favorite childhood memories, harvests at my grandparents' vineyard. Since I've been living in Germany, I've only been able to go once...Anyway. Back to the layout! To finish off my page, I added my title and a few chipboard and wood veneer pieces as well as some wooden buttons.
As for my cards. I love love love the Mega Alphabet dies so I thought I'd make some cards with one of them. Namely, the B. I thought I'd make some birthday cards because for some reason I never find any when I need one! But of course, I don't have a single Happy Birthday sentiment from Altenew haha! So, I went through all my stamp sets to find sentiments that make sense with the letter B :). Here's what I've come up with:
All 6 cards are A2 size and top fold. On my first two I used the Watercolor Stripes and the Cross Stitch Canvas cover dies. The stripes I backed with a purple patterned paper and glued it on my card base. The other one I left white. I then covered some white card stock with the stunning Gilded Ombre and Glitter Flurries washi tapes. I fussy cut out lots of flowers and die cut two letter B's.
I added some foam tape to one of my B's and before gluing it down, I tucked some washi flowers under it. I white embossed a tiny sentiment which I then placed on my B, using foam adhesive. On my other card I used liquid adhesive to glue down my B and layered some flowers over it, at the bottom. I embossed my sentiment on patterned paper and added it on top of the flowers.
As you see, I pretty much did the same thing as before, just decorated my letters with different supplies.
On my last duo I used my favorite patterned paper from the Reflection kit to create the card fronts. I had plenty of fussy cut roses left from my layout so I used those here. And I used the Dotted washi tape to cover my letters.
For a little something something I added some gold metallic tangled thread behind the letters.
That's it guys! I hope I could inspire you in some small way! Should you have any questions, don't hesitate to ask, I'm always happy to help!
Altenew is kind enough to sponsor a giveaway here on my blog! You can win a $20 gift certificate if you leave a comment below! Comment away :). I will try to announce the winner on January 1, 2019 - but it could be a bit later because we will be travelling to Iceland that day.