Showing posts with label design team. Show all posts

Monday, November 27, 2017

Stop and smell the roses - DT layout for Fancy Pants

Hi there crafty friends,
Zsoka here with you today sharing a new layout!
It's November, the month of Thanksgiving in the States. We don't celebrate Thanksgiving here in Germany (or not that I know of anyway!) but that doesn't mean we are not thankful for many things :).
I have a lot to be thankful for this year, big and small things. I could probably mention a thousand things. But when it comes down to it, the only thing that really matters in the big scheme of things is the health of my family. And God knows we faced some terrible news this year...
For my layout however, I decided to document a lighter, easier moment I am grateful for. I am fascinated by my son's love of nature, animals and plants, all living creatures in this world! He knows so much about animals, I have no idea how he can remember all that information! Kids are amazing, aren't they?! His love of flowers he probably gets from me, because I always stop and adore them everywhere we go. He does the same. Smells each one! So I chose to create a layout dedicated to this - hence the title, Stop and smell the roses.
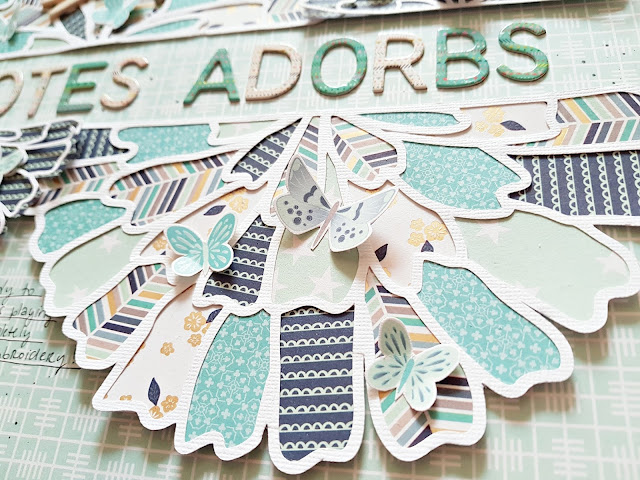
I worked with the beautiful Dream Big collection and chose a photo of Maxim admiring some pansies. I wasn't bothered by the photo not matching my title (ie roses)! I found this gorgeous cut file in the Silhouette Design Store and couldn't wait to use it!

I first cut the file from a light patterned paper, then created an offset which I cut from a different patterned paper to give it a bit of definition. I wanted to create a monochromatic kind of look to let my color photo shine. I more often than not use black and white photos but when they are of flowers, I obviously want to keep the color!


The flowers and leaves I cut from textured white card stock and backed them with different patterned papers. I did not glue down the outer edges so they are more airy and dimensional. I added some puffy stickers to the flower centers.


I also didn't adhere the whole text to background only the bottom of each word. Again, to add dimension and create interest. I didn't want to cover up any of the cut file, so I tucked my photo behind it at the top and only decorated around the photo using puffy stickers and die cuts!


To finish off my layout I added my journaling, date and black ink splatters. Which was a bit of a funny story, because I was watching some series and something happened that I don't remember anymore, but I stopped splattering for a second and a big blob of black paint fell on to the middle of my layout! The horror haha! I had to tear off "smell" and cut it again in a bigger font so I could cover up most of the paint! You can still see it a bit at the letter M, but it's not too bad. So probably not a good idea watching anything while having paint in your hands, not that I learnt my lesson, ha!

That's it for today!

What are you guys thankful for this year?!

Thanks for stopping by today! Till next time X 


Saturday, October 21, 2017

Halloween mini album - DT project for Paige Evans + Silhouette

Hey there scrappy friends,
 
I'm back today with a Halloween themed mini album for the Paige Evans + Silhouette DT.
 
Since we don't do Halloween, but we do buy pumpkins to carve, I thought I could document our first pumpkin patch experience in this mini! I didn't even know there were pumpkin patches here in Germany! We just happened upon one on Facebook no less, so we thought we'd check it out. It was a beautiful sunny Sunday, what else to do anyway?
 
I wanted to create a pumpkin shaped mini, using pumpkins in all shapes and kinds. Paige has quite a few cut files to choose from, I've picked Pumpkin (ID #222477 -my favourite!), Cat O Lantern (ID #216708) and Pumpkin Trio (ID #222474) for my pages.
 
 
I used the awesome new Spellbound collection from Fancy Pants Designs for the whole album. I planned out the pages in the Studio program more or less, then cut them from various patterned papers. For my cover I used the above mentioned Pumpkin cut file (ID #222477), for the title I cropped the Hocus Pocus cut file (ID #220851). I wanted to hang that funny little corpse on the front too - this is the Skeleton cut file (ID #219447).   
 
 
I created a pocket on the first page, where I hid the journaling and a couple of tags. For the next page I used one of the pumpkins in the Pumpkin Trio cut file (ID #222474). I added a photo and a couple of ephemera pieces.
 

Here I combined the pumpkin with another cut file: the Bat Background (ID #221100) and backed it with different patterned papers. I glued together two of the Halloween banner pieces from the Spellbound collection so I have an image on both sides, then punched a hole in it and added it as a decorative element to my mini.
 
 
The next page is using the Cat O Lantern cut file (ID #216708), I just used the outline of it, without the cat.

 
On the back however, I left the cat in there and didn't add a photo so one can see the design. I added some hand stitching to define the cat better. There is an acetate sheet with a cobweb design in the Spellbound collection - I created a shaker element from this. I filled it with a mix of sequins and patterned paper confetti.
 
 
The next one is again just a filler page without photo. I adhered the Spider web cut file (ID #216765) to this page plus a couple of pieces from the ephemera pack.

 
On the back side I added a photo and a couple of tags, labels and die cuts. For the next page I used another pumpkin from the Pumpkin Trio cut file, and I combined this with the Candy Corn Background cut file (ID #222459) - If you don't know how to do this, I have a video on my YouTube channel (Floral Heart) where I do the exact same technique. I backed the candy corns with different patterned papers - I did not want to add yellow to this album, so these are non traditional candy corns now hehe! The owl is from the ephemera pack.
 
 
On the other side there's another photo and all three pumpkins from the Pumpkin Trio cut file. Next up another filler page, here I cut the Trick or Treat Yoself cut file (ID #222489) from black card stock and backed it with patterned papers. You can't really tell in the picture but it's teeny tiny and so cute, it fits in my hand! I'm so glad my Cameo could cut it this nice even in such a small size. It isn't always the case!
 

Picture again on the back, together with some tags, labels and die cuts. On my last page I used the negative pieces I had left over from the Bat Background cut file I used on a previous page, plus a couple of die cut bats and stars from the ephemera pack.
 
I took apart the mini to show you all the pages, maybe the details are easier to see this way:


That's it! I hope I could inspire you to create a simple mini album like this!
 
Till next time,
 
X
 

Tuesday, September 26, 2017

Love You - DT layout for Just Nick

Hi there scrappy friends,

I'm back today with a new layout I created for Just Nick.

I chose the Graphic Background cut file for this. I have used this cut file before, but not in a long time, so I thought why not use it again?


I went with white card stock again, like most of the time... I picked the wonderful Cocoa Vanilla Wild at Heart collection for this layout. I love this navy floral paper and I thought the white cut file looks great on it. I stitched down each part of the cut file with navy thread to add some interest.


I placed my photo a bit off center, to the right, and layered a few pieces of die cuts, chipboard frame and tissue paper behind it. 


Then I started embellishing. I wanted to keep all embellishments around the photo so that most of the background is still visible.  I added lots of die cut flowers; some of them I glued down with liquid glue, others I popped up with foam adhesive to create dimension. I really love dimension on my layouts! I also used flair buttons, stickers, chipboard pieces and some resin flowers from one of the earlier Cocoa Vanilla collections. I think those are my favorites, so cute right?


I know the title is not very original, but I love the way these big chipboard letters look and well this title does fit my photo so why not? With the amount of layouts I make it's hard to come up with creative titles, especially ones that are short (because I prefer them short). So I end up with a lot of Sweet, Cute, Love, Awesome etc titles I'm afraid, especially if the photo just captures a candid moment, not any special event.


Other than the stitching, which took a bit of time, this layout came together very quickly, which is unusual for me! I really like how it turned out, I hope you do too!

Thanks for stopping by today! Until next time,

X


Saturday, September 2, 2017

Paige Evans + Silhouette Design Team - wooohooo

Hey guys,

One can tell I have no Instagram account, I have too much time on my hands! Well, the whole story managed to ruin a perfectly happy day yesterday and left me without any mojo - so blogpost it is :D.

If you follow me on Instagram (or Paige), you probably saw that she is now designing cut files which you can get your hands on in the Silhouette Design Store. 

I'm so honored and excited to have been invited to her Design Team! You know that I'm obsessed with cut files, I love Paige's collections, so I feel like this is a great fit for me!


We all created a layout for yesterday, here's mine. I used the Half Flower cut file and Paige's wonderful new collection, Turn the Page.


I cut out the file from white textured card stock, 2 bigger and 2 smaller ones. I then started backing the bigger ones with patterned paper. I was actually planning to have a colorful layout but while I was backing the files I changed my mind. It happens a lot!

Once I was done, I also backed the smaller ones, but these only with one paper. Then I arranged my flowers the way I wanted them and adhered them to the background. I used some foam adhesive to attach the smaller ones to add a bit of dimension and interest.

I fussy cut a few butterflies in different sizes as well as flowers and combined these with a few other embellies: die cuts, puffy stickers and wood veneer and glued these on my half flowers.


I tucked my photo behind one of the flowers and added my title for which I used the chipboard alphas. 


I wrote my journaling, added the date, and I was pretty much done. Oh, and black splatters of course! 

Hope you like my layout! I'll be back with a new one next week! 

Thanks for stopping by,
X

Zsoka